ACTION
REPORT
The action dates in an applicant file, if used
according to SkilMatch standards, reflect the last action and date taken and/or
the next action and date to be taken with the applicant. Even though labeled “Last Action”, you may
choose to use this area as an additional “Next Action” area if tracking last
actions is not important to you.
Suggested
Use:
Once you begin keying action dates in applicant
files, the Applicant Action Date report(s) can remind you of actions you wish
to take with applicants, like doing a quality check, or a salary review, or a
reminder about a license expiration.
Information
Report Provides:
This report prints a list of applicants based on the
dates appearing in the last action dates and next action dates from the
applicant file.
You may select the company, branch office (or
related branch), interviewer or counselor, date range of the last action date
or next action date, the action type, the last comment of a certain comment
type, and the number of copies to print.
You will receive a report sorted by Company Number,
Branch Office, interviewer or counselor, Action Date (oldest date first),
Action type and Applicant Name. The
report will display applicant name and social security number, the applicant’s
telephone number, cell number, pager number, the applicant’s division,
category, status, available date and NA? line, and the action date and the
action code (if you sorted by action code).
The report stops at the end of each interviewer/counselor and prints a
total of the number of applicant actions listed for the
interviewer/counselor. It also stops at
the end of a branch office and prints a total of the number of applicant
actions for the branch.
From the “Search Master” menu, select [Employee Reports
menu].
From the “Search Employee Reports” menu, select [Action report].
The screen will display:
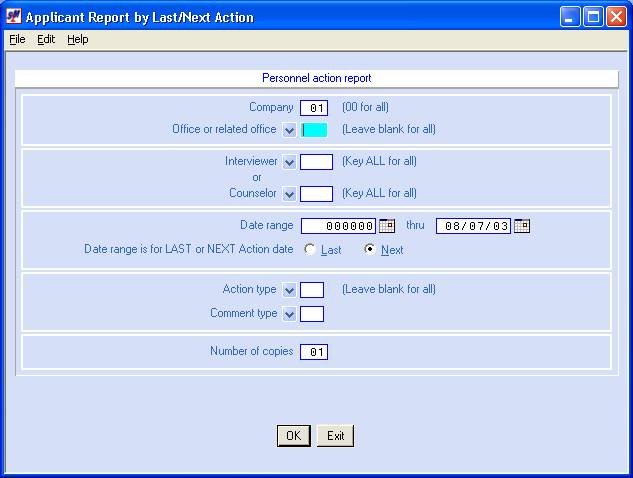
Company:
Note: this
is a required entry.
Defaults to 01.
If you are authorized to select a different company, key the desired
company number, or key 00 to select all companies.
Press the <TAB>
key for additional keying.
Office Or Related Office:
To include ALL branch offices, leave this area
blank,
OR
Key the branch office or related branch office of
the applicants you wish to print.
OR
Select a branch office by clicking the ![]() button (prompt and select button) to the
right.
button (prompt and select button) to the
right.
The screen will display:
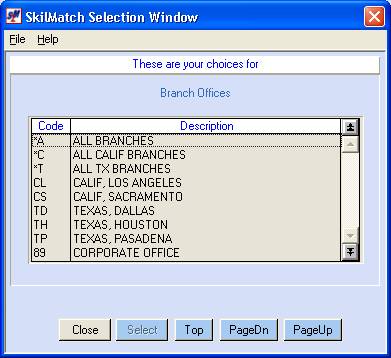
If you do not see the branch you want, and the [PageDn]
button is not grayed out, then click [PageDn] to view more. When you get to the end, [Top] will start the selections over again. If you page down past a screen of
selections, and wish to go back a screen, then click [PageUp]. To not select a branch, click [Close].
When you see the one you want to use, either <DOUBLE-CLICK> on the
description, or highlight and click [Select].
Note: a related branch office is a group of branch
offices for which you have defined a code.
This allows you to run one report for a group of offices. Refer to Menu CODES, Item Branch Offices.
Press the <TAB>
key for additional keying.
Interviewer:
Note: you must select either an interviewer or a
counselor.
To select ALL interviewers, key ALL,
OR
Key the interviewer of the applicants you wish to
include,
OR
Select an interviewer by clicking the ![]() button (prompt and select button) to the
right.
button (prompt and select button) to the
right.
The
screen will display:
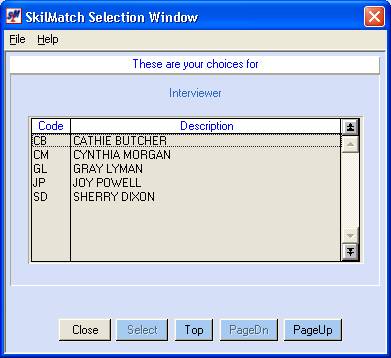
If you do not see the interviewer you want, and the
[PageDn]
button is not grayed out, then click [PageDn] to view more. When you get to the end, [Top] will start the selections over again. If you page down past a screen of
selections, and wish to go back a screen, then click [PageUp]. To not select a interviewer, click [Close]. When you see the one you want to use, either <DOUBLE-CLICK>
on the description, or highlight and click [Select].
Press the <TAB>
key for additional keying.
Counselor:
Note: you must select either a interviewer or a
counselor.
To select ALL counselors, key ALL,
OR
Key the counselor of the applicants you wish to
include,
OR
Select a counselor by clicking the ![]() button (prompt and select button) to the
right.
button (prompt and select button) to the
right.
The
screen will display:
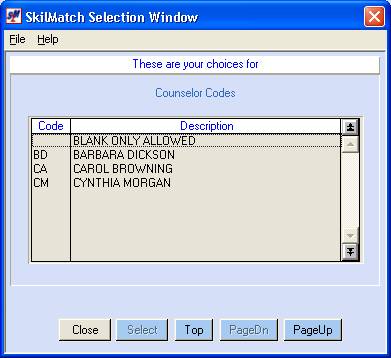
If you do not see the counselor you want, and the [PageDn]
button is not grayed out, then click [PageDn] to view more. When you get to the end, [Top] will start the selections over again. If you page down past a screen of
selections, and wish to go back a screen, then click [PageUp]. To not select a counselor, click [Close]. When you see the one you want to use, either <DOUBLE-CLICK>
on the description, or highlight and click [Select].
Press the <TAB>
key for additional keying.
Date Range:
The date may be keyed in MMDDYY format (without
punctuation) or may be selected by clicking the ![]() button (prompt and select button) to the
right of dates throughout SkilMatch2. The
button (prompt and select button) to the
right of dates throughout SkilMatch2. The ![]() button will display a calendar from which you
may click on a date to select, and then click [OK] to key the date.
button will display a calendar from which you
may click on a date to select, and then click [OK] to key the date.
Key the range of action dates you wish to include in
your report. Must be valid dates. You may not use 000000 or 999999.
If you wish to see
applicants with action dates for ONE specific day, key that date as both the
beginning and ending dates.
Press the <TAB>
key for additional keying.
Date range is for LAST or NEXT
Action date:
If you wish to select by the LAST action date, click
‘LAST’
If you wish to select by the NEXT action date, click
‘NEXT’.
A black dot will display next to your choice.
Press the <TAB>
key for additional keying.
Action type:
To print for ALL action
types, leave this area blank,
OR
Key the action type you wish to print,
OR
Select an Action type by clicking the ![]() button (prompt and select button) to the
right.
button (prompt and select button) to the
right.
The
screen will display:
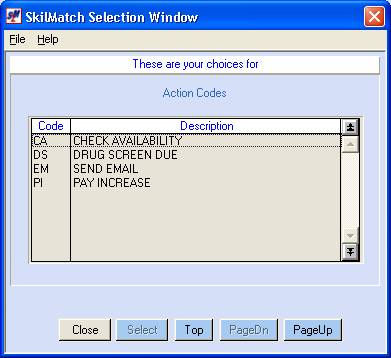
If you do not see the action type you want, and the
[PageDn]
button is not grayed out, then click [PageDn] to view more. When you get to the end, [Top] will start the selections over again. If you page down past a screen of
selections, and wish to go back a screen, then click [PageUp]. To not select an action type, click [Close]. When you see the one you want to use, either <DOUBLE-CLICK>
on the description, or highlight and click [Select].
Press the <TAB>
key for additional keying.
Comment type:
If you do NOT wish to
print any comments from the applicant file, leave this area blank.
If you want to print the
most recent comment of a specific type from each applicant file, key the
comment type.
OR
Select a comment type by clicking the ![]() button (prompt and select button) to the
right.
button (prompt and select button) to the
right.
The screen will display:
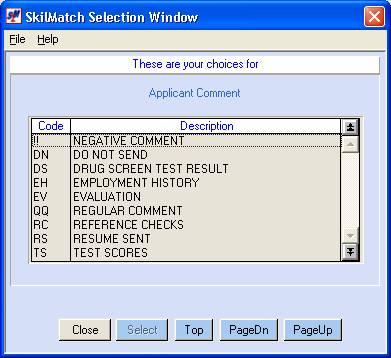
If you do not see the comment type you want, and
the [PageDn]
button is not grayed out, then click [PageDn] to view more. When you get to the end, [Top] will start the selections over again. If you page down past a screen of
selections, and wish to go back a screen, then click [PageUp]. To not select a comment type, click [Close]. When you see the one you want to use, either <DOUBLE-CLICK>
on the description, or highlight and click [Select].
Press the <TAB>
key for additional keying.
Number Of Copies:
Defaults to one copy, but you may select to print up
to 99 copies.
If you
wish to process this report, click [OK]. You
will be returned to the “Search Employee Reports” menu as soon as the report
has completed. This report will display
in your outqueue with AP708 in the “User data” column.
If you
do not wish to process this report but wish to return to the “Search Employee
Reports” menu, click [Exit].