PAYROLL
SYSTEM REQUIREMENTS
The ‘Payroll System Requirements File’ maintains your organization’s choices for a specific G/L company. Selections are made on whether certain optional programs are used, and how they are used. This file also maintains designated general ledger accounts and default tax codes used in numerous payroll and accounting procedures. The data entry programs for applicant/employees, customers and job orders are directly affected by the choices made in this system file.
To begin, select the [File Maintenance] menu in the Pay and Bill library.

Next, scroll down or right click and select [Payroll System Requirements].

The screen will display:
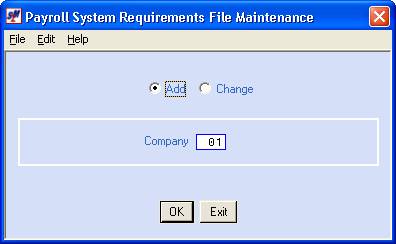
Add or Change:
Defaults to add. To change an existing file, click once on Change to select (a black dot will appear next to your selection).
Company:
Defaults to company 01. To work with the payroll system requirements file for a different
company, key the desired company number.
To continue, click [OK].
OR
To cancel and return to main menu, click [Exit].
The screen will display:

Password:
Note: the cursor is not positioned at this
area. You must move to this area to key
the password.
Key up to 8 characters. This password will be required to process Menu PBENTR, Item Begin Cycle, and to update employee direct deposit detail through Menu CHANGE, Item Employee or Menu SEARCH, Item Name Search.
A black dot should display beside ACTIVE. Although unlikely, if you wish to disable this payroll system requirements file, select delete by clicking on the option once (a black dot will appear next to your selection).
Key up to 30 characters of the company name as it is to appear on all printed material, including SUTA reports and W-2’s.
Address line
#1:
Key up to 30 characters of the company address as it is to appear on all printed material.
Address line
#2:
Key the city, state and zip code of the company as it is to appear on printed material.
Key the federal unemployment percentage.
The 5.3 means this is a 5-position
field, with 3 positions to the right of the decimal.
Example: the percentage .6% is keyed 600.
Note: If you are given a decimal, change the decimal to a percent and enter the percent. Example: .006 equals .6%, which would be entered as 600.
Screen images and
examples in document may not reflect current law; always verify rates and
figures with government officials and/or accounting professional.
Tax $ limit:
Key the federal unemployment tax dollar limit. Use two zeroes to hold decimal spaces.
This figure is a calculation of
the FUTA percent x the gross dollar limit.
This is an 8-position field, with
2 positions to the right of the decimal.
Example: .006 x $7000 = $42.00.
Screen images and
examples in document may not reflect current law; always verify rates and
figures with government officials and/or accounting professional.
Gross $ limit
(7.2):
Key the federal unemployment gross dollar limit. Use two zeroes to hold decimal spaces.
The 7.2 means this is a 7-position
field, with 2 positions to the right of the decimal.
Example: the gross limit of $7,000.00 is keyed 700000.
Screen images and
examples in document may not reflect current law; always verify rates and
figures with government officials and/or accounting professional.
If you want the employee address to print on the payroll checks, this option should be selected (a checkmark will appear next to the selection).
If you do NOT want the employee address to print on the payroll checks, leave the box blank.
There are 2 types of check format – over/under and side-by-side.
If you use Create-a-check (CAC) you must select over/under.
If you use pre-printed laser checks you must use over/under.
If you use Direct Deposit, you must use over/under.
If you use a dot-matrix printer then you may use
either format, although over/under is considered the ‘standard’.
Over/under
- the stub prints on top and the check
beneath. The stub on dot-matrix check
stock and pre-printed laser check stock can list up to 7 individual deductions,
including a brief description of each, plus one state tax, and up to 3 local
taxes. The CAC check stub can print up
to 18 entries, which can be any combination of deductions (with descriptions),
state taxes, and local taxes.
Side-by-side - where the stub is on the right side and the check
on the left. The stub on the
side-by-side is pre-printed with boxes and field names and can only print a
deduction total, and no description.
Click the box to select the over/under format. A check mark will display in the box.
If you want the non-standard side-by-side format, leave the box blank.
This code, a.k.a. Paycheck hold code or Timesheet hold code, is a mandatory entry on a timecard during the payroll process. It indicates how the paycheck is to be handled (like hold for pickup, or mail, or deliver to a customer, etc.), and may be used for automatic paycheck sorting during the print check option. The Hold code can be added to the timecard in one of three ways: by automatically pulling in from the employee’s record; or, by keying onto a timecard in a batch and letting it automatically duplicate onto other timecards; or, by using a combination of both methods.
Duplicate - if your employees get to choose how they want their check handled by marking the weekly timesheet, then you should select Duplicate. You will hand sort the timesheets into groups by handling code (i.e. mail, hold, deliver, etc). During timesheet entry the system will duplicate the hold code from the previously entered timesheet.
Use from employee file - if you require your employees to pre-select a check handling method, then this handling code can be entered as a default into the employee's record. During employee entry you will be required to enter a paycheck handling code. When a timecard is keyed during payroll the system will pick up this hold code from the employee's file and automatically insert it onto the timecard.
Both - if you wish to use a combination of “Duplicate” and “Use from Employee File”, then your selection will be both. You will not be required to key a hold code in the employee's file, but may do so. During timesheet entry if the employee has a default hold code, the system will pick up that code from the employee's master file. If the employee does not have a default hold code, the system will insert the last duplicated hold code.
(If you use the SkilMatch direct deposit programs you MUST select either “Use from Employee File” or “Both”)
Post WC Insurance to general ledger:
If you want the system to automatically post workers’ compensation insurance costs to the general ledger as a part of the payroll procedure, this option should be selected (a checkmark will appear next to the selection).
If you do NOT want the system to automatically post workers’ compensation insurance costs to the general ledger as a part of the payroll procedure, this option should NOT be selected (no checkmark should appear next to the selection).
Print job division description:
Very few organizations will use this option. Normally you will NOT check this box.
If, however, your organization operates any internal division under a “dba”, and you want different names to print on the invoices mailed to your customers, then you can choose to order invoice forms without a company name, and by selecting this option, let the system print the Division description on the invoice during payroll processing. This description is picked up from the Division codes that are created for use in applicant, customer, and job order entry. The division description is 20-characters and will print on line 1 of Box 1 of the Invoice Comments file.
Allow late fee in customer files:
To charge a late fee to any customer in this general ledger company, then this option must be selected (a checkmark will appear next to the selection). You can then change individual customer files that should NOT be charged a late fee.
If you do NOT want to charge late fees to ANY customers in this general ledger
company, leave the box blank. You will
not be allowed to say YES in any customer file if this option is not selected.
Note: if you change the response in this field from selected to
unselected or unselected to selected, the system can optionally process a
conversion of your existing customer files to accommodate the change in late
fee policy, so that you do not have to update each individual customer
file. Details are outlined later in
this document; refer to Change in Late Fee Policy.
If you already have late fees selected but wish to process the conversion program, please refer to Change in Late Fee Policy, Scenario 5 at the end of this document for instructions.
If an employee receives more than one paycheck for a week-ending date, the system can combine the grosses of each check into a single total, tax the total gross, then divide (reallocate) the taxes back among the individual checks.
To summarize & reallocate, this option should be selected (a checkmark will appear next to the selection).
If you do NOT wish to summarize & reallocate, this option should NOT be selected (no checkmark should appear next to the selection).
(Not selecting this option will likely cause your temporaries to have taxes under withheld for the year!)
To allow the pay and bill rate on a job order to be changed after payroll has been processed on the order, this option should be selected (a checkmark will appear next to the selection).
If you do NOT wish to allow the
pay and/or bill rate on a job order to be changed once payroll has been
processed on the order, this option should NOT be selected (no checkmark should
appear next to the selection). If
selected you will be required to enter a NEW job order should the pay and/or
bill rates on the job change.
Default cash in bank GL account:
Key the 8-digit general ledger account number from which your temporary payroll checks are written.
Default paid expense GL account:
FYI: Employee wages are charged (expensed) to a designated 8-digit G/L account number that is part of a Job Order Labor Distribution code. The 8-digit account number is made up of a 2-digit division/cost center, a 4-digit account number, and a 2-digit sub-account. Usually, while your organization may have numerous cost center numbers, the wage account in each cost center will be the same 4-digit account number. (Example: 01-4100-00, 02-4100-00, 03-4100-00, etc)
If you reimburse expenses to temporaries through payroll using the Expense area on the timecard, then the cost of the reimbursement will not be charged to the wage account. Instead, the system will charge these expenses to the account you set up here. Just like with the wage accounts, your general ledger should have one ‘Reimbursed expense to temps’ for each cost center. Each of these accounts (which are 8-digits in length) should have an identical 4-digit number to represent this expense. (Example: 01-5150-00, 02-5150-00, 03-5150-00)
You must key the 8-digit
account from any one of the cost centers – it does not matter which one is
entered here, because the system will only look at the middle 4-digits. When payroll is processed, the system will
use the same cost center as is used for the wage expense.
Use sub:
If you also want the system to use the 2-digit sub-account of the wage account, rather than the 2-digit sub-account keyed in the expense account, click once to select (a checkmark will appear).
Default billed
expense GL account:
SkilMatch handles expenses
billed to a customer separately from regular income. Income is posted to the general ledger based on job order’s Labor
Distribution record. Expenses that are
billed to a customer, however, will be posted using the account number keyed in
this area. Just as with expenses paid
to employees, a substitution of part of this account number occurs, so only the
4-digit account is used for the posting of expenses. When payroll is processed, the system will use the same cost
center as is used for the posting of income.
Your general ledger should have one ‘Billed expense to customer’ for each cost center. Each of these accounts (which are 8-digits in length) should have an identical 4-digit number to represent these billings. (Example: 01-4150-00, 02-4150-00, 03-4150-00)
Key the 8-digit income account from one of the cost centers. (2-digit division, 4-digit account number, 2-digit sub-account) During payroll the 2-digit division will be substituted with the 2-digit division from the job order’s income account.
Use sub:
If you also want the system to substitute the 2-digit sub-account with the 2-digit sub account from the job order’s income account, click once to select (a checkmark will appear).
Default advance cash GL
account:
Key the 8-digit general ledger account number from which your temporary payroll advance checks are written
Advance GL:
Key the 8-digit general ledger account number used to track outstanding payroll advances written to temporary employees.
Default Local
Tax(es):
If EVERY job order in this
company will be subject to one or more local taxes, key up to 3 local tax
codes. These codes will be added
automatically to every job order entered.
The only exception is when the employee assigned to the job has his own
local taxes.
Key a local tax code.
OR
Select a tax
code by clicking the ![]() button (prompt and select button) to the
right.
button (prompt and select button) to the
right.
The screen will display:
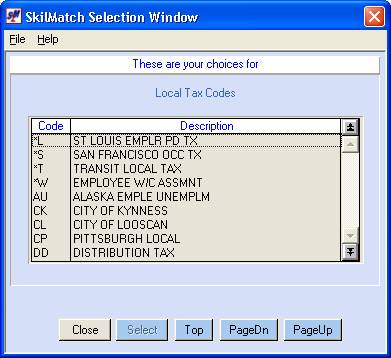
If you do not see the tax code you want, and the [PageDn] button is not grayed out, then click [PageDn] to view more. When you get to the end, [Top] will start the selections over again. If you page down past a screen of selections, and wish to go back a screen, then click [PageUp]. To not select a tax code, click [Close]. When you see the one you want to use, either <DOUBLE-CLICK> on the description, or highlight and click [Select].
Default SUTA
tax:
If you accrue SUTA (SUI) for
one state only, key the two-character state postal code in these areas. The
postal code from this area will be added automatically to every job order
entered. The only exception is when the
employee assigned to the job has his own SUTA tax code in the personnel file.
If this general ledger company reports to more than one state, then you should NOT use a company default. Instead, leave these fields blank and complete the appropriate tax requirements in the personnel file or on a per job basis.
Key a SUTA tax code.
OR
Click the ![]() button (prompt and select) to choose from the
list of valid SUTA Tax codes.
button (prompt and select) to choose from the
list of valid SUTA Tax codes.
Default SIT
tax:
If you withhold state income
tax for one state only, key the two-character state postal code in these areas.
The postal code from this area will be added automatically to every job order
entered. The only exception is when the
employee assigned to the job has his own SIT tax code in the personnel file.
If this general ledger company reports to more than one state, then you should NOT use a company default. Instead, leave these fields blank and complete the appropriate tax requirements in the personnel file or on a per job basis.
Key an SIT tax code.
OR
Click the ![]() button (prompt and select) to choose from the
list of valid SIT Tax codes.
button (prompt and select) to choose from the
list of valid SIT Tax codes.
Default state
SDI:
If EVERY job order in this
company will be subject to SDI (State Disability Income), key the two-character
state postal code in this area. This
code will be added automatically to every job order entered. The only exception is when the employee
assigned to the job has his own tax codes.
Key an SDI tax code.
OR
Click the ![]() button (prompt and select) to choose from the
list of valid SDI Tax codes.
button (prompt and select) to choose from the
list of valid SDI Tax codes.
Key the federal tax ID number for this general ledger company.
Note: this
data must be numeric only, no hyphens, blanks, or alpha characters.
Rate calculation burden (5.3):
To add an overhead "burden" to:
(1) the Rate Calculation Program
(2) the gross
margin calculation for regular bill rates
Key in the percent to be used.
The 5.3 means this is a 5-digit field, with 3 of the
digits to the right of the decimal place.
To establish a minimum pay rate for the Rate
Calculation Program, key in the minimum acceptable dollar amount.
The system will not allow you to calculate a bill rate (with the Rate Calculation Program) that is too low to meet your required gross margin and still meet the minimum pay rate established here.
The 5.2 means this is a 5-digit field, with 2 of the
digits to the right of the decimal place.
Note: you cannot select to have the system figure regular bill rates based on both a Markup and a Gross Margin calculation.
You may select one or the other.
Also, you cannot opt for the system to create Overtime or Doubletime
bill rates based on Gross margin. Once the REGULAR bill rate is calculated, the
OVERTIME and DOUBLETIME bill rates will follow the standard calculation of 1.5
or 2.0 times the REGULAR bill rate.
If you want the system to automatically create a REGULAR bill rate during job order entry based on a gross margin calculation of the REGULAR pay rate, key the gross margin percentage you wish to use. Do not key a decimal point, but use zeroes to hold spaces if keying a whole number.
(A gross margin calculation uses
the FUTA percentage, the job order state’s SUTA percentage, the job’s workers’
compensation rate, the employer’s portion of FICA and Medicare, and any
overhead percentage per-defined in the PR System requirements file.)
Example: if the REGULAR bill rate always needs to produce a 20% gross margin based on the REGULAR pay rate, key 2000. (The 5.2 means this is a 5-digit field, with 2 of the digits to the right of the decimal place.)
Minimum GM:
If you want the system to monitor for a minimum
acceptable gross margin percentage during job order entry, key the minimum
percentage in this area.
The 5.2 means this is a 5-digit field, with 2 of the
digits to the right of the decimal place.
Example: 18%
is keyed as 1800
If, during job
order entry, the regular pay/regular bill rate combination falls short of this
minimum, you will receive a warning message.
This warning may be overridden if desired. (A gross margin calculation uses
the FUTA percentage, the job order state’s SUTA percentage, the job’s workers’
compensation rate, the employer’s portion of FICA and Medicare, and any overhead percentage per-defined
in the PR System requirements file.)
Bill rate mark-up of pay rate:
Reg %: Ovt %:
Dbl%:
The 5.2 means this is a 5-digit field, with 2 of the
digits to the right of the decimal place.
Example: 50%
is keyed as 5000
If you want the system to automatically create a REGULAR, OVERTIME or DOUBLETIME bill rate during job order entry based on a markup of the pay rate, key the markup percentage you wish to use. Do not key a decimal point, but use zeroes to hold spaces if keying a whole number.
Examples:
Regular: If the pay rate is $7.00 and the regular bill rate will always be a 60% markup of the REGULAR pay rate, then key 6000 – the system will auto-rate a regular bill rate of $11.200.
Overtime: If the regular pay rate is $7.00 (making the OT pay rate $10.50) and the OVT bill rate will always be 40% of the pay rate, then key 4000 – the system will auto-rate an ovt bill rate of $14.70 ($10.50 x 40%).
Double time: If the regular pay rate is $7.00 (making the DBL pay rate $14.00), and the DBL bill rate is always 35% of the pay rate, then key 3500 – the system will auto-rate a DBL bill rate of $18.90 ($14 x 35%).
When you have completed all changes to this screen, click [OK] to bring up Screen 2 of payroll system requirements file,
OR
To cancel without saving changes and return to add and change menu to work with a different company number, click [Close].
OR
To cancel without saving changes and return to main menu, click [Exit].
If you clicked [OK],
all data on this screen will be validated before Screen 2 is displayed. The Screen 2 will display:

If you want the system to automatically assign job numbers during job order entry, this option should be selected (a checkmark will appear next to the selection).
If you do NOT want the system to assign job numbers, and wish to assign job order numbers manually, this option should NOT be selected (no checkmark should appear next to the selection).
Start after
this number for regular jobs:
If you selected to let the system automatically assign job numbers, leave zeroes in this area. The system will assign the next available number to REGULAR job orders beginning with 1.
Bonus and
Cancelled jobs:
If you selected to let the system automatically assign job numbers, leave zeroes in this area. The system will assign the next available number to BONUS/CANCEL job orders beginning with 1.
Invoice Form: Long Short
Note: if you
use Create-A-Check (CAC) for invoicing, you must select Long.
The short invoice form prints a
maximum of 6 employees per invoice. (The number of employees that can print on a
single invoice depends whether or not there are "invoice
descriptions" associated with an employee. Use of the invoice description options will reduce the number of
employees that can fit on an invoice.) Select SHORT by clicking on the option once (a black dot will appear
next to the selection).
The long invoice form prints a
maximum of 18 employees per invoice. (The number of employees that can print on a
single invoice depends whether or not there are "invoice
descriptions" associated with an employee. Use of the invoice description options will reduce the number of
employees that can fit on an invoice.) Select LONG by clicking on the option once (a black dot will appear
next to the selection).
Sort by Invoice Handling
Code:
An Invoice Handling code can be assigned to each customer file. If you activate this option, then the system will print the invoices in groups by handling code. You might use this if certain invoices are hand-delivered, or need special items inserted in the envelopes, or if certain customer invoices are sent by delivery service.
If you want invoices to be sorted into groups by invoice handling code before printing, click once on this option to select (a checkmark will appear next to the selection).
If you do NOT want invoices to print in invoice handling code order, leave this option unselected (no checkmark should appear next to the selection).
Print life hours on employee P/R checks?
If you want to print on the paycheck stub the life-to-date cumulative hours processed for an employee by this G/L company, this option should be selected (a checkmark will appear next to the selection). (There is room to print both the LTD and YTD hours on the stub.)
Note: if
this company was in business prior to processing payroll on SkilMatch, the
"LIFE" hours will only be accurate if hours were
"converted" for each employee prior to the first SkilMatch payroll. Otherwise, the "LIFE" hours will
only include the cumulative hours processed through the SkilMatch payroll
programs.
If you do NOT want to print the cumulative hours,
leave the box blank.
Print YTD hours on employee P/R checks?
If you want to print on the paycheck stub the year-to-date hours processed for an employee by this G/L company, this option should be selected (a checkmark will appear next to the selection). (There is room to print both the LTD and YTD hours on the stub.)
Note: if
this company has been on SkilMatch less than one calendar year, then the
"YTD" hours will only be accurate if hours were "converted"
for each employee prior to the first SkilMatch payroll. Otherwise they will only include the YTD
hours processed through the SkilMatch payroll programs.
If you do NOT want to print the year-to-date hours,
leave the box blank.
Print worked
or paid hours (i.e. include *BONUS hours):
If you pay bonuses (like holiday pay, vacation or longevity pay, etc.) as hours x rate, rather than a flat dollar amount, then these hours are considered "paid" hours, not “worked” hours.
If you want the YTD & LIFE hours mentioned above to include only “worked” hours, select WORKED by clicking once on the option (a black dot will appear next to your selection). “Worked” hours will exclude bonus hours.
If you want the YTD & LIFE hours mentioned above to include only “paid” hours, select PAID by clicking once on the option (a black dot will appear next to your selection). “Paid” hours will include bonus hours.
Print social security
numbers on PR checks?
If you do NOT want the employee’s social security number (SS#) to print on the face of the payroll check, leave the box blank.
If you want the employee’s social security number to print on the face of the payroll check in the format XXX-XX-NNNN (X=number hidden, N=SS number displayed), select this option (a checkmark will appear in the box). Only the last 4-digits of the SS# will print on the check.
Print social
security numbers on PR check stub?
If you want the employee’s social security number to print on the payroll check stub in the format XXX-XX-0000 (X=number hidden, 0=SS number displayed), leave the box blank. Only the last 4-digits of the SS# will print on the stub.
To print the employee’s entire social security number (SS#) on the payroll check stub, select this option (a checkmark will appear in the box).
Print customer
code on PR checks?
If you do NOT want the customer code to print on the pay-stub, leave the box blank.
If you want the customer code to print on the pay-stub, select this option (a checkmark will appear in the box.)
Print customer
name on PR checks?
If you do NOT want the customer name to print on the pay-stub, leave the box blank.
If you want the customer name to print on the pay-stub, select this option (a checkmark will appear in the box.)
Block additional users from viewing the same applicant during Search?
Leave the box blank if you want more than one user
to view a personnel file at the same time (no checkmark should appear next to
the selection).
Select this option if you want to BLOCK additional users from viewing the same personnel file at the same time.
(Most SkilMatch customers allow multiple users to
view a personnel record at the same time.
However, only 1 user is allowed to make changes to the personnel record
at a time, regardless of whether viewing is blocked. The message, “Update not allowed: in use in SEARCH by (USER)
as of (date)” notifies users of this.)
Allow workers' comp codes to be entered on the employee tax screen:
Most SkilMatch customers do NOT allow a workers’
comp to be assigned to employee files.
Leave the box blank to restrict users from assigning a specific workers’ comp code to an employee.
Select this option if you want a workers’ comp code to follow an employee on every job to which they are assigned.
Note: if a
workers’ comp code is assigned to an employee, you may experience an error
message during job order entry if the employee’s w/c code is not on the
customer’s list of valid codes.
Note: if you
used to ALLOW the code and change the setup to PREVENT it, those personnel
files with a default workers’ compensation code will require removal of the
code the next time you access that employee's file for updating.
Only allow ADDS for options 1,2,3,4 on the CHANGE menu:
Normally, access to a Company/Branch’s employees, customers and job orders are restricted by an internal security program (PB250) when using options on the SEARCH menu.
As long as your users are allowed to access to ALL companies and ALL branches, there is no potential breach of security in allowing your users to ‘Change’ personnel, customer, and job order files through the options on the CHANGE menu.
If, however, your users are allowed limited to specific company number(s) and/or specific branch(es), a user could theoretically make changes to files they are not authorized to by using the options on the CHANGE menu.
By selecting this feature you will restrict your users to making changes to files by first accessing the file through one of the SEARCH menu options. The users will only be allowed to ADD new personnel, customers or job orders through the CHANGE menu.
Most SkilMatch customers do NOT select this feature, as it tends to be very restrictive and could affect productivity. Any “illegal” change to a file is readily attributed to a user by displaying #* (change) comments.
Cumulative Billing? (multiple pay cycles, one invoice cycle):
If selected (a checkmark will appear next to the selection), this option allows you to process multiple payrolls for one general ledger company WITHOUT processing billing until all payrolls for the period are complete. The billing from all payrolls is accumulated and processed together. A customer MAY receive one invoice per pay period (invoice sequence selection also affects this; for further information, refer to Menu PBMANT, Item Payroll Constant).
If NOT selected, each payroll processed produces its own invoices. If a customer has timesheets in multiple payrolls, the customer receives multiple invoices.
Note: you may process a stand-alone payroll in
between cumulative billings. When all
payrolls are completed, you will process your cumulative billing procedures.
Allow upper and lower case data entry in selected fields:
Most data entry in SkilMatch is automatically converted to all-upper case. This can save on data-entry time, since users are not concerned with the use of the shift key.
However, if you plan on using mail merges, you may want to allow certain information to appear in upper and lower case.
Select this option if you want to allow upper and lower case in the applicant, employee, customer and customer contact name and address fields (a checkmark will appear in the box).
Do NOT select this option if you want data entry to remain upper case only.
If you currently have all UPPER case, and want to switch to upper/lower case, you must run a program to convert your files. Once you have completed the entire System Requirements screens:
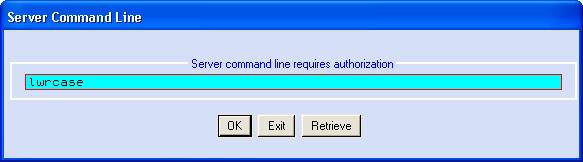
Select the ![]() button.
On the command line, key LWRCASE and press [OK]. The system will convert the name and address
areas in the employee, customer and customer contact files to upper and lower
case. (Your User Profile must contain the SKMANAGE group in order to process
this command).
button.
On the command line, key LWRCASE and press [OK]. The system will convert the name and address
areas in the employee, customer and customer contact files to upper and lower
case. (Your User Profile must contain the SKMANAGE group in order to process
this command).
Setup of
employees and/or contractors in the employee master file:
Note: a contractor is a person who pays their own
taxes – you do not withhold or report taxes for them. Contractors may be paid through payroll (if a personnel file is
created) or through accounts payable (if a vendor file is created). Contractors receive a 1099 rather than a
W-2.
You may allow the setup of employees only, contractors only, or both employees and contractors in a general ledger company. If you want to pay contractors through accounts payable and not through payroll, you may prevent personnel files from being set up for contractors.
The system defaults to employees only (a black dot appears next to the selection).
If you want to allow contractors only, select Contractors by clicking once on the selection (a black dot appears next to your selection).
If you want to allow both employees and contractors, select Both by clicking once on the selection (a black dot appears next to your selection).
When you have completed all changes to this screen, click [OK] to bring up Screen 3 of payroll system requirements file,
OR
To cancel without saving changes and return to add and change menu to work with a different company number, click [Close].
OR
To cancel without saving changes and return to main menu, click [Exit].
OR
If you want to return to Screen 1, click [Screen 1]. (The system will retain any changes you made to Screen 2.)
If you clicked [OK],
all data on this screen will be validated before Screen 3 is displayed. The Screen 3 will display:

Print complete
bank account data on Direct Deposit checks?
If you want to print the employee’s bank name, complete account number, and complete bank routing number on the face of the Direct Deposit voucher, select this option (a checkmark will appear in the box).
If you only want the employee’s bank name, last 4-digits of the bank routing number, and last 4-digits of the bank account number to print on the face of the Direct Deposit voucher, leave the box blank.
Maintain last day
worked?
If you want to track the last day worked by employees, select this option (a checkmark will appear in the box). During timecard entry, you will be required to select a last worked date. Once added, you are allowed to maintain the date through the employee’s file.
If you do NOT want to keep track of the last day an employee worked on an assignment, leave the box blank. You will not be allowed to key a date into the last day worked area on the timecard, nor can you maintain the date through the employee’s file.
Maintain the
employee benefits screen?
If you want to track any type of paid time off (PTO) benefit for employees, then you must select this option (a checkmark will appear in the box). Selecting this option will cause a new screen to display during employee entry where you may add valid PTO plans to an employee’s file for the system to track.
If you are not going to have any paid time off (PTO) benefits for employees, leave this box blank. (If left blank, you will not be allowed to select any of the next 3 options.)
Print accrued PTO
holiday hours on check stub?
(You must be using CAC to print employee paychecks to select this option.)
If you do not use CAC for paycheck printing, or if you do not want to print accrued PTO holiday hours on the stub, click the circle to the left of NO (a black dot appears next to the selection).
If an employee is accruing hours toward holiday paid time off, and if you want to print the current number of hours accrued on the employee’s CAC paycheck stub, click the circle to the left of YES (a black dot appears next to the selection).
If an employee is accruing hours toward holiday paid time off, and if you want to print the current number of hours accrued on the employee’s CAC paycheck stub but only when the employee has positive hours, click the circle to the left of YES, but not negative hours (a black dot appears next to the selection).
Print accrued PTO sick hours on check stub?
(You must be using CAC to print employee paychecks to select this option.)
If you do not use CAC for paycheck printing, or if you do not want to print accrued PTO sick hours on the stub, click the circle to the left of NO (a black dot appears next to the selection).
If an employee is accruing hours toward paid time off for illness, and if you want to print the current number of hours accrued on the employee’s CAC paycheck stub, click the circle to the left of YES (a black dot appears next to the selection).
If an employee is accruing hours toward sick paid time off, and if you want to print the current number of hours accrued on the employee’s CAC paycheck stub but only when the employee has positive hours, click the circle to the left of YES, but not negative hours (a black dot appears next to the selection).
Print accrued PTO
vacation hours on check stub?
(You must be using CAC to print employee paychecks to select this option.)
If you do not use CAC for paycheck printing, or if you do not want to print accrued PTO vacation hours on the stub, click the circle to the left of NO (a black dot appears next to the selection).
If an employee is accruing hours toward paid time off for vacation, and if you want to print the current number of hours accrued on the employee’s CAC paycheck stub, click the circle to the left of YES (a black dot appears next to the selection).
If an employee is accruing hours toward vacation, and if you want to print the current number of hours accrued on the employee’s CAC paycheck stub, but only when the employee has positive hours, click the circle to the left of YES, but not negative hours (a black dot appears next to the selection).
Deduction code used to pay per diem as a credit deduction:
(This option is only applies to Create-a-check users)
If you print paychecks using CAC, then the deduction designated as ‘Per Diem’ will print as a positive amount in a designated area on the pay stub. (Normally a deduction that is PAID will print as a negative, but the system will reverse the sign)
If you do not use CAC, then this option will have no affect on your pay stubs. Any ‘per diem’ deduction will print just like any other deduction types, except that it will print as a negative (assuming you are PAYING the amount rather than deducting the amount).
(You must have already created a Deduction code before you can add it here).
Key the per diem deduction code.
OR
Select the
deduction code by clicking the ![]() button (prompt and select button) to the
right.
button (prompt and select button) to the
right.
OR
Leave blank if you are not a CAC user.
Allow special jobs (SSN<10000) to bypass
selected fields during maintenance?
This option will allow the system to “bypass” selected fields on special jobs if the Social Security Number is less than 10000. Social Security number <10000 usually represent special job orders such as “OPEN Orders, CLOSED Orders, HOLIDAY Pay” and require less detail when setting up the job order. Selecting this option will no longer REQUIRE user to complete specific fields.
If you do NOT want the staff to bypass selected fields on special jobs, leave the box blank.
To allow staff to bypass selected fields on special jobs, select this option (a checkmark will appear in the box.)
Fields that can be bypassed:
Start Time, End Date, Job Length - Numeric & Alpha Fields, Pay Rate, Bill Rate, Sales Territory, CSR, Reason For Order, Order Source, State SUTA Code, SIT Code, State SDI Code, Local Codes 1, 2 & 3, W/C State & Code, Customer Department (12A), Invoice Description, Last Action Date, Last Action Code, Next Action Date, And Next Action Code
When this job's SS# is changed to a number
greater than or equal to 10000 (assigned to an employee), ALL the above fields
must be populated with valid data/codes.
When valid SS# is entered all the bypass logic is negated because the
SS# is no longer less than 10000.
Allow system assignment of applicant/employee
ID number (SS)?
This option will allow “auto-creation” of social security numbers in an applicant or employee file. While this feature is intended for use in the new Applicant Tracking System (ATS), and the new SkilMatch interface ATS.connect, it can also be used outside ATS in your live database of employees. Use with caution in a live payroll company, however! You would not want to discover at the end of a year that you have been paying an employee with an ‘assigned’ number rather than a valid social security number.
If you do NOT want the staff to use “auto-creation” of social security numbers in an applicant or employee file, leave the box blank.
If you want the staff to use “auto-creation” of social security numbers in an applicant or employee file, select this option (a checkmark will appear in the box.)
Optional Until Needed, blank
accepted: Designated deduction code for $200,000+ Medicare tax:
NEW setup for Additional Medicare tax
effective 1-1-2013.
This option only needs to be setup if you have an employee(s) that exceed $200,000 in Medicare gross earnings in a tax year. This option is a one time setup.
Key the
Deduction Code created in the PR GL Distribution file, designated for
“Additional Medicare tax” for this payroll (temp or staff) in this G/L company
or select the deduction code by clicking the ![]() button (prompt and select button) to the
right.
button (prompt and select button) to the
right.
To accept and save all the additions and changes to this screen, click [OK].
OR
To cancel without saving changes and return to add and change menu to work with a different company number, click [Close].
OR
To cancel without saving changes and return to main menu, click [Exit].
OR
If you want to return to Screen 2, click [Screen 2]. (The system will retain any changes you made to Screen 3.)
Change to Late
Fee Response:
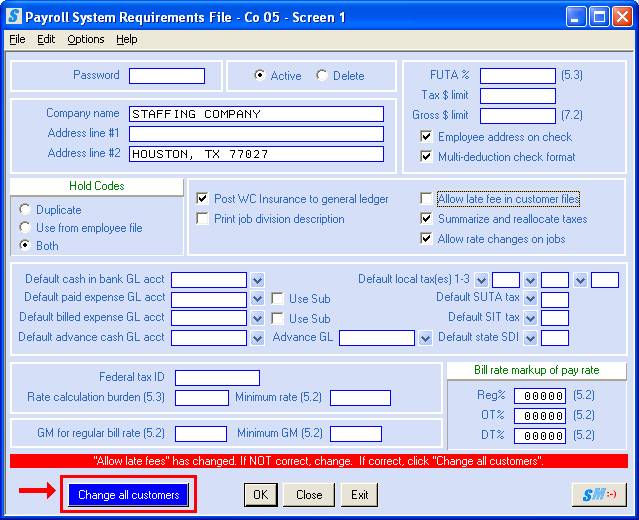
When you click [OK] on Screen 3 of the payroll system requirements file, the system will look to see whether or not a change was made to the response in the LATE FEE area.
If a change was made, you will receive a message at the bottom of the screen, “Allow late fees has changed; if NOT correct, change. If correct, click Change all customers”.
Screen images in
document may not reflect current law; always verify rates and figures with
government officials and/or accounting professional.
Your cursor will be positioned at the BILL LATE FEES area. If you changed the response to this in error, change the response back to the original response and click [OK] again. The message will disappear. Click [OK] again to continue with the updating of this screen.
If the change to the ALLOW LATE FEES IN CUSTOMER
FILES area was intended, click [Change all customers] and
the system will bring up a selection screen that allows you to customize the
conversion of the existing customer files or allows you to choose not to
convert the customer files at all.
The screen will display:

Note: please
review the following scenarios and select the one that best matches your
situation to determine how to respond to this screen.
Scenario 1:
If:
(1) the payroll system file was previously set up NOT to allow late fees, and
(2) you have changed the setup to allow late fees, and
(3) you want to bill late fees to all customers, and
(4) you plan to bill the same percentage late fee to all customers, then
Your screen should look like:
Note: there
will be no manual updating of the customer files required.
Scenario 2:
If:
(1) the payroll system file was previously set up NOT to allow late fees, and
(2) you have changed the setup to allow late fees, and
(3) you want to bill late fees to most customers, and
(4) you plan to bill the same percentage late fee to all late-fee customers, then
Your screen should look like:

Note: after
conversion you will need to go into the files of those customers who are NOT to
be billed a late fee and change the late fee response in the customer file from
yes to no.
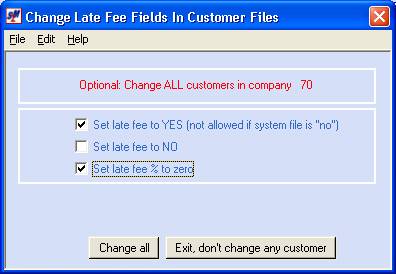
Scenario 3:
If:
(1) the payroll system file was previously set up NOT to allow late fees, and
(2) you have changed the setup to allow late fee, and
(3) you want to bill late fees to most customers, and
(4) you plan to bill the same percentage late fee to most late-fee customers, then
Your screen should look like:

Note: after
conversion you will need to go into the files of those customers who are not to
be billed a late fee and change the late fee response from yes to no. Additionally, you will need to go into the
files of those customers who are to be billed a percentage that is to be
different from the payroll standard and key the desired percentage.
Scenario 4:
If:
(1) the payroll system file was previously set up to allow late fees, and
(2) you have changed the setup to disallow late fees (you no longer plan to charge late fees), then
Your screen should look like:
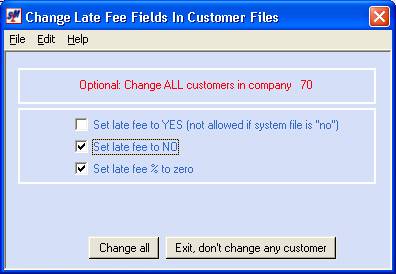
Note: there
will be no manual updating of the customer files required.
If:
(1) the payroll system file is already set up to allow late fees, and
(2) you charge late fees to a few, but not all, customers, and
(3) you plan to begin charging late fees to all customers, then
You will not need to make a change to the response in the payroll system requirements file.
You will, however, need to process the conversion program so that all customer files will be set to allow late fees (Yes) rather than the current disallow (No) response that is in most of the customer files.
To process just the conversion program, you must key a special procedure name on any command line (from any library). Your User Profile must have the SKPAYROLL special group in order to key the special command. You will need to know the general ledger company number.
On a command line, key PB222 and click [OK].
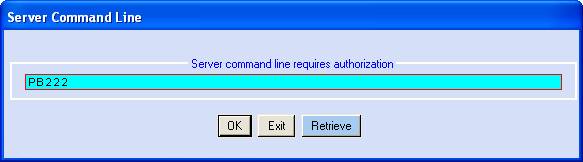
The screen will display:

Enter Company
Number:
Enter the company number for the customer files you
wish to change.
To continue, click [OK].
OR
To cancel and return to main menu, click [Exit].
The screen will display:
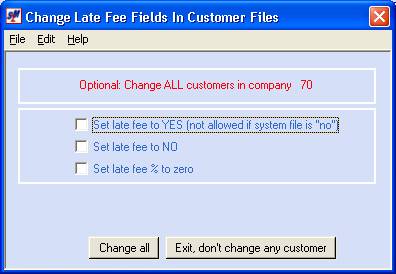
You will need to select SET LATE FEE TO YES.
If you plan to bill the same
percentage late fee to most late-fee customers, select SET LATE FEE % TO ZERO.
Note: you
will need to update the files of those customers who are to be billed a
percentage that is to be different from the standard in the payroll system
requirements file.
If you do not wish to "convert" your customer files, click [Exit, don’t change any customer]. The system will update the payroll system requirements file with any changes made, but will not convert the individual customer files.
If you do want the system to "convert" your customer files, then click [Change all] after selecting the appropriate responses for this screen.
The system will display a message at the bottom of
the screen, confirming your selection.
The conversion does not begin until you click [Change all]. You may process this conversion while users are in the customer files - no one has to get off the system. Once you click [Change all] you will remain "input inhibited" (your screen will be tied up) until the conversion has completed.
Once the conversion has completed, your screen will display:
Click [OK] to return to menu.
Note: if you need to make any manual adjustments to
the late fee responses in the customer files, you should wait until after this
message has been answered.