PAYROLL CONSTANT FILE
The Payroll Constant file contains the defaults used for each payroll process. While this file is changeable as an option on the File Maintenance menu, you will generally update the defaults during a ‘Begin Cycle’ process. The system opens the Constant file as one of the procedures that occur automatically during the ‘Begin Cycle’.
Do NOT use this menu option as a substitute for a ‘Begin Cycle’. The pulling in of the Constant file is only one of the processes that occur during the ‘Begin Cycle’. You should use this option to VIEW the defaults that are being used for the current payroll, or to CHANGE the defaults if you made a mistake when you made the selections during the ‘Begin Cycle’.
The following is a list of the different features that are selected for each payroll process:
Current
1-Week Prior
2-Weeks Prior
3 Weeks Prior
First Check
Check Date
Deductions
Check Message, Line 1
Check Message, Line 2
Beginning Invoice
Invoice Date
Invoice Message
Invoice Sequence
Late Fee %
Late Fee Date Due
Check Sequence
Check Register Sequence
Payroll Journal Sequence
HOW TO MAINTAIN THE PAYROLL
CONSTANT FILE
To begin, sign on to the PayBill Library. The screen will display:
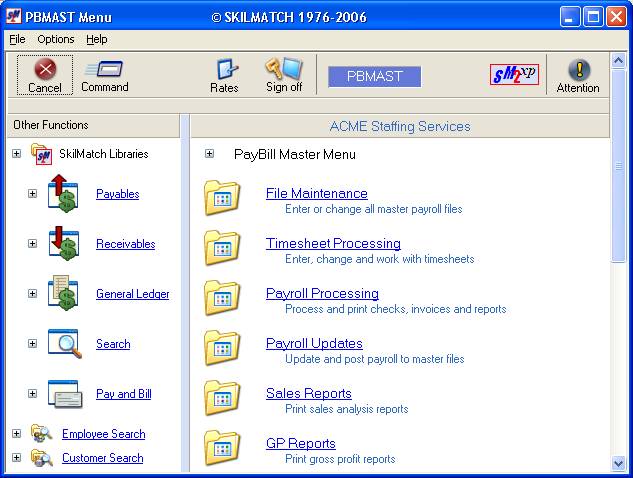
Select the [File Maintenance] menu.
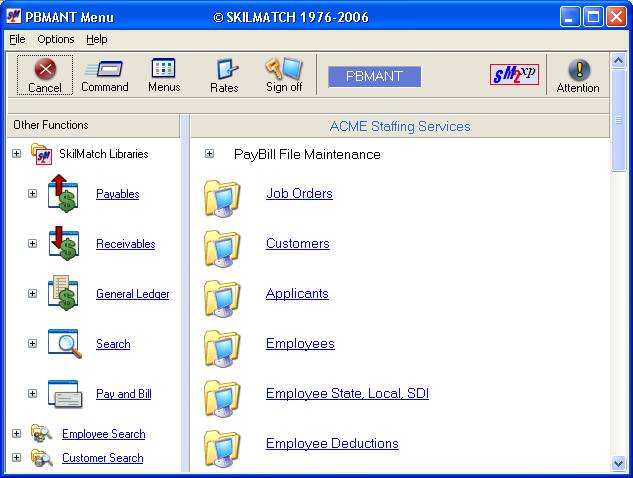
Drag the blue bar down, or right-click in the white space to the right for more menu selections.

Select [Payroll Constant]. The screen will display:
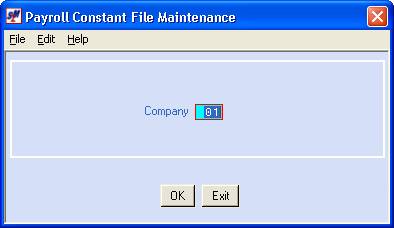
Company Code:
Defaults
to company 01. If you wish to work with
the payroll constant file for a different company, key the desired company
number.
To NOT proceed, click [Exit]. You will be returned to menu.
To proceed, click [OK].
If you
chose to continue, the screen will display:
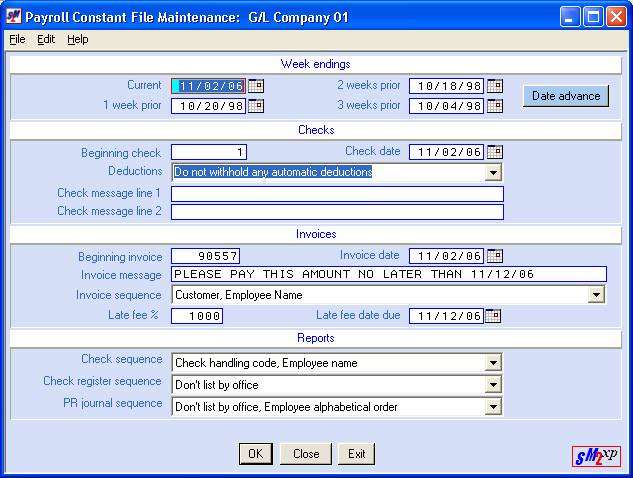
Establishing
week-ending (w/e) dates (or period-ending dates) in the Constant file
eliminates the need to key the most common dates during timesheet entry. The Constant file requires four different
w/e dates - current w/e, 1 week prior, 2 weeks prior, and 3 weeks prior.
If
your pay periods are weekly, you may move all dates forward by one week, rather
than manually keying or selecting them individually, by clicking the [Date
Advance] button on
the right side of this section.
Current
1
Week Prior
2 Weeks Prior
3 Weeks Prior
The dates used for the previous payroll processed for this company will display. To have the system advance each date field by 1 week, click the [Date Advance] button, or (F10).
OR
Key the desired week ending date into each date field. Each date must be a valid date, and must use the format MMDDYY. Also, each date field must have a date that is earlier than the preceding field, with the CURRENT date being the most future.
OR
Select dates
by clicking the ![]() button (calendar) to the right of dates
throughout SkilMatch2.
The
button (calendar) to the right of dates
throughout SkilMatch2.
The ![]() button will display a calendar from which you
may click on a date to select, and then click [OK]
to key the date.
button will display a calendar from which you
may click on a date to select, and then click [OK]
to key the date.
Each time the [Print Check] option is processed, the system will count ahead to the next new check number. Verify that the number displayed is the correct beginning check number for the next [Print Check] option. Depending on the type of printer you use, you may have to change the number to allow for alignment checks that will be wasted.
Note: you will be given another opportunity to verify and/or change
this number when you select the print check option (refer to Menu
Payroll Processing, Item Checks).
Check Date:
Displays the last check date entered.
The check date
may be keyed (without punctuation) or may be selected by clicking the ![]() button (prompt and select button) to the
right of dates throughout SkilMatch2. The
button (prompt and select button) to the
right of dates throughout SkilMatch2. The ![]() button will display a calendar from which you
may click on a date to select, and then click [OK]
to key the date.
button will display a calendar from which you
may click on a date to select, and then click [OK]
to key the date.
Note: you will be given another opportunity to verify/correct this date
when you select the print check option (refer to Menu
Payroll Processing, Item Checks).
Deductions:
Rather than keying deductions directly onto timecards, you may set up individual employee deductions ahead of time using the File Maintenance menu, Item Employee Deductions. Each deduction is assigned a Frequency of 1,2,3 or 9. SkilMatch does not dictate the meaning of each frequency (every payroll, once per month, one-time only, once per quarter). It is important that your organization select a meaning for each frequency, and to be consistent in the use of the frequencies.
Selecting a frequency for the
current payroll process will cause the system to withhold certain deductions,
and to ignore other deductions. Use the
![]() button (prompt and select button) to the
right of deductions to select from these options:
button (prompt and select button) to the
right of deductions to select from these options:
Withhold type 1 deductions only.
Withhold type 2 deductions only.
Withhold type 3 deductions only.
Withhold type 1 and type 2 deductions.
Withhold type 1, type 2 and type 3 deductions.
Withhold type 2 and type 3 deductions.
Withhold type 1 and type 3 deductions.
Do not withhold any automatic deductions.
Check Message Line 1:
You may have the system print a message to employees at the bottom of each paycheck stub. There are 2 lines that have 40 characters each. Key the first line of the message in the Check Message line 1.
The system will retain this message in the Constant file and will display it for updating each time the ‘Begin Cycle’ is processed. Since this message is kept on file, we recommend you use a standard or generic message that would appropriate for most payrolls. Then, if you want to use a more specific or seasonal message for one payroll you should wait and make the one-time change when you select the print check option (refer to Menu Payroll Processing, Item Checks). Changing the check message during the print option will NOT make a permanent change to this check message. Permanent changes must be made to the Constant file.
Check Message Line 2:
You may add a second message line to the bottom of each paycheck stub. This line also holds up to 40 characters. The system will retain this message each time the ‘Begin Cycle’ is processed. You will be given an opportunity to make a one-time change when you select the print check option (refer to Menu Payroll Processing, Item Checks). Changing the check message during the print option will NOT make a permanent change to this check message. Permanent changes must be made to the Constant file.
The system will display the next sequential invoice number based on the last batch of invoices that were processed. There are two circumstances in which this number would not be correct. 1) if invoices were produced manually and posted directly into Accounts Receivable, 2) if you processed the print Invoice option, answered NO to post, and reprocesses again. In either case, you will need to manually key the correct starting invoice number. Please refer to your binder of printed Accounts Receivable Registers to verify the next invoice number.
Note: Since invoices are not pre-numbered, you do not have to worry
about skipping a number for an ‘alignment’ invoice.
Note: you will be given an opportunity to verify/correct the invoice number when you select the print invoice option (refer to Menu Payroll Processing, Item Invoices).
Invoice Date:
The system will display the last invoice date entered.
The invoice
date may be keyed (without punctuation) or may be selected by clicking the ![]() button (prompt and select button) to the
right of dates throughout SkilMatch2. The
button (prompt and select button) to the
right of dates throughout SkilMatch2. The ![]() button will display a calendar from which you
may click on a date to select, and then click [OK]
to key the date.
button will display a calendar from which you
may click on a date to select, and then click [OK]
to key the date.
Note: you will be given an opportunity to verify/correct this date when you select the print invoice option (refer to Menu Payroll Processing, Item Invoices).
Invoice Message:
You may have the system print a message to customers at the bottom of each invoice. Key up to 53 characters. This message will be superceded if the system needs to print sales tax or late fees on the invoice page. Otherwise, the message will print exactly as entered, so use upper and lower case accordingly.
The system will retain this message in the Constant file and will display it for updating each time the ‘Begin Cycle’ is processed. Since this message is kept on file, we recommend you use a standard or generic message that would appropriate for most payrolls. Then, if you want to use a more specific or seasonal message for one payroll you should wait and make the one-time change when you select the print invoice option (refer to Menu Payroll Processing, Item Invoices). Changing the invoice message during the print option will NOT make a permanent change to this invoice message. Permanent changes must be made to the Constant file.
Invoice Sequence:
The Invoice Sequence you select will control the order in which the invoices will print. Some of the choices will also contribute to the sorting of timecards on the invoices. Please read the following Overview before making your Invoice Sequence selection.
Overview of
Customer Invoicing:
There
are choices on several menu options that control customer invoicing. The choices you make will control the
selection of jobs that will print on an invoice, the order in which the
employees print on an invoice, and the number of separate invoices that a given
cuscode will receive. These choices
appear as selections on the following menu options:
Invoice Handling method (selected in the Payroll System Requirements file),
Invoice Sequence (selected in the Payroll Constant file),
Sort Sequence (selected in the customer file),
Invoice Format (selected in the customer file),
Certain functions used during
timesheet entry
First Sort: The Invoice Handling code will always be the primary sort, if this method is “turned on” in the Payroll System Requirements file.
Second Sort: The job order Branch will be the next sort to occur, should you select an Invoice Sequence below that includes Branch office.
Third Sort: The system will sort the timecards into groups by cuscode (a customer group with multiple cuscodes will receive a minimum of 1 invoice per cuscode).
Fourth Sort: Within a cuscode, the system will sort the timecards into groups by the job order Division, for any of the Invoice Sequence selections except the Streamline invoicing (see numbers 5 & 10).
Fifth Sort: Within Division, the timecards will sort into groups by job order Class.
Sixth Sort: The system will look next to the customer file for invoicing instructions. The customer’s Invoice Sort method (job department, attention-to line, subtotal by dept) is applied to the timecards, then the Invoice format (1 job per invoice, multiple jobs on a single page, multiple jobs/multiple page).
Seventh Sort: Next come instructions from the timecard itself. A credit memo timecard will print on an invoice by itself. If the =2= sort (refer to document Menu PBENTR, Item Timesheets for additional information on this feature) has been used, then the system will group together identical =2= sorts.
Final Sort: The final sort applied to the timecards looks to the Invoice Sequence selection in the Payroll Constant file for instructions in printing the employee names – either in alphabetical order, or in job number order.
Use the ![]() button (prompt and select button) to the
right of Invoice Sequence to make a selection from these choices:
button (prompt and select button) to the
right of Invoice Sequence to make a selection from these choices:
(1) Customer, Division, G/L Class, Job Number.
(2) Division, G/L
Class, Customer, Job Number.
(3) Customer, Division, G/L Class, Employee
Name.
(4) Division, G/L Class, Customer, Employee
Name.
(5) Customer, Employee Name (referred to as ‘streamlined invoicing’). The customer gets one invoice regardless of the number of
branch/division/class combinations on that customer’s jobs).
Options
1-5 do not sort by Job branch office.
Therefore, even if a customer code has multiple job orders, each with
different branch offices codes, those jobs will appear on the same
invoice. While the system will post the
income and payroll expense of each job order to the account numbers designated
by the job’s Labor Distribution, the invoice amount will NOT be separated. Instead, a single total invoice amount will
be posted to a single A/R account. The
A/R account used is picked up from the Labor Distribution of the LAST job
printed on the invoice. If you have
multiple branch offices, you may wish to select from Options 6-10.
(6) Office, Customer, Division, G/L Class, Job Number.
(7) Office, Division, G/L Class, Customer, Job Number.
(8) Office, Customer, Division, G/L Class, Employee Name.
(9) Office, Division, G/L Class, Customer, Employee Name.
(10) Office, Customer, Employee name (referred to as ‘streamlined invoicing’). The customer gets one invoice per branch regardless of the number of branch/division/class combinations on that customer’s jobs).
“Office”
refers to the branch office in the job
order file.
Note: options (8) and (10) are the most commonly
selected invoice sequence options.
Late Fee %:
To use
this feature, you must be using either Create-a-Check for your invoicing, or a
pre-printed invoice form that has the large box on the bottom. The BILL LATE FEES feature in the Payroll System
Requirements file must be “turned on”.
Late fees will be charged only to customers whose customer file has the
Late fee box checked.
Late fees are calculated as a percentage of the total invoice amount. Key the percent to be assessed. DO NOT KEY A DECIMAL POINT, BUT DO KEY ZEROES TO HOLD DECIMAL PLACES! (Example: 2% keyed as 200; 1.5% keyed as 150). This will produce a line on the invoice that reads: TOTAL WITH LATE FEE. If the customer’s file has a designated late fee percentage, then the Constant file percentage will be ignored.
Late Fee Date Due:
If you are NOT assessing a late fee, leave this area blank.
If you are assessing a late fee, key a late fee date. This date should be the last day that the invoice can be paid WITHOUT the late fee being due.
OR
Select dates
by clicking the ![]() button (prompt and select button) to the
right of dates throughout SkilMatch2. The
button (prompt and select button) to the
right of dates throughout SkilMatch2. The ![]() button will display a calendar from which you
may click on a date to select, and then click [OK]
to key the date.
button will display a calendar from which you
may click on a date to select, and then click [OK]
to key the date.
A Late fee
invoice will have three lines that read:
TOTAL WITH LATE FEE -à $___
(PAY TOTAL WITH LATE FEE AFTER-àDDMMYY)
IF PAYMENT IS MADE BEFORE DUE DATE ABOVE, PLEASE PAY-à $___
Check Sequence Code:
Your choice will determine the order in which the payroll checks will print. Making the correct selection will prevent the hand-sorting of payroll checks into distribution groups.
Use the ![]() button (prompt and select button) to the
right of check sequence to select from these options:
button (prompt and select button) to the
right of check sequence to select from these options:
Order merged
Print checks in the order in which batches were merged, and then into the order in which timecards were keyed into the individual batches.
Employee
name
Print checks alphabetically by employee last
name.
Check handling
code, Employee name
Sort checks into groups by Hold code, then alphabetically by employee last name.
Office, Order
merged
Sort checks by the employee’s Branch code (not job branch), and then, the order in which the batches were merged, and finally, the order in which timecards were entered into individual batches.
Office, Employee
name
Sort checks by the employee’s Branch code (not job branch), and then, alphabetically by employee last name.
Office, Check
handling code, Employee name
Sort checks by the employee’s Branch code (not job branch), and then, into groups by Hold code, then alphabetically by employee last name.
Check Register
Sequence:
Determines whether the system will produce a single check register with the checks listed in sequential numeric order, or whether the system will produce multiple check registers – one per Job Branch office - with only the checks for the branch listed on the individual reports.
Use the ![]() button (prompt and select button) to the
right of check register sequence to select from these options:
button (prompt and select button) to the
right of check register sequence to select from these options:
(1) List by office
(2) Don’t list by
office
P/R Journal
Sequence:
Determines whether the system will produce a single payroll journal with the employees listed in alphabetical or social security number order, or whether the system will produce multiple journals – one per Job Branch office - with only the employees for the branch listed.
Use the ![]() button (prompt and select button) to the
right of check register sequence to select from these options:
button (prompt and select button) to the
right of check register sequence to select from these options:
(1) List by Job Branch office, Employee alphabetical order
(2) List by Job Branch office, Social security number
(3) Employee alphabetical order
(4) Social security number
If you wish to enter this screen as it appears, click [OK].
If you do NOT wish to enter this screen as it appears, and wish to try again, click [Close]. You will be returned to the previous screen where you may enter a different company number.
If you do NOT wish to enter this screen as it appears, and wish to return to menu, click [Exit].