PAYROLL G/L DISTRIBUTIONS
The payroll general ledger (G/L) distribution file is a table of all types of payroll taxes and deductions that affect your employee’s paychecks. Each record in the file contains the G/L account numbers and specifications used in the automatic G/L posting during the payroll process. There must be a record for each federal and state, employer and employee payroll taxes, income taxes, FUTA, SUTA, workers’ compensation, local taxes, and employee deductions.
If you are creating a pre-tax deduction, then you must also set up pre-tax calculation records for federal, state and local taxes. You may process a command (taxcrsupd) to have the system create these records for you, or create them manually by using Menu File Maintenance, Item Miscellaneous Deductions: Pre-tax. If you neglect to create these records, then the pre-tax deductions will NOT be treated as exempt!
Once a code has been created, you cannot go back and change the Pre-Tax designation. If it was marked as pre-tax during entry, but should not be pre-tax, or was not marked as pre-tax when it should be, you will have to deleted this code and add a new code with the correct designation.
If you are setting up Automatic AEIC or fringe benefits
refer to specific
documentation by clicking on the link.
401K
Setup – With the
Federal government’s implementation of new limits for individual of a certain
age (i.e. 50 years old and above), this creates a need for new handling for
401K setup. One of the following two
options recommended.
Option
1: New
Deduction Code -
Setup a new deduction code (separate from original 401K deduction) for the new
401K Age Bracket/Limit. This new
deduction code will have it’s own maximum $ per year limit and if limits change
from year to year, only one change needs to be made in the PR GL Distribution
file. Any limit change(s) will apply to all employees setup with this new 401K
deduction code.
Option
2: Employee
Deduction File Limit Change - No new deduction code needs to be setup for 401K employees when they
reach the age when limits are changed.
You will need to identify those employees that have reached a certain
age (i.e. 50 years old and above) and go into their “Employee Deductions” file
and change the limit on their individual 401K deduction setup to the
appropriate limit. When the federal
government sets a new limit, you will need to go into EACH EMPLOYEE file and
changed to the new limit (and repeat each time the limit changes).
To begin, on the PayBill Library Maintenance menu, click [Payroll G/L Distributions]. The screen will display:
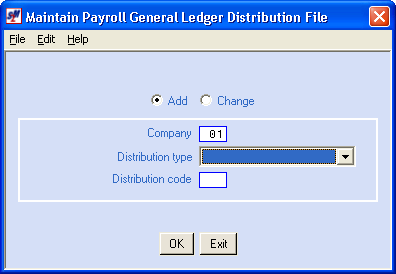
Add or Change:
Defaults to add. To change a distribution already set up, click once on change to select (a black dot will appear next to your selection).
Company Code:
System defaults to company 01. To work with distributions for a different
company, key the desired company number.
Distribution Type:
Select a
distribution type by clicking the ![]() button (prompt and select button) to the right
of the distribution type.
button (prompt and select button) to the right
of the distribution type.
Choices are:
Social Security Employer portion (Code C)
Social Security Employee portion (Code A)
Federal Income Tax or AEIC (Code F) NOTE: Advance Earned Income Credit, AEIC, is no longer available to employees through payroll as of December 31, 2010.
State tax (Code S)
SDI tax (Code D)
Workers’ Comp (Code I)
FUTA (Code G)
SUTA (Code H)
Deductions (Code K)
Medicare Employer portion (Code M)
Medicare Employee portion (Code N)
Employer paid local tax (Code Y) NOTE: *This deduction type needs custom programming, contact SkilMatch for assistance. A code type Y must also have a corresponding code type L.
Employer paid SDI tax (Code Z) NOTE: This deduction type needs custom programming, contact SkilMatch for assistance.
“Deductions” cover a broad spectrum of types such as EIC reimbursements,
fringe benefits, child support, 401K, garnishments, insurance, and more.
Distribution Code:
Use 01 for all federal tax types except automatic EIC (Social security, Medicare, FIT, FUTA). NOTE: Federal 01 is FIT-STANDARD
Use 02 for NEW 2020 W4 compliant Federal tax tables, Federal 02 is FIT-W4 STEP2 CHKBOX
Use only 04 for AEIC (automatic earned income credit) NOTE: AEIC is no longer available to employees through payroll as of December 31, 2010.
Use state postal abbreviations where appropriate (SIT, SUTA, Workers’ comp, SDI).
Use only ** for AEIC reimbursements (this is required). NOTE: AEIC is no longer available to employees through payroll as of December 31, 2010.
Use only $$ for fringe benefits (this is required).
Use only #S for HIRE Act exempt wage reporting (this is required).
We recommend M$ for Additional Medicare Tax (calculated when staff/employee gross wages exceeds $200,000) if the code is not currently being used. There is additional setup to identify this code in the PR System Requirements file, so your company can determine the code used. This “K” deduction will not have a W2 box setup, the system will apply the dollars appropriately when W2’s are created. Select this link for full details on the Additional Medicare Tax.
We recommend that the asterisk symbol *, be used in the first position for Employer paid local tax codes “Y” to assist with tracking tax code withholdings that could potentially require future reporting to federal, state and/or local taxing authorities.
NOTE: Special Maryland State codes (N1-N9, Q1-Q9, R1-R9) and Indiana Local codes for county tax (00-99) should be reserved on your system if you have the possibility of doing business in these states. Contact SkilMatch for additional details.
Design your own 2-character code for all other deduction types.
If you are setting up a pre-tax deduction in both temp payroll and staff payroll, you should assign the same code in both places unless the deduction will be pre-tax in only one of the two files.
If this deduction is to be pre-tax in one file, but taxable in the other, then you must assign a different code to one of the files. For example, you CANNOT use code MI in temporary as a non pre-tax deduction for medical insurance and code MI in staff as a pre-tax deduction for medical insurance. Nor can you use CH in temp for child support garnishments, and use CH in staff for pre-tax Child Care.
To continue, click [OK].
OR
To cancel and return to main menu, click [Exit].
If you select [OK] to continue, any Distribution type other than Deductions Code K,
the screen will display:

If you select Deductions (Code K), the screen will display:

Screen images and
examples in document may not reflect current law; always verify rates and
figures with government officials and/or accounting professional.
Distribution Description:
The first 2 characters of the 15-character description should be US if this is a federal tax, or the postal code if this is a state tax, or a 2-character design of your choice for a local tax. If this is a deduction, you may use all 15 characters to describe the deduction.
Examples: US-FIT
US-SS employer
US-SS employee
TX-SUI
TH-HISD, TX
401K plan
Child support
Health insurance
If this is a deduction (K type), this description will print on the paycheck stub of employees if you use the multi-deduction format. (Refer to document Menu File Maintenance, Item Payroll System Requirements for more information concerning check format).
All descriptions will appear on the general ledger transaction register produced during payroll updating. (Refer to document Menu Payroll Updates, Item Post Payroll for more information concerning the general ledger transaction register).
G/L Liability Account:
Key the 8-digit general ledger
account number to which the calculated dollar amount should post. Please note that although this area is mostly
used for a liability-type account (number under 4000), the area will accept all
valid account numbers (0001-3999, 4100-9999).
The general ledger account
number must already exist. If not, refer
to document Menu GLMANT, Item Accounts.
G/L Expense Account:
Certain distribution types will also incur an expense for the employer. Key an 8-digit general account number for the expense. Your general ledger should have an expense account for each of the types listed below. Example: 5200-Social Security, 5210-Medicare, 5220-FUTA.
In addition, every type will have an account for each of your general ledger’s Cost centers. Example: 01-5200 Social Security for the Houston branch, 02-5200 Social Security for the Pasadena branch, 03-5200 Social Security for the Conroe branch.
You can only key the expense account for ONE cost center. The system automatically substitutes the 2-digit cost center portion keyed into this area, with the account number for the cost center being charged for the wages (as set up through the Labor Distribution).
Example: If 01-5200 (Houston) is keyed as the expense account, but the job order has Conroe as the Labor Distribution, then the Social Security expense will be posted to 03-5200.
The distribution types that require an expense account are:
Employer portion of Social Security
Worker's Comp
FUTA
SUTA (SUI)
Employer portion of Medicare
Employer paid local tax
Employer paid SDI tax
Use Labor Sub Account (y/n):
Many SM customers have multiple cost centers, and the system uses the Labor distribution assigned to the job order to breakout the wage expense of payroll to each cost center. Some customers like to take the breakout of employer expenses even further by making use of the general ledger account number sub-account, the last 2-digits of the 8-digit account number.
Example:
01-5200-00 Houston branch Social Security expense
01-5200-01 Houston branch, Industrial division, Social Security expense
01-5200-02 Houston branch, Office division, Social Security expense
If you answer YES in this area, then the system will pick up the sub-account from the job order’s Labor Distribution expense account and substitute it for the sub-account used in the expense account keyed in the previous area.
It will affect the following types of employer’s expense:
Social Security Employer portion
Worker's Comp
FUTA
SUTA
Medicare Employer portion
Employer paid local tax
Employer paid SDI tax
If you do NOT wish to break out the payroll taxes by sub-account, key N.
State Code for Local Tax Code:
If this is a local tax, key the state postal code to which the local tax belongs. (This information is used in tax interface programs.)
Enter Tax Service Code:
If your company interfaces with one of the Tax service companies (ADP, Ceridian, ProBusiness), key the associated code for this tax type.
If your company does not interface with a tax service, leave this area blank.
If this distribution is a Deduction (type K), these additional areas
will display:
Zero At End Of Year:
To zero the deduction totals for this particular deduction at the end of the year, click once to select this option (a checkmark will appear next to the selection). EIC reimbursements, 401K, fringe benefits, and many other deductions should be set to zero at the end of the year.
OR
If you do NOT wish to zero the
deduction totals for this particular deduction at the end of the year, leave
this option unselected (no checkmark will appear next to the selection). Garnishments,
and other deductions that work toward fulfilling a total should NOT be set to
zero at the end of the year.
Garnishment:
If this deduction
is a garnishment (including child support), check YES.
OR
If this deduction
is NOT a garnishment (or
child support), check NO.
Child Support:
If this deduction
is for child support, check YES.
OR
If this deduction
is NOT child support,
check NO.
Deduction is Pre-Tax:
If this is a pre-tax deduction, click this area (a checkmark will display).
OR
If this is NOT a pre-tax deduction, leave this area blank.
Note: Make very certain you make the correct response to this area – you will NOT be allowed to change your response once the code has been created!
Maximum deduction $ allowed (Employee override is
allowed):
If the deduction
dollars withheld for this deduction type are not to exceed a certain dollar
amount, key the amount (up to $9,999,999.99).
This maximum will apply to every employee who has this deduction
withheld, unless the employee’s individual file is set up with a different
maximum (see Menu File Maintenance, Item Employee Deductions).
Many deductions
may not have a maximum – like Child Support, or Medical insurance. Others will have a government regulated
maximum – like 401K. Still others will
not have a standard maximum; instead each employee’s deduction file with have its own
maximum.
If this deduction type has a standard maximum, then we recommend that you set the maximum in the distribution file, rather than in the individual employee deduction files. Then, when the maximum changes (like 401K, which changes annually), you can make one change by resetting the maximum in the distribution file, rather than resetting the maximum person-by-person (through Menu File Maintenance, Item Employee Deductions).
If your company has multiple deduction codes for a deduction (401K deduction codes of K1, K2, and K3), enter in this area the total maximum deduction $ allowed for every code. Example: if 401K maximum deduction $ allowed is $15,000.00 and you have K1, K2, and K3 as 401K deduction codes, enter $15,000.00 in this area for K1 and K2 and K3.
We recommend you always verify Federal rates and/or figures with the www.irs.gov website, to ensure most current information.
W-2 Box 14 Description:
Only Box 14 (Other) prints descriptions on the W-2. The description is limited to 3 characters and should describe the type of deduction. Examples: MED, DEN or INS for medical or dental insurance.
W-2 Box 12 Code:
Box 12 on the W-2 requires a code to identify the type of deduction. These codes may change from year-to-year based on federal requirements. Depending on the code you key, an additional screen of data entry may come up when you complete this screen (additional documentation below) and click [OK].
Position cursor over “Hover help” and a list of codes will display. Determine appropriate code to enter based on the currently allowed list.
D – 401K
S – Simple IRA
W – Health Saving Plan, Employer Contribution
*New for 2010
AA – Roth 401K contribution
CC – HIRE Act exempt wages
*New for 2013
DD – Aggregate Health Insurance Dollars (There is NO W-2 box setup needed for this code, internal programming associates deductions marked with a “Yes” in the Health Insurance fielded.
This field has two boxes for the code.
If the code has one character, key the code in the first field.
OR
If the code has two characters, key the first character of the code and tab to the second field to key the second character of the code.
W-2 Box (10,12,14):
NOTE: Review IRS website for full details as to
what is covered for the following deductions
Use this area if this deduction should print in W-2 boxes 10, 12, or 14.
For tax year 2010:
Box 10 is for Dependant Care
Box 12 is for deduction types listed under W-2 Tax codes and include 401K, IRAs, Roth 401K, HIRE Act exempt wages, etc…
Box 14 is for Pre-Tax Section 125, Medical/Dental/Health insurance deductions
For AEIC reimbursements – leave the W-2
box number blank. (The program is
hard-coded to print deduction code ** as a reimbursement on the W2 form, box
09.) NOTE: AEIC is unavailable as of 12/31/10.
For Fringe benefit reimbursements – leave the W-2 box number blank. (The program is hard-coded to print deduction
code $$ as a fringe benefit on the W2 form, box 14.)
Reimbursement? (Reverse Sign):
You will only select Yes or No if you keyed a selection into one of the W-2 boxes above. If you did not key a selection, then you will leave the Reimbursement area blank.
If this “deduction” is actually an amount paid out to the employee, like Child Care, click YES.
OR
If this is NOT a reimbursement (dollars are deducted from employee’s pay), click NO.
Health Insurance:
Programming in 2011 added a Health Insurance Yes/No field to identify if the deduction being setup is for Health Insurance. Federal legislation requires aggregate health insurance reporting for 2012, for this reason we need to identify which deduction codes are for health insurance. (The Federal government defines “Aggregate” as ALL dollars paid by the employee and employer combined.)
During program installation in 2010, all pre-existing deduction file health insurance codes were preset to “No”. This field needs to be checked appropriately for all NEW deductions (and if not yet completed, UPDATE all pre-existing deductions). This field will need to be updated to “Yes” for deductions that represent health insurance. ONLY those deduction codes setup with a “Y” (Yes) will display for selection on your Aggregate Health Insurance Setup (for additional details refer to this link on Aggregate Health Insurance, AHI Details.)
NOTE:
Heath Insurance and Combined Insurance only apply to this field. As of this enhancement notice, Life, Dental,
Vision Only policies do not qualify.
NOTE: Only Payroll
G/L Distribution deduction records setup as "Health Insurance? Yes"
will be used by SkilMatch programs to report "aggregate" health
insurance dollars on W2s.
If this deduction
is for health insurance, check YES.
OR
If this deduction
is NOT health insurance,
check NO.
Active/Delete:
Defaults to active. If this is a code you wish to use, leave active selected (SM users will display blank in the area).
To delete this code, click once to select this option (SM users key a D to delete).
Be very careful of your accuracy before clicking the [OK] button! Once established, some deduction codes CANNOT be modified! A prime example is the pre-tax area. Once you have created a deduction code that has been marked as a pre-tax deduction, the system will NOT allow you to “un-mark” it.
To add, change or delete this code, click [OK].
OR
To return to add and change menu, without saving changes, and enter new distribution code, click [Close].
OR
To cancel without saving changes and return to main menu, click [Exit].
If you select [OK] to continue, and the W-2 Tax Code was not D and Box 12 (401K), you have completed setup and will return to distribution Add/Change menu.
OR
If you keyed a “D” for W-2 Tax
Code, and selected Box 12, then the system will display the screen for optional
401K Employer Match data entry after
you click [OK].
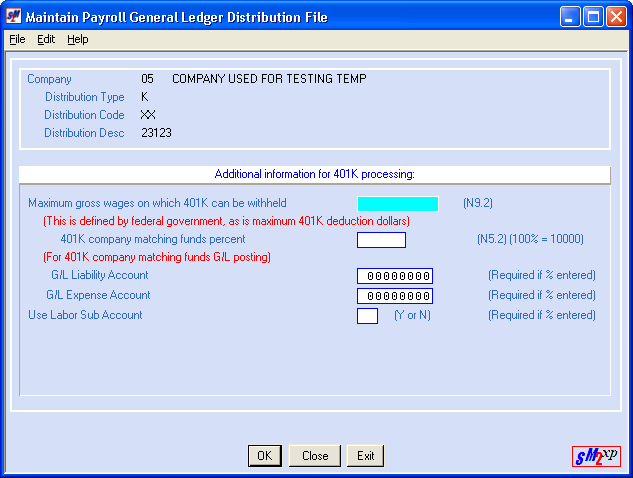
Maximum Gross Wages On Which 401K Can Be Withheld:
Enter the maximum gross wage amount defined by the federal government.
NOTE: Confirm 401K figures with the IRS and your accountant.
Screen images and
examples in document may not reflect current law; always verify rates and
figures with government officials and/or accounting professional.
401K Company Matching Funds Percent:
If your company matches employee 401K deductions, key the percentage to be matched. (There are 2 decimal positions, so if the percentage is a whole number, remember to leave 2 zeros to hold the decimal places.)
OR
If your company does more than one kind of matching, then you must have multiple 401K codes – one for each percentage. Example: matching of 3% might be K1, 5% assigned a code of K2, and 7% could be K3.)
G/L Liability Account:
If you key a matching percent in the previous area, then you must also key the general ledger liability account number to which these matching dollars should be posted during the payroll process.
G/L Expense Account:
If you key a matching percent in the area above, then you must also key the general ledger expense account to which these matching dollars should be posted during the payroll process.
Use Labor Sub-Account:
Key Y, if you want the expenses to be charged to the job order's labor distribution sub-account number.
OR
Key N, if you do not want the expenses to be charged to the job order's labor distribution sub-account number.
To add, change or delete this code, click [OK].
OR
To return to add and change menu, without saving changes, and enter new distribution code, click [Close].
OR
To cancel without saving changes and return to main menu, click [Exit].
Special Automatic AEIC setup:
NOTE: AEIC, is no longer
available to employees through payroll as of December 31, 2010. The following directions remain to assist
those that may need to track and/or review prior year withholdings/setup.
If you have employees who receive AEIC, the system will do an automatic calculation, if you set up the distribution using the following:
Add 2 distribution records. One should be Distribution type FEDERAL INCOME TAX, code 04. Use a description of EIC payments, and enter the EIC liability account.
The second record should be Distribution type DEDUCTIONS, code **. Use a description of EIC payments, the liability account, respond “Y” to zero at end of year, and “N” to the garnishment questions. All other fields should be left blank.
Go to the FILE MAINTENANCE menu and select the FICA TAX TABLE option. Make certain the field on the FICA/Medicare screen called MAX GROSS $ for EIC contains the limit for the current tax year.
Go to the FILE MAINTENANCE menu and select the FIT, STATE, LOCAL TAX TABLES button. Make certain the tax tables for Federal 04, Married (only 1 spouse filing EIC), Single, and Exempt (married, both spouses filing EIC) are set up correctly for the current tax year.
Go to the Employee’s file and get to their tax screen. In the SPECIAL FIT field, select one of the AEIC options, but leave the FIT $ or % field blank. As soon as an employee has one of the AEIC selections in their file the system will begin the automatic calculation and payment of EIC during payroll - there is no other step you need to complete.
You should NOT create an Employee Deduction of **. The system will automatically create a ** deduction file for the employee, but only uses it to track the YTD payments. If the employee becomes no longer eligible for EIC, you will go back to the SPECIAL FIT field and blank it out. That will stop the automatic calculation and payment.
You will only use the EMPLOYEE DEDUCTIONS option to “deactivate” any existing employee whose EIC payment has been calculated manually in the past, or to adjust (add to/subtract from) the amount being calculated automatically through the use of the SPECIAL FIT field. “Deactivate” the manual calculation by removing the amount/percent or by changing the deduction frequency to a 9.
If you want fringe benefits to print on an employee’s W-2 in the correct box (Box 14), and with the correct description (FGB), then you MUST use a distribution code of $$ (2 dollar signs).
Use a description of Fringe Benefits, and enter the correct G/L liability account number. Respond “Y” to zero at end of year, and “N” to the garnishment and child support questions. ALL OTHER AREAS MUST BE LEFT BLANK! The system has been programmed to know what to do.
Fringe benefits are normally dollars that are not given to the employee in the form of a check, but are dollars that must be a part of the employee’s Gross Income on the annual W-2. These dollars may be fully taxed, or not taxed, or subject to some but not all tax types. As a result, the computation of Fringe benefits is generally processed during the final payroll of the tax year. SkilMatch maintains “how-to” documents on the processing of Fringe Benefit payrolls. Please call SkilMatch software support for the most current version that matches your need.
Creation of Pre-Tax records
If you have created a new deduction that is pre-tax, or if you have existing pre-tax deductions, and are adding a new state, or a new locality, you must either use a menu option to manually create the pre-tax records, or you may use a command to have the system create them automatically. Before processing this command, make certain that the W-2 box areas are set up correctly for the current year. The system will use your responses to identify the deduction type.
To create the records manually, use Menu PBMANT, Item Miscellaneous Deductions: Pre-tax.
To have the system create the records automatically, using the 2006 specifications from the American Payroll Association, you will key a special command. Your user profile must have the SKMANAGE group in order to process this command.
From a menu, click the ![]() button at the top of the screen. On the command line, key TAXCRSUPD and
click [OK].
button at the top of the screen. On the command line, key TAXCRSUPD and
click [OK].

The screen will display:
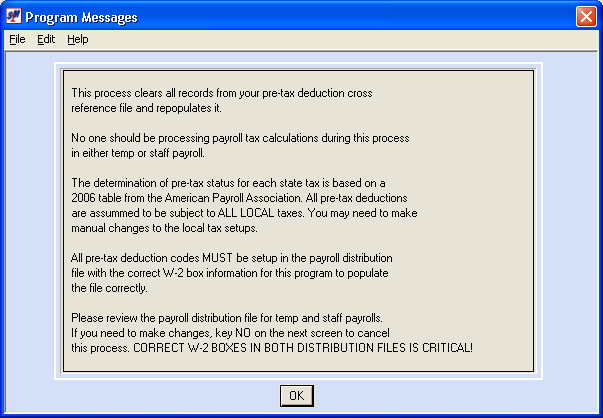
The system will ‘clear’ out the pre-tax record file of all existing records, and will re-populate the file with the ‘hard-coded’ 2006 specifications. If your system has local taxes or SDI, please be aware that the system automatically makes every pre-tax deduction code SUBJECT to SDI and local taxes. If this deduction is EXEMPT from local tax or SDI, you must manually correct the Pre-Tax record when the automated program has finished. You will have to make these adjustments EACH time the command is processed, since the file is completely cleaned out and re-populated each time. Click [OK] after you have read the screen.
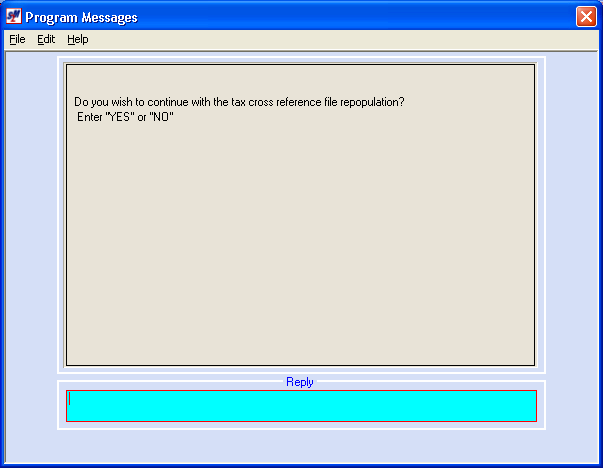
If you are certain that your W-2 boxes are current, and you want to continue with this process, key YES and press <Enter>.
OR
To cancel, key NO and press <Enter>. You will return to menu.
If you keyed YES, the screen will remain displayed while the program processes. When it has finished, you will return to menu. You should go to the File Printing menu and print the Miscellaneous Deduction Pre-tax file to verify that there are not any local taxes or SDI responses that need to be adjusted.