EMPLOYEE
DEDUCTION FILE
Once you have created valid
deduction code types using Menu
PBMANT, Item Payroll G/L Distributions, you may begin setting up
individual employee deductions.
The
following is a list of the different features described in this documentation:
Deduction
Percent Amount (Deduction Percent Of Gross Or Net)
Maximum or Minimum Deduction Percent
(% of Gross or Net; % is Maximum or Minimum)
Multi-Garnishment Maximum Percent
(% of Gross or Net)
Split
Multi-Deduction Same Priority
Deductions
Used In Net Pay Calculations
Maximum Deduction $ In Distribution File
This
Is A Garnishment/Child Support
Setting
up Accounts Payable Data
(1) The
calculation of deductions is based on the week-ending worked date of a
timecard. If an employee has multiple
timecards for the same week-ending worked date, the system will divide
the deduction amount proportionally between the paychecks. If an employee has multiple timesheets in a
payroll process, but with different week-ending worked dates, deductions
will be calculated on each separate week-ending worked date.
(2) If a
deduction code has been set up as a “garnishment” (through Menu
PBMANT, Item Payroll G/L Distributions), a NEGATIVE NET CHECK will
NEVER occur as a result of the deduction.
If there is not enough payroll to withhold the full amount of the
garnishment, then the deduction program will automatically adjust the amount of
the garnishment withheld to prevent a negative net check calculation.
(Non-garnishment
deductions, however, may cause a negative net check amount.)
(3) If, for
the same week-ending worked date, you have a VOIDED check and a REISSUED check
(voided and reissued through Menu PBENTR, Item Voided Checks), the deductions
on the REISSUED check will be exactly the same as on the original check –
regardless of how a deduction may have been changed for future calculations.
(4) If you
are VOIDing a check that had a deduction withheld, and you key in a REGULAR
timesheet (rather than selecting a reissue) for the same week-ending as the
check you are voiding, then the amount of the deduction being VOIDed will not
affect the calculation of deductions being withheld from the new REGULAR
timecard. The only exceptions to this
“rule” are: if the deduction on the original check had met the maximum
deduction amount allowed and the act of voiding causes the “to-date” deduction
dollars to fall back below the maximum; or if the maximum amount allowed has
been increased since the previous maximum was met; or if the amount of the
deduction itself has been changed.
Example One:
If Deduction code XX was set to
withhold $10.00/week-ending at the time the original check was issued, then the
VOID check will be processed with an XX deduction of $10.00-. If the original deduction met the limit for
the deduction maximum, then the REGULAR timesheet will have also have an XX
deduction of $10.00.
Example Two:
If Deduction code XX was set to
withhold $10.00/week-ending at the time the original check was issued, but has
been changed since then to withhold $25.00/week-ending, then the VOID check
will be processed with an XX deduction of $10.00-. The REGULAR timesheet will have an XX deduction of $25.00.
(5) If, for
the same week-ending worked date, you have a PRE-PAID check and a REGULAR
timesheet, then the amount of the deduction entered on the PRE-PAID will be
included as a part of the calculation for that week’s deduction from the
REGULAR timesheet.
Example One:
Deduction code XX is currently
set up to withhold $25.00/period-ending. PRE-PAID check has an XX deduction of
$5.00. The REGULAR timesheet will have
an XX deduction of $20.00.
Example Two:
Deduction code XX is currently
set up to withhold $25.00/period-ending.
The maximum deduction allowed amount for XX has not been met, but the “to-date”
amount withheld to-date is only $2.00 short of the maximum allowed amount. The PRE-PAID check has an XX deduction of
$5.00 (which must be withheld, because the amount was keyed during in
the entry of the pre-paid check). The
REGULAR timesheet will not have an amount withheld. Since the $5.00 withheld on the PRE-PAID exceeds the maximum
allowed for deduction XX by $3.00. This
$3.00 will be refunded automatically for deduction XX during the next
payroll process.
(6) If a one-time deduction
(entered during timesheet entry), is a garnishment or pre-tax
deduction, it must have been previously set up just as recurring deductions
are, otherwise you will get a “terminal” error in the timecard batch.
(7) Throughout this document NET is calculated as GROSS minus
EMPLOYEE-PAID TAXES (taking into account pre-tax deductions) minus the total
dollars of DEDUCTION CODE(S) entered in the
“Deductions Used in Net Pay Calculations” field below.
HOW TO ADD OR CHANGE A DEDUCTION
(If this
deduction is a garnishment, then you must have already created an Accounts
Payable vendor code before you begin entry of the employee’s garnishment
deduction. The system will REQUIRE a
valid A/P vendor during data entry.)
To
begin, on the “PayBill Library Master Files: Data Entry of …” menu, click [Employee
Deductions].
The
screen will display:
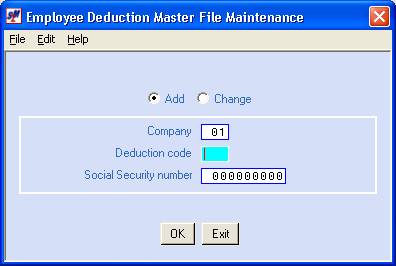
Add or
Change:
Defaults to add. If you wish to change a deduction already
set up for an employee, click once on change to select (a black dot will appear
next to your selection).
Company
Code:
Defaults to company
01. If you wish to work with deductions
for an employee in a different company, key the desired company number.
Deduction
Code:
Key the desired (valid)
deduction code. This code must have
been previously set up as valid using the Payroll Distribution option on the
Maintenance menu.
Social
Security Number:
Key the social security number
of the employee.
To NOT proceed, click [Exit]. You will be returned to the “PayBill Library
Master Files: Data Entry of …” menu.
To proceed, click [OK].
The screen will display:
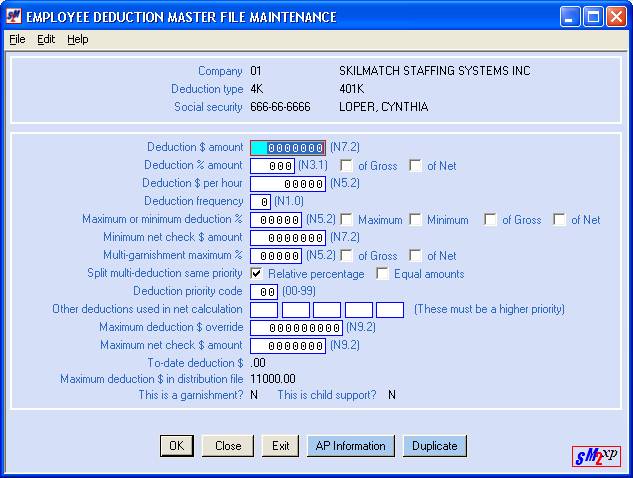
You may choose between deducting a FLAT DOLLAR
amount, a PERCENT or an AMOUNT PER HOUR.
You may only select one of these. (If you are going to
use the MAXIMUM NET CHECK $ AMOUNT field, then you must leave these fields
blank.)
Deduction $ Amount: (N7.2)
* N7.2 means numeric
field, seven numbers long, two numbers to the right of the decimal. $20.00 is entered as 2000.
If a
flat dollar amount is to be deducted, enter the specific amount to be deducted
from the combined week-ending worked date timecards during a payroll process.
-OR-
Deduction % Amount: (N3.1) of Gross / of Net:
* N3.1 means numeric
field, three numbers long, one number to the right of the decimal. 17.5% is entered as 175.
If a
percentage is to be deducted, enter the specific percentage to be deducted from
the combined week-ending worked date timecards during a payroll process.
If you enter a deduction
percent, you must also select whether this amount is to be a percentage of
GROSS or NET. If you did NOT enter a
deduction percent amount, leave this area blank.
-OR-
* N5.2 means numeric field, five numbers long, two numbers to the
right of the decimal. $.25/hour is
entered as 25.
If a dollar amount per hour is
to be deducted, enter the specific amount per hour to be deducted from each
hour worked in a payroll process.
* N1.0 means numeric field, one number long, no decimal place.
* This is a required entry; every deduction must have a frequency.
Select from 1, 2, 3, or 9.
“Frequency” refers to how often
a deduction should be withheld from an employee’s paycheck. Having a selection of frequencies allows you
to distinguish between deductions that are withheld from each payroll process
(like child support), from deductions that are withheld only monthly (like
health insurance), from deductions that are withheld quarterly or yearly (like
a United Way contribution).
During the “Begin Cycle”, the
deduction frequency for that payroll is established on the “Constant
File”. If this is the payroll where
health insurance deductions are to be withheld in addition to child support,
you may choose a deduction frequency code that withholds multiple deduction
frequencies within a single payroll - like deductions frequencies 1 and
2 (“every payroll” deductions and “monthly” deductions).
SkilMatch has defined the following deduction frequencies:
1
represents withhold from every payroll
9
means do not withhold
Your organization should
determine what deduction frequencies 2 and 3 represent:
2
might be monthly, and
3
could be quarterly
Maximum
or Minimum Deduction %: (N5.2)
Maximum/Minimum of Gross / of Net:
* N5.2 means numeric
field, five numbers long, two numbers to the right of the decimal.
* This is an optional entry; not every deduction will have this
parameter.
If the Deduction
Amount/Percent/Percent per hour selected earlier should not exceed a certain percentage of the gross or net check
amount, key the percent, <TAB>, select Maximum, <TAB>, and select
either Gross or Net.
Examples:
(1) deduction must not exceed 50% of the employee’s net
pay. Enter 5000, Maximum, Net.
(2)
deduction must not exceed 20% of the employee’s gross pay. Enter 2000, Maximum, Gross
If the Deduction
Amount/Percent/Percent per hour selected earlier should be at least a certain percentage of the gross or net check
amount, key the percent, <TAB>, select Minimum, <TAB>, and select
either Gross or Net.
Examples:
(1)
deduction must be at least 25% of the employee’s net pay. Enter 2500, Minimum, Net.
(2)
deduction must be at least 50% of the employee’s gross pay. Enter 5000, Minimum, Gross.
Minimum Net Check $ Amount: (N7.2)
* N7.2 means numeric
field, seven numbers long, two numbers to the right of the decimal.
* Other deductions could
further reduce the actual net of the
check.
* This is an optional
entry; not every deduction will have this parameter.
* You may NOT use this
field and the Maximum Net Check
Amount field listed below.
* This field can only be used for the deduction codes have been pre-defined as a garnishment using Menu PBMANT, Item Payroll G/L Distributions.
If the employee’s net check
amount must be at least a certain amount, key the amount.
Multi-Garnishment
Maximum %: (N5.2) of Gross
/ of Net:
* N5.2 means numeric
field, five numbers long, two numbers to the right of the decimal.
* This is an optional entry; not every deduction will need this option.
* This field can only be used for deduction codes that have been set
up as garnishments using Menu PBMANT, Item Payroll G/L Distributions.
If this employee has multiple garnishments
(not just multiple deductions, but multiple garnishments),
and the grand total of these
garnishments are not to exceed a certain percent of the employee’s gross or net
pay, key the percent.
* All garnishments must
be assigned the same percent. If garnishments are assigned different
percentages, then the system will use the percentage of the first code it comes
to (alphabetically by deduction code) for ALL garnishment deductions.
If you entered a
multi-garnishment maximum percent, select Gross pay or Net pay. If you did NOT enter a multi-garnishment
maximum percent, leave this area blank.
Split
Multi-Deduction Same Priority:
* This is an optional entry; not every deduction will have this
parameter.
* If garnishment deduction codes of the same priority are assigned
conflicting methods of split, then the system will use the Relative Percentage
method.
* This field can only be used for deduction codes that have been set
up as garnishments through Menu PBMANT, Item Payroll G/L Distributions.
Look at the next field for a description of PRIORITY. This split only occurs between deductions of the same priority.
If the employee has multiple
types of deductions to withhold, but the total amount of the deductions is more
than is allowed (because there is not enough net pay, or because of a deduction
restriction), then you may designate how much of each deduction type should be
withheld.
Select from either RELATIVE
PERCENTAGE or EQUAL AMOUNTS.
Relative percentage means
the system will withhold a portion of each deduction. Each deduction’s “portion” is based on the amount that would be
deducted if all amounts COULD be deducted.
Example: if a deduction of
$100.00 and a deduction of $200.00 (total $300) would be deducted if no
restrictions existed, but for “restricted reasons” total deductions must not
exceed $250.00, then the RELATIVE PERCENTAGE of the $100.00 deduction is 33.34%
and the RELATIVE PERCENTAGE of the $200.00 deduction is 66.66%. The $100.00 deduction becomes $83.35 (33.34%
of $250.00) and the $200.00 deduction becomes $166.65 (66.66% of $250.00).
Equal Amounts means
divide the available funds equally among all the deductions, not to exceed (for
any deduction) the original deduction amount if all amounts COULD be deducted.
Example: if a deduction of
$100.00 and a deduction of $200.00 (total $300) would be deducted if no
restrictions existed, but for “restricted reasons”, total deductions must not
exceed $250.00, then the $250.00 would be divided by 2 (2 deductions) or
$125.00 maximum for each deduction. One
deduction only needs $100.00 of its allocated $125.00, so the excess would go
toward the other deduction. Using EQUAL
AMOUNTS as the split, the $100.00 deduction becomes $100.00 and the $200.00
deduction becomes $150.00.
* This is an optional
entry field. Most deductions will have priority code 00.
* We recommend that
priority codes be assigned by tens (10, 20, etc.), allowing for insertion of
priorities higher or lower than this one, as well as reserving for room for
growth
Example: This deduction
might be a assigned a priority code of 50.
You can then assign a higher code of 55 to another deduction, or a lower
priority of 45 to another deduction.
“Priority” only comes into play
if the employee has multiple deductions and did not earn enough to withhold the
entire amount of all the deductions.
The “priority” code will rate the deduction by level of importance. The higher the priority the higher the
importance.
If the employee has multiple
deductions that are assigned the same priority code, then these will be
subjected to the SPLIT MULTI-DEDUCTION option selected above.
If this deduction is assigned a
priority code that is lower than other deductions, then the system will
withhold as much as possible of the higher priority deductions, before it
attempts to withhold those with a lower priority.
Enter a 2-digit number (00-99)
to indicate this deduction’s priority in relation to other deductions. (00=lowest, 99=highest). Be certain to leave room for higher
priority deductions! If you start with
90, you won’t be able to go much higher!
Example: An employee might have
child support garnishments that have been assigned the same priority. Garnishments with the highest priority
are processed first. Garnishments with
a lower priority might have be ignored by the system in order to prevent a
negative check calculation. You would
receive a report of these adjusted garnishments should the system be forced to
modify or ignore the amounts. However,
since NON-GARNISHMENT deductions are not adjusted automatically during check
calculation, these NON-GARNISHMENT deductions could result in the calculation
of a negative net check. If this occurs,
the system will issue a negative check message and report, and will require
manual intervention/adjustment before you can continue with payroll.
Other Deductions Used In Net Calculation:
* The deduction codes
entered in this field MUST have a higher priority than THIS deduction.
If you want other deductions to
figure into the calculation of the employee’s NET pay, key up to 5 deduction
codes. This will change the calculation
from the STANDARD calculation (described in the “Understanding Deductions”
section at the beginning of this document), to a customized calculation.
Maximum
Deduction $ Override: (N9.2)
* N9.2 means numeric
field, nine numbers long, two numbers to the right of the decimal. $150.00 is
keyed as 15000.
* Some maximums should NOT be set up in the distribution
file, but entered person-by-person (loans, for example).
If the distribution file for
this deduction code does NOT already have a pre-defined maximum deduction
amount, and you want to need to set a maximum for this employee, key the
maximum amount that should be withheld.
Any maximum set in the employee deduction file will OVERRIDE any
maximum in the distribution file.
You may prefer to set a maximum
in the distribution file (through Menu PBMANT, Item Payroll G/L Distributions)
rather than in the employee deduction file. For example: 401K maximum can be set up once in the distribution
file instead of being set up in each person's 4K deduction. Should the 401K maximum change, you could
make a single change that affects ALL employees by resetting the maximum in the
distribution file (through Menu
PBMANT, Item Payroll G/L Distributions) rather than having to reset
the maximum in each individual employee deduction record.
If this deduction code already
has a maximum deduction amount set up through Menu PBMANT, Item Payroll G/L
Distributions), and you want to override the
pre-defined maximum with a different amount, key the maximum that should be in
effect for this employee.
Maximum Net Check $ Amount: (N7.2)
* N7.2 means numeric
field, seven numbers long, two numbers to the right of the decimal. 150.00 is
entered as 15000.
* If you use this field,
you may NOT use the Minimum Net Amount
field, nor the AMOUNT/PERCENT/AMOUNT PER HOUR fields.
* This field can only be used for deduction codes that have been set up as garnishments through Menu PBMANT, Item Payroll G/L Distributions.
Before using this field, please
refer to the “Understanding Garnishments” section at the beginning of this
document for a review of the definition of NET PAY. This field can be used instead of the
AMOUNT/PERCENT/AMOUNT PER HOUR to determine a garnishment amount.
If you key an amount in this
field, then the system will calculate NET PAY for the employee paycheck; will
subtract the amount keyed in this field; and will use the remaining dollars as
the garnishment amount to withhold.
The employee’s eventual net
check can be affected by other deduction codes – this field affects the
calculation of just this one garnishment!
This information displays only;
changes are not allowed from this screen.
The amount displayed reflects the to-date dollars withheld for this
deduction for this employee. If you are
converting an employee who has existing to-date dollars, call SkilMatch for
further instructions.
Maximum Deduction $ In Distribution File:
This information displays only;
changes are not allowed from this screen.
This area displays the maximum deduction amount set up for this deduction
code through Menu PBMANT, Item Payroll G/L
Distributions.
This Is
A Garnishment/Child Support:
This information displays only;
changes are not allowed from this screen.
This area displays when the deduction is set up in the distribution file
(through Menu PBMANT, Item Payroll G/L
Distributions) as a garnishment or child support.
If this deduction is a garnishment,
you may set up Accounts Payable data for this deduction. Refer to Setting
up Accounts Payable Data for assistance.
If this is NOT a garnishment or
you do NOT wish to set up Accounts Payable data for this deduction, you may:
Proceed and add the displayed
deduction detail to the employee's file - click [OK].
Do NOT proceed; begin again -
click [Cancel]. You will return to the previous screen to
try again.
Do NOT proceed; return to the
“PayBill Library Master Files: Data Entry of …” menu, click [Exit].
If you wish to set up additional
deductions or change existing ones, follow the preceding steps.
When you have finished with this
option, click [Exit]. You will
be returned to the “PayBill Library Master Files: Data Entry of …” menu.
Setting up Accounts
Payable Data:
If this deduction is a
garnishment, then you are required to set up Accounts Payable. You should have created a vendor code and
file prior to creating this employee deduction.
The screen will display:
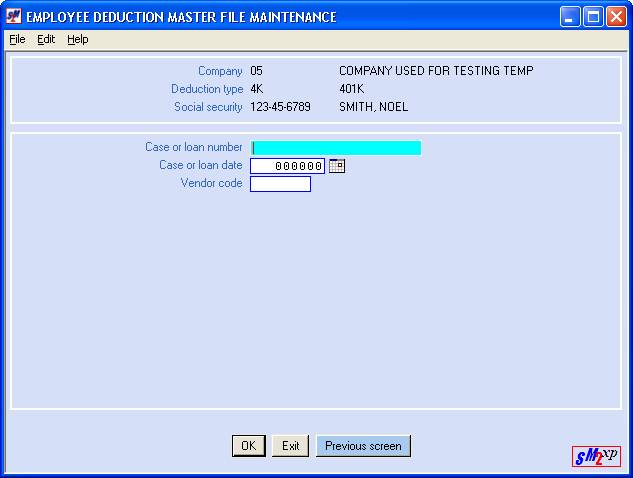
Enter up to 20 characters of the
case or loan number or some other description.
Enter a 6-digit case/loan date
or other deduction-type date. Format is
MMDDYY.
Vendor
Code:
Enter the 6-character A/P vendor code previously
created in the SkilMatch Accounts Payable.
WARNING: if
you interface with another A/P software package, then the SkilMatch vendor code
should be the EXACT match of the vendor code in the other A/P software package.
After keying the Vendor code,
you may:
Proceed and add the displayed
deduction detail to the employee's file - click [OK].
Do NOT proceed; return to the
previous screen, click [Previous Screen].
Do NOT proceed; return to the
“PayBill Library Master Files: Data Entry of …” menu, click [Exit].