EMPLOYEES
In SkilMatch, the basic difference between an ‘employee’ and an ‘applicant’ is the extra name and address fields and the tax data fields that are a part of an ‘employee’ record. A person may be added first as an ‘applicant’ and later upgraded to an ‘employee’ by simply going into the Employees menu option and adding the necessary tax information. The ‘applicant’ file contains the data used by the various search programs; the ‘employee’ file contains the taxing data necessary for payroll processing.
If you prefer to enter a person as an ‘applicant’ (without tax data), please refer to document Menu File Maintenance, Item Applicants
NOTE: Applicants cannot be placed on job orders.
The Employees menu option allows you to add a new employee to the system and make changes to existing employee records. You are restricted to adding and/or changing employee files that belong to the company number(s) to which you have been authorized.
NOTE: The feature ![]() “prompt and select” button throughout employee
entry allows users to access a list of
codes available for designated field. A
blank field is required for a full list of valid code options. If this field already contains a
character(s), the system will search by that character(s) and will give you a
sorted list based on the text in the field.
“prompt and select” button throughout employee
entry allows users to access a list of
codes available for designated field. A
blank field is required for a full list of valid code options. If this field already contains a
character(s), the system will search by that character(s) and will give you a
sorted list based on the text in the field.
NEW FOR 2020
W4: SkilMatch programming installed to enable NEW 2020 W4 compliance, allowing employees to calculate more accurate
withholdings. The NEW 2020 W4 allows
employees new tax setup options starting January 1, 2020 that will affect the
employee withholding during tax calculations.
Employees
are now able to elect the following new options on their W4 Form and will need
to be entered into their employee file:
1) Employees can now select new “Head of household” as a filing status
in Step 1 (Married and Single
options are still available).
2) Employees can check W4 Box 2 tax withholding for houses
with 2 jobs total in Step 2.
3) Employees can “Claim dependents” dollars in Step 3 to assist with withholding
calculations.
4) Employees can list “Other income” dollars in Step 4a to assist with withholding
calculations.
5) Employees can list “Deductions” in Step 4b to assist with withholding calculations.
NOTE: Employee “Extra
withholding” in Step 4c will use
the EXISTING Special FIT and FIT $ or % fields.
NOTE:
The NEW 2020 W4 no longer allows
option for employees to claim dependents for filing. This
is now handled on the 2020 W4 in Step 3 using dependent amount for tax
calculation.
If an
employee’s 2020 W4 fields (2, 3, 4a, 4b) contain data, the Dependents field in
employee file MUST BE 0 (zero
dependents). If data is entered in the Dependents
field during W4 entry, and data is also entered
in new
fields 2, 3, 4a and/or 4b, an error message will prevent you from proceeding
with entry.
WARNING:
You can NOT pay an employee
in 2019 with NEW 2020 W4 tax
setup. You will receive a warning
message during entry in employee file (entry of tax information allowed in
2019), but if you attempt to create a timesheet in a 2019 payroll the batch will
NOT pass edit.
REVIEW IRS WEBSITE
FOR FULL DETAILS: Visit this IRS website to understand
implementation, compliance responsibilities, logic and rules for the NEW 2020
W4 form for your current and future employees.
2020 W4 form: https://www.irs.gov/pub/irs-pdf/fw4.pdf
The following is a list of the different features described in this documentation:
How to Enter or Change an Employee
Last Name, First
Address
City, State, Zip
Area Code/Phone
Branch
Division
Status
Category
Home Location
Interviewer
Counselor
Interview Date
1, 2, 3, 4
Minimum $
Source
Education
Birth date
Parsed name fields
Spouse
Email address
Alternate
Emergency
Cell
Pager
Customized fields
Next date/code
Last date/code
EIN or SS#
2020 W4 Box 2
2020 W4 Step 3
2020 W4 Step 4a
2020 W4 Step 4b
Status
Dependents
Special FIT
FIT $ or %
SUTA
State
Local(s)
SDI
NA?
Today, Future, No Change
Available Date
HOW TO
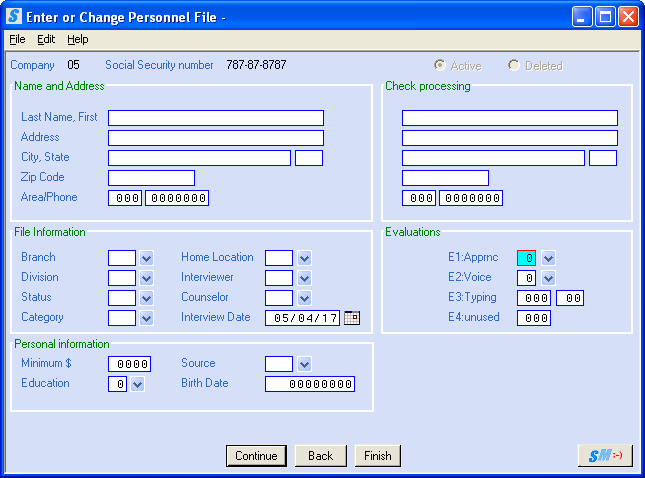
ENTER OR CHANGE AN EMPLOYEE
Change:
Making changes to existing employee files is very similar to adding new files. When you enter an existing social security number, rather than displaying a blank data entry screen, the system will display the person's current file.
With the employee file displayed, advance (tab or point and click) to the fields you wish to change. BE VERY CAREFUL NOT TO BLANK OUT FIELDS AS YOU MOVE THROUGH THEM.
When making changes to an employee file, you must click [Continue] or [Finish] to retain the changes made to the employee file. If you exit the employee file by clicking [Back], [Close], or [Exit] your changes will NOT be retained. If you select an option to exit without saving changes, a warning message will display.
(The
system keeps track of all permanent data entry changes in an employee
file: Every time the file is changed
through data entry, a comment is written to the person’s Activity Comment
screen. It is dated and timed, shows the
user making the change, and shows what the information was before and after the
change. These comments are designated as
“changes to file” comments and have a comment type of “#*”).
Delete:
Deleting an employee file is NOT allowed. Instead, you should use the social security number merge feature to transfer data from an incorrect number to one that is accurate. The system will not allow you to delete/remove a person in social security merge who has earnings in the current year.
If a person has been paid under the wrong social security number, or, if a person is in the system multiple times (with 2 or more social security numbers), you should process a social security number merge to merge the data from the incorrect social security number file into a file using the correct social security number. (Please refer to online documentation, Library Pay and Bill, Menu End-of-Year, Item Go to Social Security Merge Processing).
NOTE: Employees with a status of ‘D’ (Do not
use) or ‘F’ (File and Forget) cannot be added to Job orders. We recommend you change employees to one of
these status codes to prevent them accidentally being paid.
NOTE: Only one person may access an employee file
at a time for purposes of making changes.
Add/Change:
To begin, select the [File Maintenance] menu in the Pay and Bill library.
Select [Employees].

The screen will display:
Enter A Company Number:
The system will default to Company 01. To enter/change an employee file in another company, key the desired Company Number.
OR
Starting with a blank field, select a Company
Number by clicking the ![]() button (prompt and select) to choose from a
full list of valid Company Numbers.
button (prompt and select) to choose from a
full list of valid Company Numbers.
NOTE: The feature ![]() “prompt and select” button throughout employee
entry allows users to access a list of
codes available for designated field. A
blank field is required for a full list of valid code options. If this field already contains a character(s),
the system will search by that character(s) and will give you a sorted list
based on the text in the field.
“prompt and select” button throughout employee
entry allows users to access a list of
codes available for designated field. A
blank field is required for a full list of valid code options. If this field already contains a character(s),
the system will search by that character(s) and will give you a sorted list
based on the text in the field.
The screen will display:

When you see the company code you wish to use, either <DOUBLE-CLICK> on the description, or highlight and click [Select]. If you do not see the company code and the [PageDn] button is not grayed out, then click [PageDn] to view more. When you get to the end, [Top] will start the selections over again. If you page down past a screen of selections, and wish to go back a screen, then click [PageUp]. To not select a code, click [Close].
NOTE: You are restricted to adding and/or changing
employee files that belong to the company number(s) to which you have been
authorized.
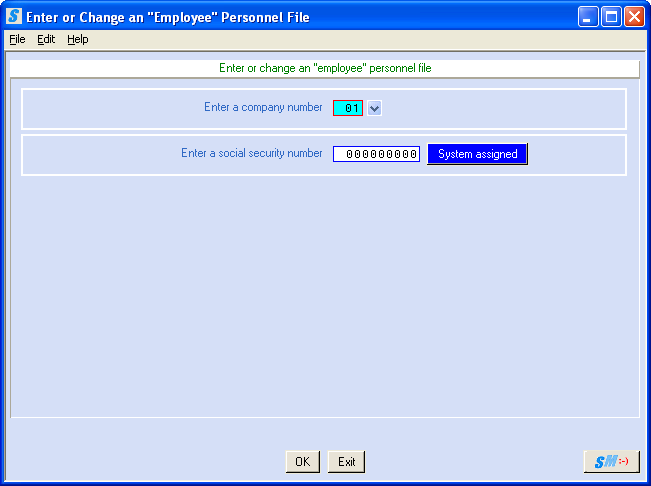
Enter A Social Security Number:
Key the social security number of the person you wish to add/change. Remember, only one person can work with an employee file at a time. If someone is making a change to the person’s file, you will be denied access to the file until the other person is finished.
NOTE: If you are adding a
special employee file for "Open order", “Cancelled order”, “Unfilled
order”, etc… the social security number
must be less than 10,000 (000-00-9999 or lower).
NOTE: If you are adding a
special employee file for anything other than "Open order",
“Cancelled order”, “Unfilled order” (like non-employees or vendors who are
being paid through the payroll, or non-employees who have images-like
timesheets or maps attached to their file), the social security number must be
between 10,000 and 99,999. (000-01-0000
through 000-09-9999)
System Assigned:
Auto-creation of ‘social security numbers’ – You may now have the system assign a ‘social security number’ (SSN) to an applicant or employee file. While this feature is intended for use in the new Applicant Tracking System (ATS), and the new SkilMatch interface ATS.connect, it can also be used outside ATS in your real database of employees.
WARNING: This feature
is designed for Applicant Tracking System (ATS/ATS.connect)
interface and is NOT recommended for a real payroll company. You would not want to discover at the end of
a year that you have been paying an employee with an “assigned” number rather
than a real social security number (SSN).
A social security merge will need to be processed if a system assigned
number is used and an employee needs to be changed to a valid SSN.
During data entry, instead of keying a real SSN, click the [System Assigned] button. If the company number displayed has been set up to allow this feature, or is an ATS or ATS.connect company, then the system will assign a unique number greater than 10000.
NOTE: If you want to use the “system assigned” SSN feature in a regular payroll company, it must be activated in the Payroll System Requirements file.
To cancel and return to the main menu, click [Exit].
OR
To proceed with entering/changing the employee file, click [OK].
If the social security number is already on file and if you are allowed to make file “changes” from this option, the system will display the file that belongs to the social security number entered.
OR
If the social security number is not on file, the screen will display a new blank employee file to be completed:
Active/Deleted:
This area is grayed out.
You are not allowed to delete an employee file. If the social security has been entered
incorrectly, this record can be ‘merged’ over to a correct social security
number.
NOTE:
If this is a NEW file and you see the social security number has been
keyed “incorrectly” for a new employee, click [Back] to exit without saving the file
and repeat the above steps with the correct social security number. At anytime during the creation of this
employee file, you can exit without saving the information keyed. However, once you select [Finish], the data will be saved to the new employee file and the only
way to change employee data to correct SSN is through a SS merge.
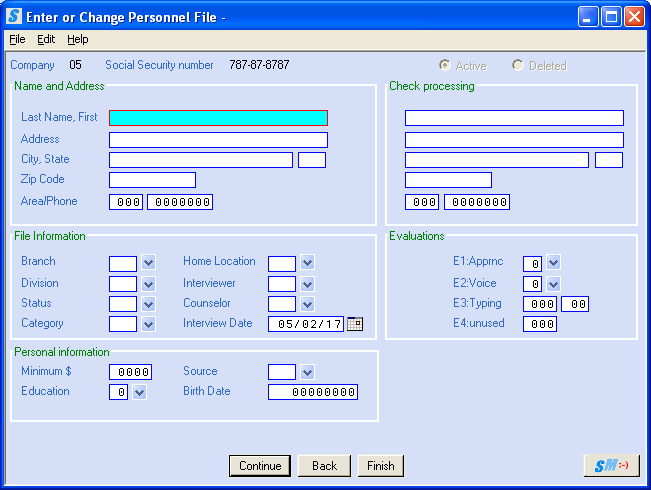
(REQUIRED) Key up to 25 characters of the last name and the name the person prefers to be called.
(William may prefer to be called Bill, Margaret may prefer Peggy, or the person may go by their middle name – James Douglas may go by Doug). This name will be used for search purposes, and will print on some reports, but will not be used for printing payroll checks, customer invoices, SUTA or W-2 reporting.
To follow postal regulations, DO NOT TYPE PERIODS in a person’s name.
Key the name using the following format:
Last name (comma) (space) first name
OR
Last name (comma) (space) nickname
Examples:
Smith, William
Smith, Bill
If the person has a family name, key the designation AFTER the First Name, otherwise the name will not alphabetize correctly on reports:
Smith, Bill Jr (Omit punctuation)
Smith, Bill III (Omit punctuation)
If there is another space keyed after the FIRST name, then the system will consider this a MIDDLE name.
Example:
Smith, Mary Jane (Smith is the LAST NAME, Mary is the FIRST NAME, and JANE is the MIDDLE NAME)
Address (left side):
Key the person’s residential address (where the person lives). The address entered will be used for dispatching. To follow postal regulations, OMIT PUNCTUATION AND USE STANDARD POSTAL ABBREVIATIONS in an address.
City (left side):
Key the person’s city of residence. The city entered will be used for dispatching. To follow postal regulations, OMIT PUNCTUATION AND USE STANDARD POSTAL ABBREVIATIONS in an address.
(If you are entering several employee files, one after the other, the city used for the previous entry will be displayed. You may leave the city as shown, or key the correct city.)
State (left side):
Key the person’s state of residence. The state entered will be used for dispatching. To follow postal regulations, key the proper state abbreviation and OMIT PUNCTUATION.
(If you are entering several employee files, one after the other, the state used for the previous entry will be displayed. You may leave the state as shown, or key the correct state.)
Zip Code (left side):
Key the residential address zip code. The zip code entered will be used for dispatching. To follow postal regulations, use the 9-digit zip code if known (entered without punctuation).
Area Code (left side):
Key the area code of the person’s primary phone number.
(If you are entering several employee files, one after the other, the area code used for the previous entry will be displayed. You may leave the area code as shown, or key the correct area code.)
Phone (left side):
Key the person’s primary phone number. Omit punctuation (do not insert a dash).
Last Name, First (right side/check processing):
The name keyed in this area should match the name on the employee’s social security card. This name will print on paychecks, W-2s and customer invoices.
OR
If this name is exactly the same as the name keyed in the left-side name area, leave this area blank and the system will copy the left-side name into this area for you.
Address (right side/check processing):
If paychecks and W-2s are to be mailed to the same address keyed in the left-side address area, leave this area blank and the system will copy the left-side address to this area for you.
OR
Key the person’s mailing address. To follow postal regulations, OMIT PUNCTUATION AND USE STANDARD POSTAL ABBREVIATIONS in an address.
City (right side/check processing):
If paychecks and W-2s are to be mailed to the same city keyed in the left-side city area, leave this area blank and the system will copy the left-side city to this area for you.
OR
Key the mailing address city. To follow postal regulations, OMIT PUNCTUATION AND USE STANDARD POSTAL ABBREVIATIONS in an address.
State (right side/check processing):
If paychecks and W-2s are to be mailed to the same as the state keyed in the left-side state area, leave this area blank and the system will copy the left-side state to this area for you.
OR
Key the mailing address state.
Zip Code (right side/check processing):
If paychecks and W-2s are to be mailed to the zip code keyed in the left-side zip code area, leave this area blank and the system will copy the left-side zip code to this area for you.
OR
Key the mailing address zip code. The zip code entered will appear on paychecks and W-2s. To follow postal regulations, use the 9-digit zip code if known (entered without punctuation).
Area Code (right side):
Phone (right side):
The area code and phone number keyed on the right side generally go with the address on the right side. If both the left and right side addresses are identical, then you may use this as a second phone number. (Remember that the next screen of data entry has designated fields for alternate, emergency, cell and pager phone numbers.)
OR
If the area code of the person’s secondary phone number is exactly the same as the area code keyed in the left-side area code area, leave this area blank and the system will copy the left-side area code to this area for you.
(REQUIRED) Key the Branch office where this person registered.
(If you are entering several employee files, one after the other, the Branch office used for the previous entry will be displayed. You may leave the Branch office as shown, or key the correct Branch office.)
OR
Starting with a blank field, select a Branch by
clicking the ![]() button (prompt and select) to choose from a
full list of valid Branch codes.
button (prompt and select) to choose from a
full list of valid Branch codes.
The screen will display:
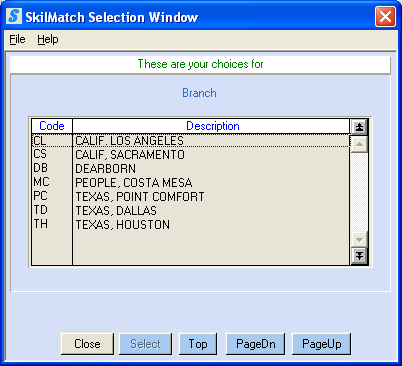
When you see the code you wish to use, either <DOUBLE-CLICK> on the description, or highlight and click [Select]. If you do not see the code and the [PageDn] button is not grayed out, then click [PageDn] to view more. When you get to the end, [Top] will start the selections over again. If you page down past a screen of selections, and wish to go back a screen, then click [PageUp]. To not select a code, click [Close].
Division:
(REQUIRED) The Division, if used according to SkilMatch standards, reflects the type of position a person is seeking (office clerical, industrial, technical, etc.).
Key a valid Division code.
OR
Starting with a blank field, select a Division code
by clicking the ![]() button (prompt and select) to choose from a
full list of valid Division codes.
button (prompt and select) to choose from a
full list of valid Division codes.
The screen will display:
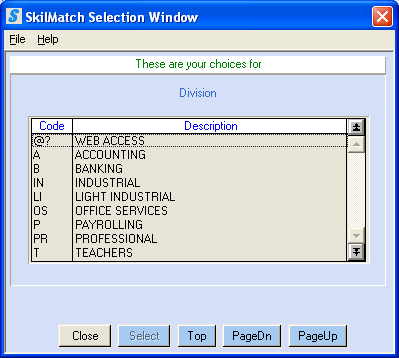
When you see the code you wish to use, either <DOUBLE-CLICK> on the description, or highlight and click [Select]. If you do not see the code and the [PageDn] button is not grayed out, then click [PageDn] to view more. When you get to the end, [Top] will start the selections over again. If you page down past a screen of selections, and wish to go back a screen, then click [PageUp]. To not select a code, click [Close].
Status:
(REQUIRED) The Status, if used according to SkilMatch standards, should reflect the job-seeking status of a person (active, inactive, do not use, and more). This is NOT the area in which to track day-to-day availability.
NOTE: Employees with a status of ‘D’ (Do not
use) or ‘F’ (File and Forget) cannot be added to Job orders.
Key a valid Status code.
OR
Starting with a blank field, select a Status code
by clicking the ![]() button (prompt and select) to choose from a
full list of valid Status codes.
button (prompt and select) to choose from a
full list of valid Status codes.
The screen will display.
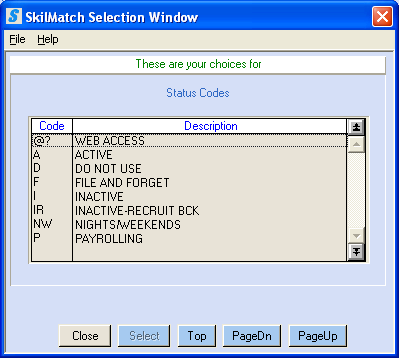
When you see the code you wish to use, either <DOUBLE-CLICK> on the description, or highlight and click [Select]. If you do not see the code and the [PageDn] button is not grayed out, then click [PageDn] to view more. When you get to the end, [Top] will start the selections over again. If you page down past a screen of selections, and wish to go back a screen, then click [PageUp]. To not select a code, click [Close].
Category:
(REQUIRED) The Category, if used according to SkilMatch standards, should reflect the general kind of position a person is seeking (secretarial, accounting, skilled labor, unskilled labor, etc.).
Key a valid Category code.
OR
Starting with a blank field, select a Category code
by clicking the ![]() button (prompt and select) to choose from a
full list of valid Category codes.
button (prompt and select) to choose from a
full list of valid Category codes.
The screen will display:
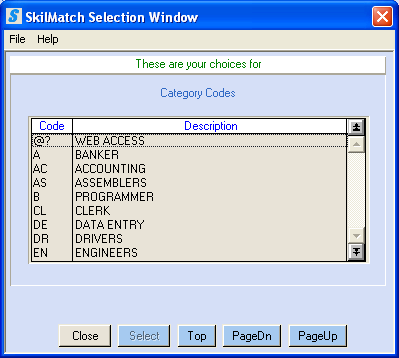
When you see the code you wish to use, either <DOUBLE-CLICK> on the description, or highlight and click [Select]. If you do not see the code and the [PageDn] button is not grayed out, then click [PageDn] to view more. When you get to the end, [Top] will start the selections over again. If you page down past a screen of selections, and wish to go back a screen, then click [PageUp]. To not select a code, click [Close].
Home Location:
(REQUIRED) The Home location, if used according to SkilMatch standards, should reflect the area where the person lives (not were they are willing to work). The information entered will assist you in filling orders by allowing you to search for people who live in a specific area.
Key a valid Home Location code
OR
Starting with a blank field, select a Home Location
code by clicking the ![]() button (prompt and select) to choose from a
full list of valid Home Location codes.
button (prompt and select) to choose from a
full list of valid Home Location codes.
The screen will display:
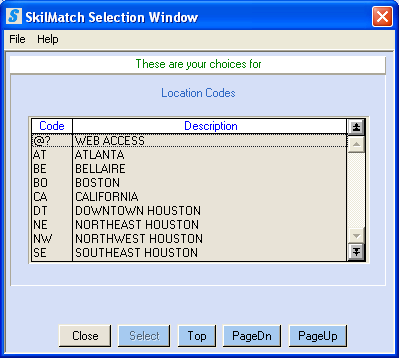
When you see the code you wish to use, either <DOUBLE-CLICK> on the description, or highlight and click [Select]. If you do not see the code and the [PageDn] button is not grayed out, then click [PageDn] to view more. When you get to the end, [Top] will start the selections over again. If you page down past a screen of selections, and wish to go back a screen, then click [PageUp]. To not select a code, click [Close].
Interviewer:
(REQUIRED) The Interviewer, if used according to SkilMatch standards, should reflect the staff person who conducted the interview. The information entered will be used in some reports (interviewer summary report, gross profit reports sorted by interviewer, etc.).
Key a valid Interviewer code.
OR
Starting with a blank field, select an Interviewer
code by clicking the ![]() button (prompt and select) to choose from a
full list of valid Interviewer codes.
button (prompt and select) to choose from a
full list of valid Interviewer codes.
The screen will display:
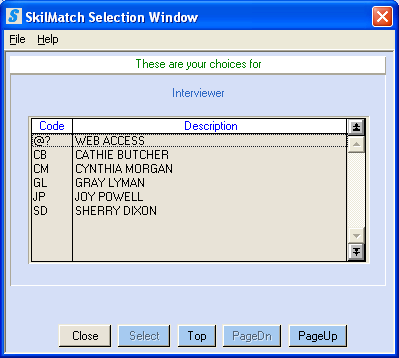
When you see the code you wish to use, either <DOUBLE-CLICK> on the description, or highlight and click [Select]. If you do not see the code and the [PageDn] button is not grayed out, then click [PageDn] to view more. When you get to the end, [Top] will start the selections over again. If you page down past a screen of selections, and wish to go back a screen, then click [PageUp]. To not select a code, click [Close].
Counselor:
If your organization assigns a Counselor to each employee, then you will use this area. Generally a Counselor is assigned only if you have staff that do direct hire placements only. If your employees are not assigned to work with specific staff member, then the Counselor should reflect the staff member who “is responsible” for the person. This information is for display purposes only. It will not be used in any search nor will it be used in reports (unless this information is used in custom reports).
Key a valid Counselor code.
OR
Starting with a blank field, select a Counselor
code by clicking the ![]() button (prompt and select) to choose from a
full list of valid Counselor codes.
button (prompt and select) to choose from a
full list of valid Counselor codes.
The screen will display:
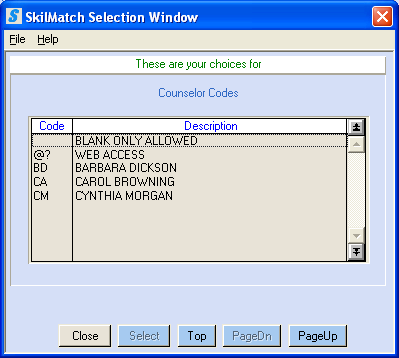
When you see the code you wish to use, either <DOUBLE-CLICK> on the description, or highlight and click [Select]. If you do not see the code and the [PageDn] button is not grayed out, then click [PageDn] to view more. When you get to the end, [Top] will start the selections over again. If you page down past a screen of selections, and wish to go back a screen, then click [PageUp]. To not select a code, click [Close].
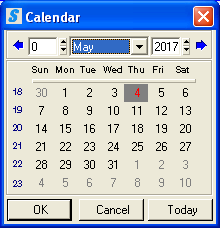
Interview
Date:
The interview date, if used according to SkilMatch standards, should reflect the date the person was interviewed or the person’s application date (your organization should define this for you). The information entered may be used in reports (interviewer summary report, etc.).
The interview date will default to today’s date.
OR
The date may be keyed in MMDDYY format (without punctuation).
OR
Select date by
clicking the ![]() button (prompt and select) to the right of
dates and a calendar will display from which you may click on a date to select,
and then click [OK] to bring the calendar date
into the date field.
button (prompt and select) to the right of
dates and a calendar will display from which you may click on a date to select,
and then click [OK] to bring the calendar date
into the date field.
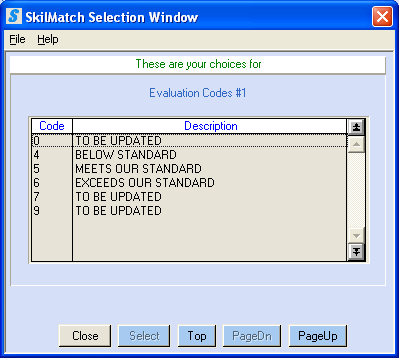
There are 4 areas for evaluation of employees. Each of the E1-E4 headings can be customized by your organization to better define what is being evaluated. These headings are created on the Codes menu, User Defined Headings.
Sample data entry screen with customized
Evaluation headings:
E1: Eval 1
(i.e. Apprnc – Appearance):
(Your organization may have selected a customized heading to display rather than “Eval 1/Apprnc”)
Evaluation 1 is an optional area that, if used, is “user defined”. Your organization defines what is being evaluated, and what your selections will be. Examples might be image (appearance), quality of speaking voice, attitude, overall internal grading score, and more.
Key a valid Evaluation code.
OR
Starting with a blank field, select an Evaluation
code by clicking the ![]() button (prompt and select) to choose from a
full list of valid Evaluation 1 codes.
button (prompt and select) to choose from a
full list of valid Evaluation 1 codes.
The screen will display:
When you see the code you wish to use, either <DOUBLE-CLICK> on the description, or highlight and click [Select]. If you do not see the code and the [PageDn] button is not grayed out, then click [PageDn] to view more. When you get to the end, [Top] will start the selections over again. If you page down past a screen of selections, and wish to go back a screen, then click [PageUp]. To not select a code, click [Close].
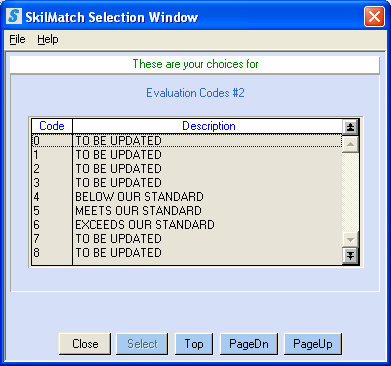
E2: Eval 2
(i.e. Voice):
(Your organization may have selected a customized heading to display rather than “Eval 2”)
Evaluation 2 is an optional area that, if used, is “user defined”. Your organization defines what is being evaluated, and what your selections will be. Examples might be image (appearance), quality of speaking voice, attitude, overall internal grading score, and more.
Key a valid Evaluation code
OR
Starting with a blank field, select an Evaluation
code by clicking the ![]() button (prompt and select) to choose from a
full list of valid Evaluation 2 codes.
button (prompt and select) to choose from a
full list of valid Evaluation 2 codes.
The screen will display:
E3: Eval 3
(i.e. Typing):
(Your organization may have selected a customized heading to display rather than “Eval 3”)
Evaluation 3 is an optional area that, if used, is “user defined”. Your organization defines what is being evaluated. Evaluation 3 has two areas – one holds 3 numbers (0-999) and the second area holds 2 numbers (0-99). It is typically used for typing score with number of errors or years of experience/years in specialty. Your organization should define the use of this area and valid options for you.
Key an Evaluation 3 figure.
E4: Eval 4
(i.e. unused):
(Your organization may have selected a customized heading to display rather than “Eval 4”)
Evaluation 4 is an optional area that, if used, is “user defined”. Your organization defines what is being evaluated. If this area is being used, you may select from 0 to 999. Your organization should define the use of this area and valid options for you.
Key an Evaluation 4 figure.
Minimum $, if used according to SkilMatch standards, should reflect the lowest pay amount a person is willing to accept. The information entered will assist you in filling orders by allowing you to search for people who have salary requirements less than a specific amount or within a specific range. This area may reflect an hourly, monthly, or annual rate; however, it is important that the compensation reflected in this area be consistent throughout your company. Your organization should define this for you.
Key the minimum compensation required by this person. Do not key a decimal point, but do key zeroes to hold decimal places. (Example: $10.00 keyed as 1000; $15.50 keyed as 1550).
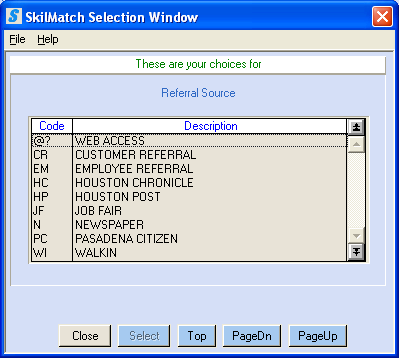
Source:
(REQUIRED) The Source, if used according to SkilMatch standards, should reflect how this person became aware of your organization. The information entered may be used in reports (sources summary report, advertising sources report).
Key a valid Source code
OR
Starting with a blank field, select a Source code
by clicking the ![]() button (prompt and select) to choose from a full
list of valid Source codes.
button (prompt and select) to choose from a full
list of valid Source codes.
The screen will display:
When you see the code you wish to use, either <DOUBLE-CLICK> on the description, or highlight and click [Select]. If you do not see the code and the [PageDn] button is not grayed out, then click [PageDn] to view more. When you get to the end, [Top] will start the selections over again. If you page down past a screen of selections, and wish to go back a screen, then click [PageUp]. To not select a code, click [Close].
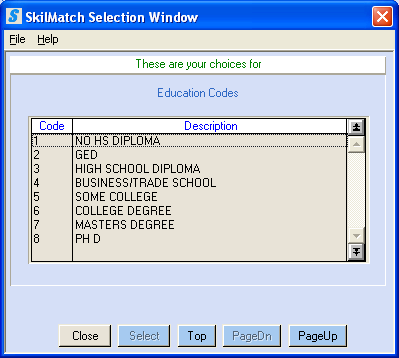
Education:
The education level should reflect the highest level of education attained by the person. The information entered will assist you in filling orders by allowing you to search for people who have education levels at or above a specific level.
Key a valid Education code
OR
Starting with a blank field, select an Education
code by clicking the ![]() button (prompt and select) to choose from a
full list of valid Education codes.
button (prompt and select) to choose from a
full list of valid Education codes.
The screen will display:
When you see the code you wish to use, either <DOUBLE-CLICK> on the description, or highlight and click [Select]. If you do not see the code and the [PageDn] button is not grayed out, then click [PageDn] to view more. When you get to the end, [Top] will start the selections over again. If you page down past a screen of selections, and wish to go back a screen, then click [PageUp]. To not select a code, click [Close].
Birth Date:
You may key all zeroes for the birth year if you do not wish to enter the actual year. When an employee file is displayed in Search, the birth year does not display. You do not have access to discriminatory information (age) when making hiring decisions.
The information entered may be used in reports. (The birthday report may be used to send birthday greetings to current employees or to send birthday greetings as a re-recruiting tool to previous employees. The employee list report can be used to identify 401K qualifiers, among other things).
The birth date must be keyed in MMDDYYYY format (without punctuation).
To proceed with data entry of this employee, click [Continue].
OR
To cancel without saving changes and return to main menu, click [Back]. A warning message will display, all information keyed to this point will NOT be saved.
OR
If this is an existing file being changed (not a new file), and the desired changes were made on this screen, you may click [Finish] to update the file with the change(s) and exit from this employee file.
If you select [Continue], the screen will display:
Explanation of First name and Last name:
When the person is first added, the system will automatically ‘parse’ the Last name and First name that was keyed on the LEFT side of the previous screen. It will disregard any middle name. If you decide to modify the parsed Last name or First name, these changes will be retained until a change is made to the left-side Name on the first page of the Employee file.
The system looks at placement of the comma and various spaces to determine which characters make up the Last name, the First name, and the middle name (if any). Example: SMITH, MARY ANN (Smith is the LAST name, Mary is the FIRST name, Ann is the MIDDLE name)
All characters to the left of the comma are considered the LAST NAME, regardless of any additional spaces.
Example: SMITH JONES, MARY ANN (Smith Jones is the LAST name, Mary is the FIRST name, Ann is the MIDDLE name)
Characters immediately following the comma/space, and up to another space, are considered the employee’s FIRST NAME.
Example: SMITH, MARY ANN (Smith is the LAST name, Mary is the FIRST name, and Ann is the MIDDLE name)
If there is another space, then the system will consider the remaining characters to be a MIDDLE NAME.
Example: SMITH, MARY ANN (Smith is the LAST name, Mary is the FIRST name, Ann is the MIDDLE name)
First Name:
The system will display the portion of the left-hand FIRST NAME area (keyed on first screen) that is after the comma/space. The left-hand name is automatically parsed (separated) into individual first and last names for mail merges and mailing labels. If you do want to use the name as it displays, you may change the First name. In the example above, the person may prefer to be called Mary Ann. The system will have disregarded the ANN as a middle name, so you must manually change the area to read Mary Ann. This name may also be in upper/lower case depending on the selection made in the Payroll System Requirements file.
Last Name:
The system will display the portion of the left-hand LAST NAME area (keyed on first screen) that is before the comma/space. The left-hand name is automatically parsed (separated) into individual first and last names for mail merges and mailing labels. This name may also be in upper/lower case depending on the selection in the Payroll System Requirements file.
Spouse:
If desired, you may keep the name of the employee’s spouse in this area. You may key up to 25 letters or numbers of the name.
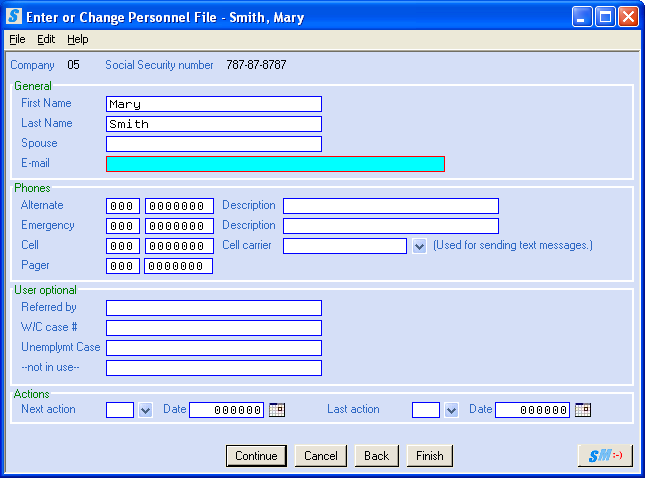
E-mail:
If desired, key the employee’s email address. This field is case-sensitive. If you display the email address while in the Name search, and if your system uses Outlook Express, then the system will open Outlook for you and the employee’s email address will have been brought over.
NOTE: Email can be included in reports and it is extremely useful to record this information if it is available.
NOTE-EOY Processing: The employee’s email is used in the distribution of Affordable Care Act Form 1095C. It will save you time and cost to include the employee’s email in their file.
Complete, if desired, the following phone number information about the employee.
Alternate/Description:
If desired,
key an alternate phone number for the employee.
Key the area code, then press <TAB> to
move to the 7-digit phone number field.
Do not key dashes or slashes in the phone number.
AND
Press <TAB> to key a description of this phone number (like Mrs. Jones, mother; or Betty
Smith, friend).
Emergency/Description:
If desired,
key an emergency phone number for the employee.
Key the area code, then press <TAB> to
move to the 7-digit phone number field.
Do not key dashes or slashes in the phone number.
AND
Press <TAB> to key a description of this phone number (like Mrs. Jones, mother; or Betty
Smith, friend).
Cell:
If desired, key the employee’s cell phone number. Key the area code, then press <TAB> to move to the 7-digit phone number field. Do not key dashes or slashes in the phone number.
Cell Carrier:
This option is used for the Text
Messaging Interface.
You must select from a full list
of valid cell carriers by clicking the ![]() button (prompt and select) to the right.
button (prompt and select) to the right.
REVIEW CAREFULLY, this function working properly depends on accurate information keyed into cell and cell carrier fields.
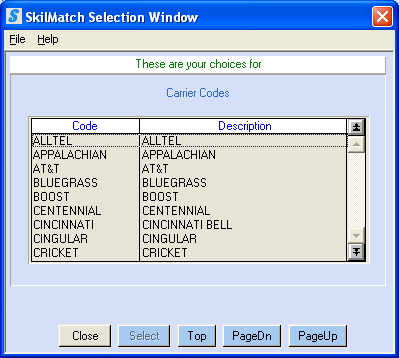
When you see the code you wish to use, either <DOUBLE-CLICK> on the description, or highlight and click [Select]. If you do not see the code and the [PageDn] button is not grayed out, then click [PageDn] to view more. When you get to the end, [Top] will start the selections over again. If you page down past a screen of selections, and wish to go back a screen, then click [PageUp]. To not select a code, click [Close].
Pager:
If desired, key the employee’s pager number. Key the area code, then press <TAB> to move to the 7-digit phone number field. Do not key dashes or slashes in the phone number.
USER
OPTIONAL (Applicant Optional 1-4)
Your organization may have selected customized headings to
display rather than “Appl User 1 – Appl User 4” that better describe the use of
the areas. These headings are created on
the menu Codes, item User Defined Headings.
NOTE: If your company has purchased the PSO (Pay Stub Online) and/or iWebTime interface and it is active on your system, the interface will use one of the User Optional fields to store the employee password that allows employees’ access to their records online. The field that contains the code SMWEBTMPW will be followed by a space and then the employee’s current password (i.e. SMWEBTMPW SAMPLEPW). The password is ONLY the SAMPLEPW portion.
Sample screen with customized User Optional headings:
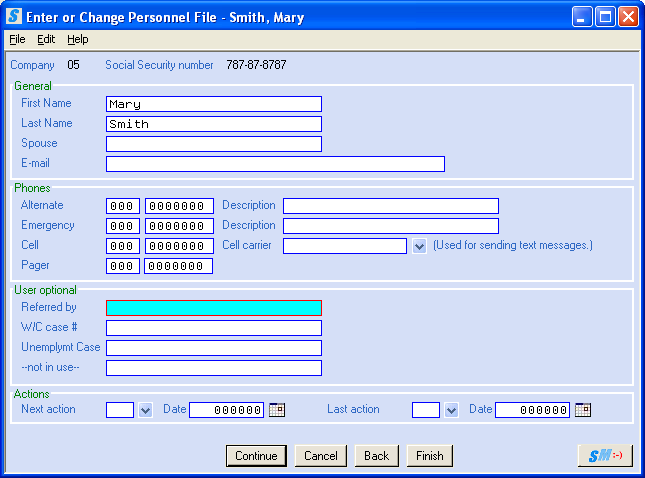
Appl User 1 (i.e. Referred by):
(Your organization may have selected a customized heading to display rather than “Appl User 1”)
Appl User 1, if used, means your organization has defined the use of this area and the information to be keyed in this area. Key up to 25 letters or numbers associated with the heading. (For example, if the heading reads REFERRED BY, then you should key the name of the person who referred the employee)
Appl User 2 (i.e. W/C case #):
(Your organization may have selected a customized heading to display rather than “Appl User 2”)
Appl User 2, if used, means your organization has defined the use of this area and the information to be keyed in this area. Key up to 25 letters or numbers associated with the heading. (See example listed in Appl User 1)
Appl User 3 (i.e. Unemplymt Case):
(Your organization may have selected a customized heading to display rather than “Appl User 3”)
Appl User 3, if used, means your organization has defined the use of this area and the information to be keyed in this area. Key up to 25 letters or numbers associated with the heading. (See example listed in Appl User 1)
Appl User 4 (i.e. -not in use-):
(Your organization may have selected a customized heading to display rather than “Appl User 4”)
Appl User 4, if used, means your organization has defined the use of this area and the information to be keyed in this area. Key up to 25 letters or numbers associated with the heading. (See example listed in Appl User 1)
Use the Last
and Next action dates and types to produce the Action
report (Library Search, Menu Employee Reports), or for visual reminders to take some type of action
with an applicant (Action report, AP708).
Next Action/Date - Last Action/Date:
If the date areas are left with all zeros (no date selected), then the code areas may be left blank also, even if “blank” is not a valid selection.
Key a valid Action code.
OR
Starting with a blank field, select an Action code
by clicking the ![]() button (prompt and select) to choose from a
full list of valid Action codes.
button (prompt and select) to choose from a
full list of valid Action codes.
The screen will display:
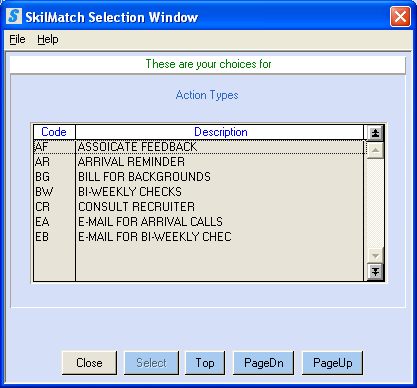
When you see the code you wish to use, either <DOUBLE-CLICK> on the description, or highlight and click [Select]. If you do not see the code and the [PageDn] button is not grayed out, then click [PageDn] to view more. When you get to the end, [Top] will start the selections over again. If you page down past a screen of selections, and wish to go back a screen, then click [PageUp]. To not select a code, click [Close].
Date:
The date may be keyed in MMDDYY format (without punctuation).
OR
Select date by
clicking the ![]() button (prompt and select) to the right of
dates and a calendar will display from which you may click on a date to select,
and then click [OK] to bring the calendar date
into the date field.
button (prompt and select) to the right of
dates and a calendar will display from which you may click on a date to select,
and then click [OK] to bring the calendar date
into the date field.
To proceed with data entry of this employee, click [Continue].
OR
To cancel without saving changes and return to main menu, click [Cancel]. All information keyed to this point will NOT be saved; you will receive a warning message.
OR
To view the previous screen before continuing, click [Back]. You will move to the previous screen while retaining the information keyed on this screen.
OR
If this is an existing file being changed (not a new file), and the desired changes were made on this screen, you may click [Finish] to update the file with the change(s) and exit from this employee file.
If you select [Continue], the screen will display:
You can use the system to track a variety of dates associated with an applicant/employee. The top section of this screen will display the dates that have been added to this employee’s file. The types of dates your organization tracks are pre-defined by management and added to the system though the Library Pay and Bill, Menu Maintenance, Item Date Tracking.
NOTE: The system allows you to run a report (SR341P)
on Date Tracking in Search library, Employee Reports Menu,
item Date Tracking.
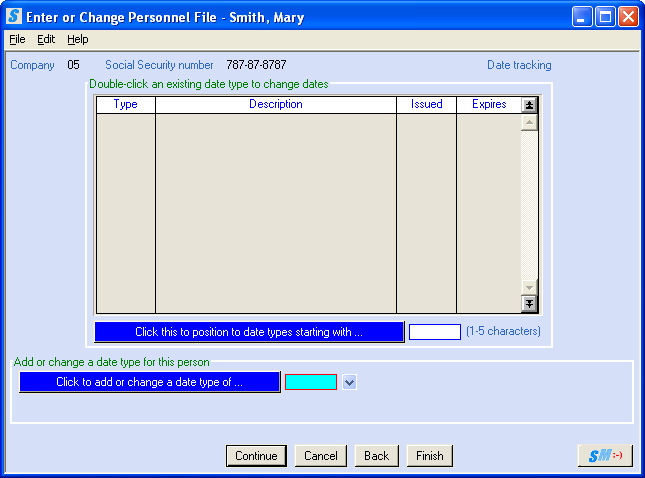
If the employee has more dates than there is room to display, you may move forward to the date type by keying 1-5 characters of the date type code you are looking for and clicking the blue button [Click this to position to date types starting with….] under the current list of date type and descriptions.
ADD OR CHANGE DATE TYPE FOR THIS PERSON
Click to Add or Change Date Type of…:
To add or change a Date Type for this employee, key a valid Date Type.
OR
Starting with a blank field,
select a Date Type by clicking the ![]() button (prompt and select) to choose from a
full list of valid Date Type codes.
button (prompt and select) to choose from a
full list of valid Date Type codes.
The screen will display:
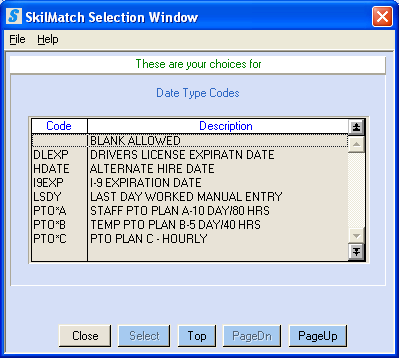
When you see the code you wish to use, either <DOUBLE-CLICK> on the description, or highlight and click [Select]. If you do not see the code and the [PageDn] button is not grayed out, then click [PageDn] to view more. When you get to the end, [Top] will start the selections over again. If you page down past a screen of selections, and wish to go back a screen, then click [PageUp]. To not select a code, click [Close].
Once the Date Type is selected, the screen will display:
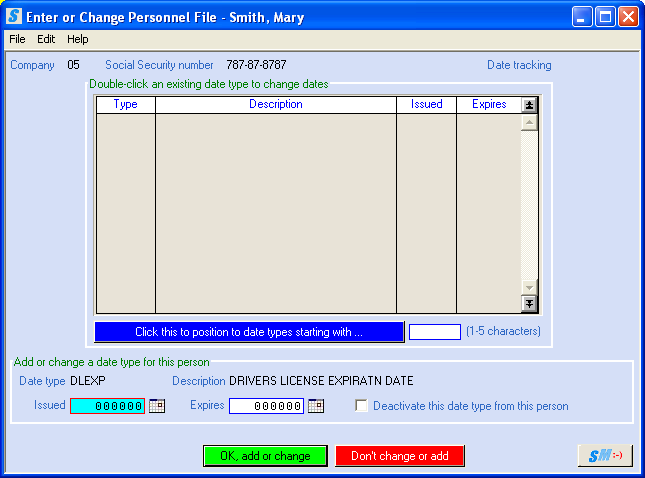
The system will display the date type and description you selected. The cursor is positioned at ISSUED.
Issued (date):
Many of the dates that are tracked on applicant/employees deal with licenses or certificates that are good for a designated time period. Other date types do not have a beginning and ending date, just a day of occurrence. Use the ISSUED date area to track either the date of issue, or date of occurrence.
The date may be keyed in MMDDYY format (without punctuation).
OR
Select date by
clicking the ![]() button (prompt and select) to the right of
dates and a calendar will display from which you may click on a date to select,
and then click [OK] to bring the calendar date
into the date field.
button (prompt and select) to the right of
dates and a calendar will display from which you may click on a date to select,
and then click [OK] to bring the calendar date
into the date field.
Expires (date):
If this date type has an expiration date, use this area to track this date. If this date type does not have an expiration date, leave this area blank.
The date may be keyed in MMDDYY format (without punctuation).
OR
Select date by
clicking the ![]() button (prompt and select) to the right of
dates and a calendar will display from which you may click on a date to select,
and then click [OK] to bring the calendar date
into the date field.
button (prompt and select) to the right of
dates and a calendar will display from which you may click on a date to select,
and then click [OK] to bring the calendar date
into the date field.
Deactivate this date type from this person:
If you no longer want to track this date type for this employee, check this box. This date type will no longer display in the employee’s file.
To cancel change or add for this date type, click [Don’t change or add]. You will go back to the Date Tracking screen.
OR
To add a new date type or to keep the changes made to this date type, click [OK, add or change]. Your add/change will be saved and you will be returned to the Date tracking screen.
REPEAT these steps to add or changed additional date types as necessary.
When you have finished adding or changing date types, choose one the options below:
To proceed with data entry of this employee, click [Continue].
OR
To cancel without saving changes and return to main menu, click [Cancel]. All information keyed to this point will NOT be saved; you will receive a warning message.
OR
To view the previous screen before continuing, click [Back]. You will move to the previous screen while retaining the information keyed on this screen.
OR
If this is an existing file being changed (not a new file), and the desired changes were made on this screen, you may click [Finish] to update the file with the change(s) and exit from this employee file.
If you chose to continue, the system will look to see whether or not Benefit Tracking is active for your organization. Benefit Tracking must be activated on the third screen of that company’s Payroll System Requirements File, located in the Pay and Bill library, File Maintenance menu, Payroll System Requirements option.
OR
If it is not active, the next screen to display will be the tax maintenance screen. Click here to move forward to the tax screen.
If benefit tracking is active, the following screen will display:
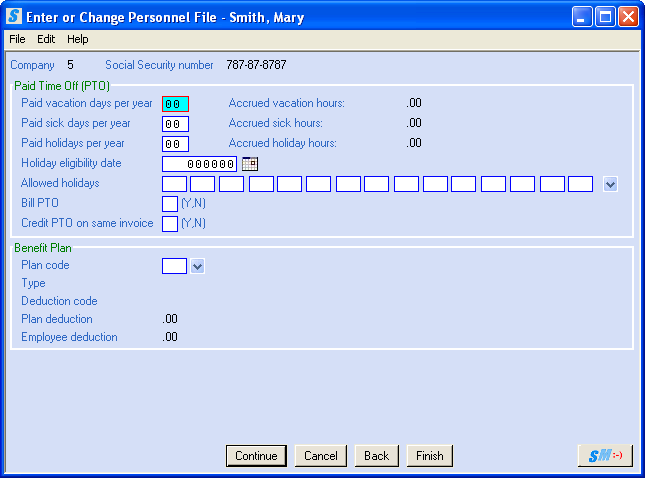
PAID TIME OFF
(PTO)
The system will display the number of days allowed to the employee and the number of hours accumulated toward the various paid time off benefits.
SkilMatch has added Paid Time Off (PTO) that accrues to
both the temp and staff payroll programs.
This is a totally separate function from the SkilMatch Bonus
programs. The PTO programs differ from
the Bonus programs in the following ways:
1) You predefine the exact holidays that you will pay.
2)
You designate,
by employee, the number of holidays, sick days, and vacation days to be paid
each year.
3)
This program
can automatically bill the customer, and optionally credit the customer the
same amount.
4)
Employees will accrue holiday, sick time and vacation time for each hour
worked, and calculation example below.
(The current SM bonus plan
determined eligibility based on ‘one-hour-worked-equals one-hour accumulated’.)
The accrual of PTO hours is based on the number of
PTO days allowed to an employee, the employee’s pay cycle code, the number of
hours worked in the pay cycle, and an annual work year of 2080 hours. Also, the system takes into account the paybill
history hours and looks at the total hours for a WE worked week. When an employee reaches their limit for a
pay cycle (i.e. 40 hours weekly, or 80 hours biweekly, 86.67 semi-monthly,
etc…), the system stops accruing PTO hours.
ACCRUAL
EXAMPLE:
This is for an employee paid Semi-Monthly getting 15 days of vacation
per year.
Hours per Year 52
weeks x 40 hours = 2080 hrs/yr
Vacation Hours Paid per Year 15
days X 8 hours = 120 vac hrs/yr
Worked Hours per Year 2080
hrs/yr – 120 vac hrs/yr = 1960 wk hrs/yr
Vacation Hours Accrued per Worked
Hour 120
/ 1960 = .06122 (rounds to 5 dec.)
Regular Hours for Semi Monthly
Employee 2080 hrs/yr DIV 24 pay periods = 86.67 hrs
Maximum # of Vacation Hrs that can
accrue per period 86.67 X .06122 = 5.3059 hrs
The PTO Programs are already installed and activate
on all customers’ systems. No additional
programming assistance is needed from SkilMatch.
Paid vacation days per year:
Key the number of days that the employee is eligible to be paid for vacation days. Key a number from 01-99.
Paid sick days per year:
Key the number of days that the employee is eligible to be paid for sick days. Key a number from 01-99.
Special Programming:
San Francisco (2007) - If you are subject to the San Francisco Paid Sick Leave act, you should key a 91 into this area.
(Please refer to the specific San Francisco Sick Leave instructions.)
California, Massachusetts and Oregon (2016) - special programs must be installed on your system for proper accrual, contact SkilMatch for assistance. (Please refer to the specific CA, MA, OR instructions for this option.)
Paid holidays per year:
Key the number of days that the employee is eligible to be paid for holidays. Key a number from 01-99.
Holiday eligibility date:
Key the first day the employee is eligible to receive a PTO holiday. The date may be keyed in MMDDYY format (without punctuation).
OR
Select date by
clicking the ![]() button (prompt and select) to the right of
dates and a calendar will display from which you may click on a date to select,
and then click [OK] to bring the calendar date
into the date field.
button (prompt and select) to the right of
dates and a calendar will display from which you may click on a date to select,
and then click [OK] to bring the calendar date
into the date field.
Allowed Holidays:
A set of codes representing valid holidays has been pre-defined for your organization (using the PayBill Library, File Maintenance Menu, Item Valid Holidays). Add the codes that this employee will be eligible to receive as a paid holiday.
Key a valid Holiday code.
OR
Starting with a blank field, select a Holiday code
by clicking the ![]() button (prompt and select) to choose from a
full list of valid Holiday codes.
button (prompt and select) to choose from a
full list of valid Holiday codes.
The screen will display:
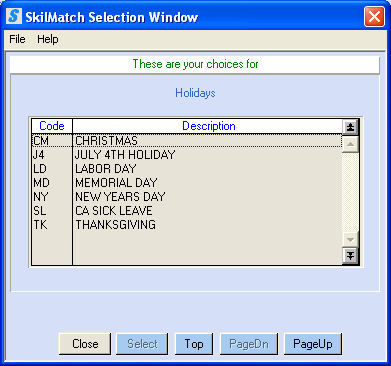
When you see the code you wish to use, either <DOUBLE-CLICK> on the description, or highlight and click [Select]. If you do not see the code and the [PageDn] button is not grayed out, then click [PageDn] to view more. When you get to the end, [Top] will start the selections over again. If you page down past a screen of selections, and wish to go back a screen, then click [PageUp]. To not select a code, click [Close].
Repeat until you have added all the appropriate Holiday codes.
Bill PTO (Y, N):
If you want the system to automatically bill the
customer for the PTO hours being paid, key Y. During payroll, if you pay PTO
hours, and if the employee’s Benefit screen indicated that the PTO should be
billed, then you will not have to key in billing information. The system will add the billing info to the
timecard for you.
OR
Key N (No) if you do not want the customer to be billed.
If the Benefits screen is active, an error message will display if this field is left blank. A Y (Yes) or N (No) must be keyed in this field.
Credit PTO on same invoice:
If you answered Y (Yes) to bill the PTO, and if you want the system to also automatically create a credit for that same billing, key Y. During payroll, if you are paying PTO hours, you will not have to enter credit information. The system will add a timecard to the merged timesheet file for the credit. Should you delete the pay timecard from the merged file, then the system will automatically delete the credit timecard as well.
Answering Y (Yes) to both the Bill PTO and Credit PTO will, in effect, demonstrate to the customer that you are indeed paying the benefit to the employee, but without ultimately billing the customer, since both the billing and the credit will appear on the same invoice.
OR
Key N (No) if you do not want the customer to be credited for the PTO hours.
If the Benefits screen is active, an error message will display if this field is left blank. A Y (Yes) or N (No) must be keyed in this field.
BENEFIT PLAN
If you are creating a new employee file, the benefit screen will be blank.
OR
If a plan already exists for this employee, then the details of the plan will be displayed for the plan code, including the associated deduction code and amount.
Example:
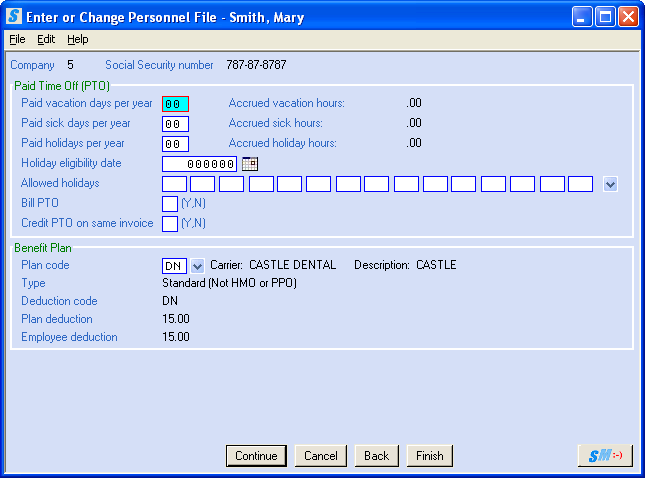
Plan code:
A set of codes representing the Health Benefit plans offered by your organization has been pre-defined (using the Pay and Bill Library, File Maintenance Menu, Item Health Benefit Plans).
If this employee will participate one of the Health Benefit plans, key a valid Health Benefit code of the plan.
OR
Starting with a blank field, select a Health
Benefit code by clicking the ![]() button (prompt and select) to choose from a
full list of valid Health Benefit codes.
button (prompt and select) to choose from a
full list of valid Health Benefit codes.
NOTE: When a health benefit code is selected and
saved in an employee file, a deduction records is “auto created by the system”
for the employee, to be withheld during payroll. This deduction can be accessed in Pay and
Bill Library, File Maintenance Menu, Item Employee Deductions. If you remove a plan code from an employee
file, the system will warn you that the deduction record for this employee will
be changed to a “9” frequency code so that it will no longer be withheld during
payroll.
The screen will display:
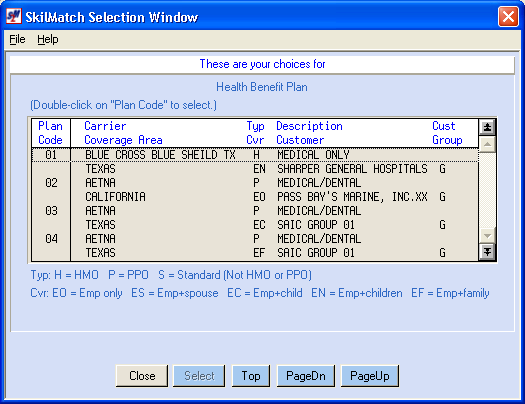
When you see the code you wish to use, either <DOUBLE-CLICK> on the description, or highlight and click [Select]. If you do not see the code and the [PageDn] button is not grayed out, then click [PageDn] to view more. When you get to the end, [Top] will start the selections over again. If you page down past a screen of selections, and wish to go back a screen, then click [PageUp]. To not select a code, click [Close].
After you have selected a Health plan for the employee (if appropriate), select from the following:
To proceed with data entry of this employee, click [Continue].
OR
To cancel without saving changes and return to main menu, click [Cancel]. All information keyed to this point will NOT be saved; you will receive a warning message.
OR
To view the previous screen before continuing, click [Back]. You will move to the previous screen while retaining the information keyed on this screen.
OR
If this is an existing file being changed (not a new file), and the desired changes were made on this screen, you may click [Finish] to update the file with the change(s) and exit from this applicant file.
If you select [Continue], the screen will display:
Previous Name:
This area can be used to record a person’s previous name (which may prove helpful when checking prior employment history). Position your cursor in this area with “point and click” or “shift + tab”. Key the desired information as directed by your organization.
(Your organization may have selected a customized heading to display rather than “U1:User 1”)
If used, your organization has defined the use of and the information to be keyed in this area. Your organization should define the use of this area for you.
NOTE: When an employee file is displayed in Search,
User 1 is the only User Defined code displayed.
Even though it does display, this information is not “searchable”
criteria and is not included in any SkilMatch reports. As a result, this area is rarely used.
Key a valid User 1 code.
OR
Starting with a blank field, select a User 1 code
by clicking the ![]() button (prompt and select) to choose from a
full list of valid User Defined 1 codes.
button (prompt and select) to choose from a
full list of valid User Defined 1 codes.
User Defined 2
– User Defined 4:
NOTE: When an employee file is displayed in Search,
User Defined 2, 3 and 4 will NOT be displayed.
This information is not “searchable” criteria and is not included in any
SkilMatch reports.
Since these areas are NOT selection criteria on any SkilMatch search option, your organization may be using them to store sensitive EEOC information. Please obtain information about the use of these areas from your management.
The system will not validate the entries, so be very careful to key the one-character codes selected by your management.
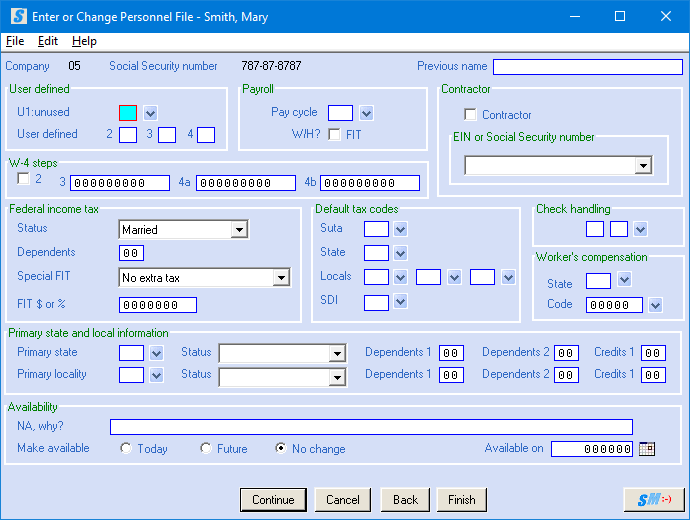
During the tax calculation part of a payroll process, an employee’s wages are “annualized”. If this G/L company has only one valid pay cycle, then the system will add the code to the employee automatically. If this G/L company has 2 or more valid pay cycle codes, then you must select a code to indicate how frequently an employee is paid (weekly, bi-weekly, monthly, etc).
Key the appropriate Pay Cycle for this person.
OR
Starting with
a blank field, select a Pay Cycle by clicking the ![]() button (prompt and select) to choose from a
full list of valid Pay Cycle codes.
button (prompt and select) to choose from a
full list of valid Pay Cycle codes.
The screen will display:
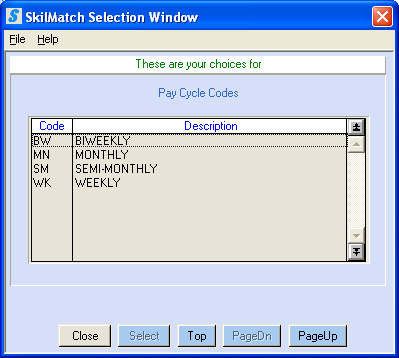
When you see the code you wish to use, either <DOUBLE-CLICK> on the description, or highlight and click [Select]. If you do not see the code and the [PageDn] button is not grayed out, then click [PageDn] to view more. When you get to the end, [Top] will start the selections over again. If you page down past a screen of selections, and wish to go back a screen, then click [PageUp]. To not select a code, click [Close].
Defaults to Yes (checked). If this person is to have federal income tax withheld, leave the checkmark displayed.
OR
If this person is exempt from FIT, click “Withhold FIT” once to remove the checkmark.
If this person is an independent contractor and responsible for paying his/her own taxes, and you wish to pay this person through payroll, click “Contractor” once. A checkmark indicates this person is a contractor and tells the system not to withhold taxes for this person. The system will NOT withhold any federal, state or local taxes, nor will it calculate FUTA or SUTA on any payroll processed. (Contractors will receive a 1099 rather than a W2)
OR
If this person is NOT an independent contractor, but an employee of your company, leave “Contractor” unchecked.
EIN or SS#:
IF you marked this person as a Contractor, then you must indicate the number entered in the social security number area is an Employee Identification Number (EIN) or a social security number.
Select EIN or Social
Security Number by clicking the ![]() button (prompt and select) to the right of the
field.
button (prompt and select) to the right of the
field.
NEW January 2020, W4 Steps 2, 3,
4a, 4b:
NOTE: If you are entering the
tax information for new 2020 W4 tax setup (fields 2, 3, 4a, 4b), you can NOT
have a figure in the Dependents field. NEW 2020 W4 replaces dependent option with Step 3 “Claim
Dependents” figure.
WARNING:
You can NOT pay an employee
in 2019 with 2020 W4 tax setup. You will
receive a warning message during entry in employee file (entry of tax
information allowed in 2019), but if you attempt to create a timesheet in a
2019 payroll the batch will NOT pass
edit.
2 / W-4 Form Step 2:
NEW 2020
W4. Select this option if employee checks the “Step 2 box” on the 2020 W4 form, a check
mark will appear in box 2.
NOTE: Select again if you want to unselect the option, the check mark will be removed.
NOTE: Step 2 box checked “Y” requires Dependents to be 0, warning
message will display.
3 / W-4 Form Step 3:
NEW 2020
W4. Key amount employee entered on Step 3 on the 2020 W4 form. NOTE:
Step 3 entry
requires Dependents to be 0, warning message will display.
Field has total of 9 digits, two spaces to the
right of the decimal, example: $100.00
keyed as 10000.
4a / W-4 Form Step 4a:
NEW 2020
W4. Key amount employee entered on Step 4a on the 2020 W4 form. NOTE:
Step 4a entry
requires Dependents to be 0, warning message will display.
Field has total of 9 digits, two spaces to the
right of the decimal, example: $100.00
keyed as 10000.
4b / W-4 Form Step 4b:
NEW 2020
W4. Key amount employee entered on Step 4b on the 2020 W4 form. NOTE:
Step 4b entry
requires Dependents to be 0, warning message will display.
Field has total of 9 digits, two spaces to the
right of the decimal, example: $100.00
keyed as 10000.
FIT Status:
NOTE: It is not necessary to complete
this area for contractors.
NEW 2020
W4. FIT now allows filing status of Head of household
starting in 2020.
Starting with
a blank field, select a status from the drop-down box by clicking the ![]() button (prompt and select) to the right of the
FIT Status. Select from Married, Single
and Head of household.
button (prompt and select) to the right of the
FIT Status. Select from Married, Single
and Head of household.
WARNING:
You can NOT pay an employee
in 2019 with 2020 W4 tax setup. You will
receive an error message during entry in employee file (entry of tax
information allowed in 2019), but if you attempt to create a timesheet in a
2019 payroll the batch will NOT pass
edit.
FIT Dependents:
Key the number of federal dependents the person claimed on the W-4. Employees with W4 forms for 2019 and before may continue to use dependents for tax calculations.
NEW 2020
W4 no longer allows
option for employees to claim dependents for filing. This
is now handled on the 2020 W4 in Step 3 using dependent amount for tax
calculation. If an employee’s 2020
W4 fields (2, 3, 4a, 4b) contain data, the Dependents field in employee file MUST BE 0 (zero dependents). If data is entered in the Dependents field
during W4 entry, and data is also entered in new fields 2, 3, 4a and/or 4b, an
error message will prevent you from proceeding with entry.
Special FIT:
NEW 2020
W4. Employee “Extra withholding” in Step 4c will use this existing Special
FIT field and the FIT $ or %
field.
The screen will default to “No extra tax”. This option will withhold federal taxes based on the federal taxes tables only. No need to change unless employee requests custom FIT withholdings.
OR
If an employee is requesting a
custom withholding and dictating the amount or percentage of federal income tax
they prefer to have withheld, you can use this special FIT option to accomplish
custom withholding. To modify the way
federal income taxes are calculated for this employee you may select from the
options in the drop-down box by clicking the ![]() button (prompt and select) to the right. NOTE:
“Table” refers to the federal tax tables.
button (prompt and select) to the right. NOTE:
“Table” refers to the federal tax tables.
Drop down options:
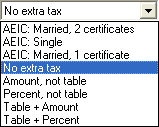
AEIC options refer to Automatic Earned Income Credit payments; the opportunity to receive AEIC through payroll expired on December 31, 2010 and is no
longer available in SkilMatch. Do not select any of the first three options used for AEIC in this field. Employees must apply for AEIC when they file their
federal tax returns.
No extra tax: “No extra tax” is the default and indicates that system will use the federal tax tables ONLY with no extra withholding.
Amount, not table: If you select this option, the amount keyed into the following FIT $ or % field will be withheld for federal taxes (taxes not calculated
using the federal tax table).
Percent, not table: If you select this option, the percentage keyed into the following FIT $ or % field will be used to calculate federal taxes (taxes not
calculated using the federal tax table).
Table + Amount: If you select this option, they system will withhold the amount the federal tax table calculates as “taxes owed” PLUS and the
additional amount specified by the employee. The additional tax amount needs to be keyed into the following FIT $ or % field.
Table + Percent: If you select this option, they system will withhold the amount the federal tax table calculates as “taxes owed” PLUS and an
additional percentage of income. The additional percentage amount needs to be keyed into the following FIT $ or % field.
FIT $ or %:
NEW 2020
W4. Employee “Extra withholding” in Step 4c will use this existing FIT
$ or % field (and Special FIT field above).
This option works WITH the “Special FIT” above. If you selected a Special FIT, then key the corresponding dollar amount or percent.
DO
NOT KEY A DECIMAL POINT, BUT DO KEY ZEROES TO HOLD DECIMAL PLACES.
Example: $10.00 keyed as 1000 (field has total of 7 digits, two spaces to the right of the decimal)
5.50% keyed as 550
Default Tax Codes: Suta State
Locals SDI:
If your organization does business in one state only, and if your employees are not subject to local taxes based on where they live, leave these default tax areas BLANK. Tax codes will have been added to the Payroll System Requirements file that will be used for all employees.
OR
Key or select default Tax codes only if this employee is subject to tax codes that are different from the Payroll System Requirements file, or if local taxes are determined by where an employee lives (rather than where they work).
OR
Starting with
a blank field, select a valid Tax code from the drop-down boxes by clicking the
![]() button (prompt and select) to the right of the
tax type.
button (prompt and select) to the right of the
tax type.
NOTE: If you make a selection into any one of these
areas, then you should make selections into ALL the areas appropriate for the
employee. The system will automatically
add selections from ALL the default areas to every job order to which the
person is assigned, and will override any default that may have been set up for
the company.
NOTE: If a person is currently on assignment and
you make a change to the person’s default tax line, you must also make the same
change to ALL active job orders for this person. THE SYSTEM
DOES NOT AUTOMATICALLY CHANGE THE JOB ORDERS.
If you add a Check Handling code to the employee’s file, then the code will be added automatically to the employee’s timecard during timecard data entry.
If you do not add a Check Handling code to the employee’s file, then you will have to add one manually to the timecard during the data entry process. The Check Handling code will print on the face of the paycheck.
NOTE: Leave this area blank if this person’s
paycheck will NOT ALWAYS be handled the same way.
Select *D as the Check handling code if this employee is participating in Direct Deposit. If this employee later drops out of the plan, you will replace the *D with any other valid hold code. If *D is selected, then an additional screen of data entry will display once you click [Continue].
Depending on the choice made on the Payroll Constant file, paychecks may be sorted into groups by Check Handling code before being printed. The groups will then print in order by Check Handling code.
Key a valid Check handling code if you want this employee's paychecks to be handled the same way each time (mailed, delivered, held for pick up, etc).
OR
Starting with
a blank field, select a paycheck hold code by clicking the ![]() button (prompt and select) to the right.
button (prompt and select) to the right.
The screen will display:
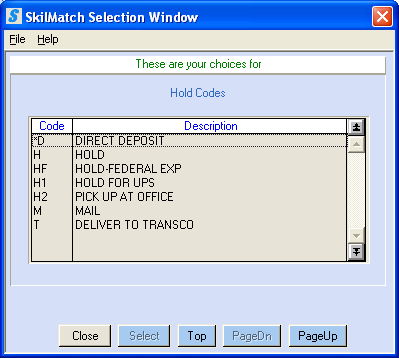
When you see the code you wish to use, either <DOUBLE-CLICK> on the description, or highlight and click [Select]. If you do not see the code and the [PageDn] button is not grayed out, then click [PageDn] to view more. When you get to the end, [Top] will start the selections over again. If you page down past a screen of selections, and wish to go back a screen, then click [PageUp]. To not select a code, click [Close].
NOTE: If you make a change to the Check Handling
code in the employee file AFTER a timecard has been entered for the
employee, the change will NOT have an effect the timecards. The new Check Handling code will not be used
until the next new timesheet is entered.
Worker’s Compensation State/Code:
These fields are generally left blank since worker’s comp is typically based on the type of work being performed on a job order, and an employee may be assigned to different types of work.
OR
If your payroll system requirements file allows it, and if this person is only to perform work under one specific workers' compensation code, then key the appropriate W/C state.
OR
Starting with
a blank field, select a workers compensation state/code by clicking the ![]() button (prompt and select) to the right. If you key a state code before clicking the
button (prompt and select) to the right. If you key a state code before clicking the ![]() button, then your selection will be limited to
the codes that are valid for that state.
If you leave both the state code and w/c code blank, then the selection
will include all codes for all states.
button, then your selection will be limited to
the codes that are valid for that state.
If you leave both the state code and w/c code blank, then the selection
will include all codes for all states.
OR
If this person is a contractor, key the special workers’ compensation state/code that has been designed specifically for contractors.
NOTE: If a W/C state/code
is entered, the combination will automatically be added to any NEW job order to
which the employee is assigned and will override any default W/C that may have
been set up for the customer. However,
if the employee’s designated W/C state and code are not on the list of approved
W/C codes in the customer file, the job order will have a terminal error until
you either remove the W/C from the employee file, or add it as valid to the
customer’s file.
NOTE: If a person is currently on assignment and you
make a change to the default W/C state/code in the employee file, you must also
make the same change to ALL active job orders for this person, if
necessary. THE SYSTEM WILL NOT AUTOMATICALLY UPDATE
EXISTING JOB ORDERS.
The screen will display:
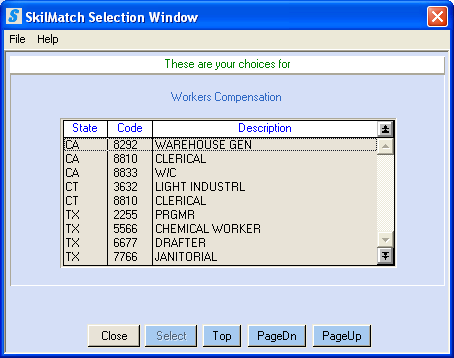
When you see the code you wish to use, either <DOUBLE-CLICK> on the description, or highlight and click [Select]. If you do not see the code and the [PageDn] button is not grayed out, then click [PageDn] to view more. When you get to the end, [Top] will start the selections over again. If you page down past a screen of selections, and wish to go back a screen, then click [PageUp]. To not select a code, click [Close].
PRIMARY STATE AND LOCAL
INFORMATION
(This area will display blank even if a state or local record
was created during a previous data entry process.)
NEW 2020 W4. New programming no longer automatically creates State and Local tax buckets to match Federal withholding. Due to changes in the 2020 W4 filing status (addition of Head of household status) and dependent processing changes (dependent count no longer used in tax calculation), the system will no longer use the Federal filing status and dependents as the DEFAULT State and Local tax filing status and dependents. NOW, if NO SETUP is done for State and Local filing status during employee entry, the system will NOW default to SINGLE with 0 for State and Local tax withholding. A warning message reminding you of this will display during timesheet entry. If you do not want SINGLE with 0 for State and Local withholding, you must make the change in employee entry and then re-edit your timesheet batch.
ALWAYS
FIRST - Display the current state
record (or records) for this employee by clicking the ![]() button (prompt and select) to the right of
Primary State. You may add a new state
record or change an existing state record.
button (prompt and select) to the right of
Primary State. You may add a new state
record or change an existing state record.
If you add or change a state record through the ![]() button (prompt and select) you will notice
that there are more options available than appear on the Employee data entry screen.
Please refer to document Menu
File Maintenance, Item Employee State, Local, SDI for an
explanation of the additional options.
button (prompt and select) you will notice
that there are more options available than appear on the Employee data entry screen.
Please refer to document Menu
File Maintenance, Item Employee State, Local, SDI for an
explanation of the additional options.
The system will use any information keyed into this area to
create a new or to update an existing State or Local record for the
employee. The State record tracks not
only state income tax data, but state unemployment, and disability insurance
data as well. You must create a primary state for EACH employee
(not contractors), even if your state does not have a state income tax!
You may create or update a Primary State or a Primary
Locality by either keying the data in the areas on the screen, but we highly
recommend using the ![]() button (prompt and select),
button (prompt and select),
If no state tax records have been created, the screen will
display:
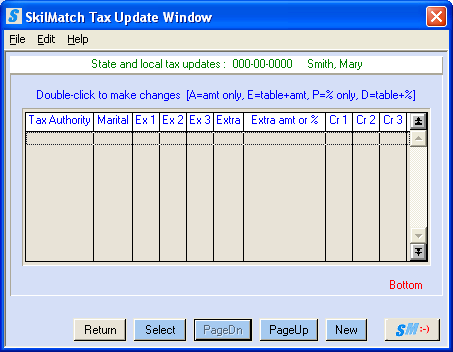
Select [New] to add a tax file, the screen will display:
OR, if a state tax records had been previously created, the
screen will display:
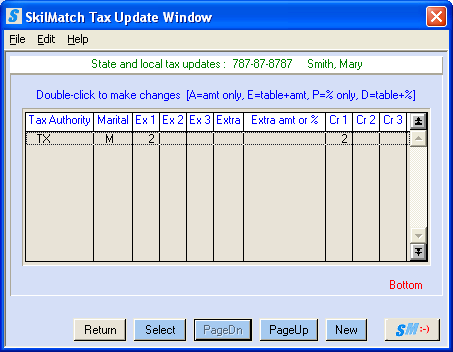
Highlight and click [Select]
on a tax authority that is
already setup to update/change.
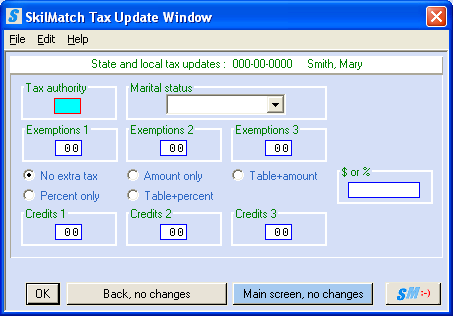
Status:
Please
verify with your accounting department how the Marital Status is used for your
state – there are special considerations for some states, including but not
limited to AZ, CT, and MD.
Click the ![]() button (prompt and select) to the right and
select from married, single, head of household, or exempt.
button (prompt and select) to the right and
select from married, single, head of household, or exempt.
NEW 2020 W4. New programming no longer automatically creates State and Local tax buckets to match Federal withholding. Due to changes in the 2020 W4 filing status (addition of Head of household status) and dependent processing changes (dependent count no longer used in tax calculation), the system will no longer use the Federal filing status and dependents as the DEFAULT State and Local tax filing status and dependents. NOW, if NO SETUP is done for State and Local filing status during employee entry, the system will NOW default to SINGLE with 0 for State and Local tax withholding. A warning message reminding you of this will display during timesheet entry. If you do not want SINGLE with 0 for State and Local withholding, you must make the change in employee entry and then re-edit your timesheet batch.
Please
verify with your accounting department how the Dependent areas are used for
each state – there are special considerations for some states, including but
not limited to AZ, CA and CT.
(If you view the employee’s State or Local records, Dependents 1 from the employee record matches the Exemptions area, and Dependents 2 from the employee record matches the Additional Exemptions 1 area. The State/Local record has an additional area named Additional Exemptions 2 area that is not accessible through the employee data entry screen.)
NEW 2020 W4. New programming no longer automatically creates State and Local tax buckets to match Federal withholding. Due to changes in the 2020 W4 filing status (addition of Head of household status) and dependent processing changes (dependent count no longer used in tax calculation), the system will no longer use the Federal filing status and dependents as the DEFAULT State and Local tax filing status and dependents. NOW, if NO SETUP is done for State and Local filing status during employee entry, the system will NOW default to SINGLE with 0 for State and Local tax withholding. A warning message reminding you of this will display during timesheet entry. If you do not want SINGLE with 0 for State and Local withholding, you must make the change in employee entry and then re-edit your timesheet batch.
Credits 1:
Please verify with your accounting department how the Credit area is
used for each state – there are special considerations for some states,
including but not limited to CA.
(In the State/Local record, the employee Credits 1 matches the Tax Credit Exemptions 1. The State/Local record has 2 additional areas named Tax Credit Exemptions 2 and Tax Credit Exemptions 3 that the employee record does not have.)
NA, why?:
The acronym NA? translates to “Not Available, Why?”
If this person is currently available for assignments, leave this area blank.
OR
If this person is currently NOT available for work, key the reason why.
NOTE: If someone else in your organization is
displaying this person's file through of one of the Search programs at the same
time you are updating, you will not have access to update the NA? Area. You can view the data, but you will not be
permitted to move your cursor into the area for updating.
Make
Available: Today/Future/No Change:
If the person is available for work today, click ‘Today’.
OR
If the person is not available for work today, but will available at a future date, click ‘Future’.
OR
To leave the person’s available date as it is, leave the default ‘No change’.
NOTE: If someone else in your organization is
displaying this person's file through of one of the Search programs at the same
time you are updating, you will not have access to update the NA? Area. You can view the data, but you will not be
permitted to move your cursor into the area for updating.
Available On (date):
If you selected ‘Today’ for the person’s availability, leave this available date blank. The system will automatically insert today's date for you.
OR
If you selected ‘Future’
for the person’s availability, key the future date the person will be available
for work. The date may be keyed (as MMDDYY) or may be selected by clicking
the ![]() button (prompt and select) to the right of
dates, click on a date to select and click [OK]
to bring the calendar date into the date field.
button (prompt and select) to the right of
dates, click on a date to select and click [OK]
to bring the calendar date into the date field.
OR
If you selected ‘No change’ for the person’s availability, leave this available date as it appears.
NOTE: If someone else in your organization is
displaying this person's file through of one of the Search programs at the same
time you are updating, you will not have access to update the NA? Area. You can view the data, but you will not be
permitted to move your cursor into the area for updating.
Click [Continue] to continue with entry of this employee.
OR
Click [Cancel] to cancel entry of this employee file and return to the main menu. All information keyed to this point will NOT be saved.
OR
Click [Back] to view the previous screen before continuing. You will move to the previous screen while retaining the information keyed on this screen.
OR
If you are making changes to an existing file and have completed the changes, or if this is a new file and you wish to bypass the remaining screens (skill codes, general comments, activity comments), you may click [Finish] to update the file and exit from this employee file.
If you did NOT enter *D as the person's PAYCHECK HOLD CODE, you should skip this section. Click here to move forward to the Skill Codes.
OR
If you entered *D as the person’s PAYCHECK HOLD CODE, you should read this section.
(To use Direct Deposit, you must have purchased the interface from SkilMatch and have it installed on your system.)
An employee can chose to have their net pay deposited directly into their bank account(s) rather than receiving printed paychecks. A special hold code, when keyed into the employee file, will cause an additional screen of data entry to display. Set up one or more bank accounts for the employee. A person can deposit pay into a single bank account, or in up to 3 different bank accounts. When payroll checks are printed, direct deposit participants will receive a ‘voucher’ rather than a standard payroll check. The information printed on the ‘voucher’ pay stub is the same as a standard paycheck. After the normal payroll options are completed, a file of direct deposit data is transmitted to your bank, and your bank will forward the pay data to the employee banks.
If the employee wants to use multiple bank accounts, two of the three accounts will be set up to receive a specific dollar amount each pay period, and one account will be designated the PRIMARY bank account and will receive the remaining dollars of the pay period. This is true whether the person receives one check or multiple checks in a pay period. Example, if the 2nd bank account is set for $50, and the 3rd account for $25, and if the employee’s net pay for the pay period is $200, then the PRIMARY account will receive $125. If the employee’s net pay for the week is $35, then the 2nd account will receive the entire $35, and no deposit will be made into the 3rd account or the Primary Account.
Most participants will begin this process with a pre-notification that allows the bank to verify the employee’s direct deposit bank and account data without actually making a direct deposit.
During the pre-note stage the employee will continue to receive printed paychecks. A zero-amount direct deposit record will be created and sent to the bank during the first payroll that is processed after the pre-note date in the employee’s file.
The bank will either accept the pre-note as valid or reject it. Most banks will not notify you of acceptances, only rejections. If you have not received a rejection from the bank within a designated time period (designated by your bank), then the pre-note can be changed to active.
If the pre-note is rejected, the bank will let you know. Generally, rejection is due to invalid banking information. Make the necessary corrections to the employee file and change the pre-note date to the date that the next "test run" should begin.
Once the pre-note is accepted, you will change the person's direct deposit status from pre-note to active and will assign a date to begin actual direct deposit.
Should the person change banks, or should the person's bank account data change, then the person will have to go back to a pre-note status for the test period.
A password is required for entering or changing direct deposit data. (It is the same password used to process a "Begin Cycle" in payroll - see Payroll System Requirements file).
A person can be removed from the direct deposit program by changing their paycheck hold code from *D to any other valid hold/check handling code.
HOW TO ADD OR
CHANGE DIRECT DEPOSIT DATA
If the employee’s Hold code/Check Handling code is *D, then the screen will display:

To add or change direct deposit information, you must key a password and click [Authorize]. Key the same password you use when processing a "Begin Payroll Cycle" for this company. (The password may be obtained through the “Search File Maintenance menu, Payroll System Requirements option).
OR
If you prefer NOT to add direct deposit data and would like to return to the previous screen and change the paycheck hold code to something other than *D, click [Back].
The screen will display the Primary Bank Account screen. The Primary bank account will receive 100% of the net pay if it is the only bank account set up for the employee. If the Second or Third bank account screens are used, then the Primary account will receive whatever net pay is left after deposits are made into the other accounts.
The Primary bank account screen displays:
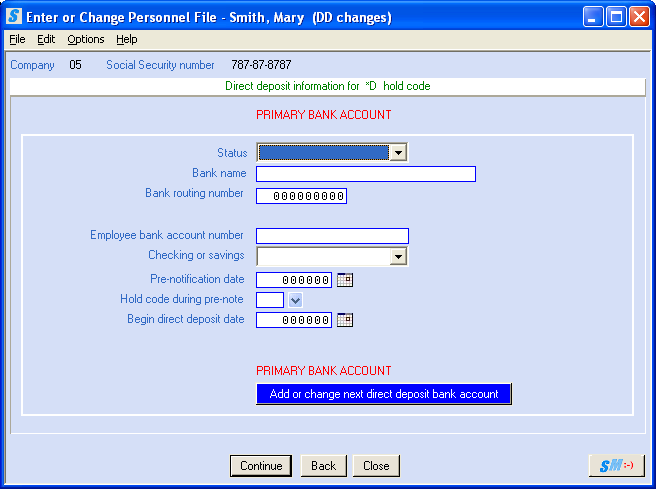
If you are updating existing direct deposit data, the Primary bank account screen will display:
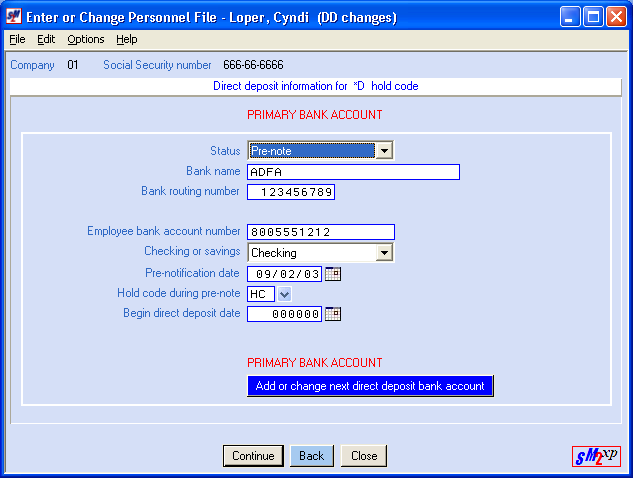
Status:
Select either Pre-note
or Active by clicking the ![]() button (prompt and select) to the right of the
Status area.
button (prompt and select) to the right of the
Status area.
Select Pre-note while in the testing phase of direct deposit for this bank account. The employee will continue to receive a printed paycheck while the status is Pre-note.
OR
Select Active when you are ready to begin depositing net pay to the employee’s Primary bank account.
Bank Name:
Key the name of the employee's bank.
Bank Routing
#:
Key the 9-digit routing number of the person's bank. VERIFY the number entered, the Direct Deposit file will be rejected by the bank if an invalid routing number exists in file.
Employee Bank
Account #:
Key up to 17 characters of the employee's bank account number. If you do not need all 17 spaces, leave the unused blank spaces to the right of the account number. VERIFY the number entered, the Direct Deposit file will be rejected by the bank if an invalid bank account number exists in file.
Checking or
Savings:
Indicate
whether this is a Checking account or Savings account. Click the ![]() button (prompt and select) to the right of the
Checking or Savings area.
button (prompt and select) to the right of the
Checking or Savings area.
Pre-Notification
Date:
Key today’s date. Any payroll processed today or after today will include a pre-note test run of payroll data.
OR
Select date by
clicking the ![]() button (prompt and select) to the right of
dates and a calendar will display from which you may click on a date to select,
and then click [OK] to bring the calendar date
into the date field.
button (prompt and select) to the right of
dates and a calendar will display from which you may click on a date to select,
and then click [OK] to bring the calendar date
into the date field.
Hold Code
During Pre-Note:
Since the employee will continue to receive a printed paycheck during the pre-note test period, you must add a valid paycheck hold code to be used during the test period. This code will print on the face of the check, in addition to the ‘real’ Check Handling code of *D. The only exception to this is when the customer (associated with the paycheck) has a special Paycheck code.
Key a valid Check Handling/Hold code.
OR
Starting with
a blank field, select a Check Handling/Hold code by clicking the ![]() button (prompt and select) to the right of the
hold code during pre-note area.
button (prompt and select) to the right of the
hold code during pre-note area.
Begin Direct
Deposit Date:
Leave this area blank if the status selected above shows as PRE-NOTE (i.e. 000000)
When the pre-note acceptance period has passed without rejection by the bank, and you are ready to begin the actual direct deposit of this person's payroll, key the week ending date that direct deposit should begin. (If you process a timecard whose week ending is before the date keyed, then the employee will receive a printed paycheck for that timecard.)
If the employee wants to have 100% of their net pay deposited into the Primary bank account only, click [Continue].
OR
If you do not wish to enter new direct deposit data, and want to go back and change the hold code to something other than *D, click [Back].
OR
If you click [Cancel] from this screen, you will be warned that all changes made will be lost. Click [OK] if you do not want to save changes, otherwise click [Cancel] to return to the direct deposit entry.
OR
If the employee wants pay to be deposited into more than one bank account, click [Add or change next direct deposit bank account]. The system will bring up a data entry screen for the SECOND bank account.
The screen for SECOND bank account will display:
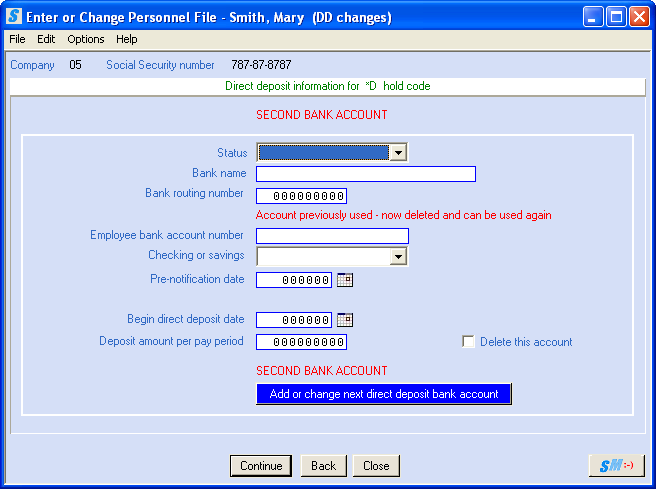
The areas are the same on the Second bank account screen as they are for the Primary Bank account, with the exception of the Deposit Amount Per Pay Period. Key the information as needed (see above instructions).
The SECOND bank account has a NEW field…
Deposit Amount Per Pay Period:
Key a specific dollar amount into this area. During payroll, if the employee has net pay equal to or greater this amount, then this amount will be deposited into the Second bank account. If the net pay for the pay period is less than the amount designated on this screen, then the entire net pay will be deposited into the Second bank account.
To proceed with data entry of this employee, click [Continue].
OR
If you want to go back and make changes to the PRIMARY bank account, click [Back].
OR
If you click [Close] from this screen, you will be warned that all changes made to the employee screens will be lost. Click [OK] if you do not want to save changes, otherwise click [Cancel] to return to the direct deposit entry.
OR
If the employee wants pay to be deposited into a 3rd bank account, click [Add OR change next direct deposit bank account]. The system will bring up a data entry screen for the THIRD bank account.
The screen for THIRD bank account will display:
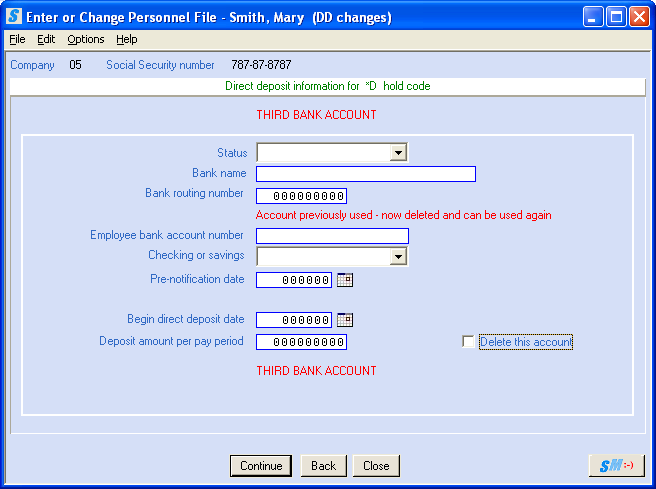
The areas are the same on the Third bank account screen as they are for the Second bank account. Key a specific dollar amount into this area. During payroll, the system will look at the Second bank account and deposit the amount designated. If there is enough net pay left to cover the amount designated for the Third bank account, then the full amount will be deposited to this account. Any remaining net pay will then be deposited to the Primary account.
OR
If you want to go back and make changes to the SECOND bank account, click [Back].
OR
If you click [Close] from this screen, you will be warned that all changes made to any of the employee screens will be lost. Click [OK] if you do not want to save changes, otherwise click [Cancel] return to the direct deposit entry.
OR
If you want to add the direct deposit data from the Primary, Second and Third bank accounts, click [Continue].
If you clicked [Continue], the screen will display:

Skill Code
1-19:
You may assign up to 114 three-character valid Skill codes. Cursor will advance to the next area as soon as any three-character code has been keyed. If you enter/select all 19 codes on this screen, the system will automatically present another screen where you may enter/select an additional 19 codes. This will continue until you have either entered/selected all the codes required, or reached 114 codes total.
Select up to 19 codes on this screen by either keying them,
OR
If you want the system to key the codes for you, or are uncertain which skill codes to use, click [Find a skill].
The screen will display:
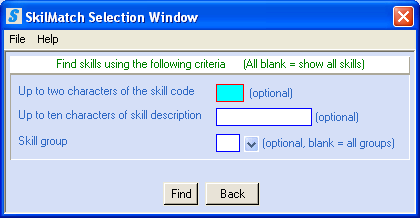
Refer to document Skill Code Lookup for additional information on using the skill code locator.
After all Skills have been selected by using of the methods described above, you may:
To proceed with data entry of this employee, click [Continue].
OR
To cancel without saving changes and return to main menu, click [Cancel]. All information keyed to this point will NOT be saved; you will receive a warning message.
OR
WARNING:
To view the previous screen before continuing, click [Back]. You
will move to the previous screen BUT will lose the
skill codes keyed on this screen.
OR
If you are making changes to an existing file and have completed the changes, OR if this is a new file and you wish to bypass the remaining screens (general comments, activity comments), you may click [Finish] to update the file and exit from this employee file.
If you clicked [Continue], the screen will display:
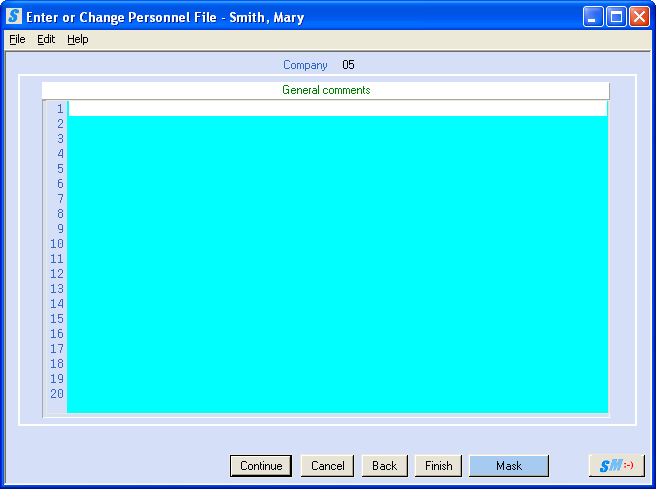
This 20-line screen is traditionally reserved for applicant detail that can be changed/updated at some future date. This may include the person’s test scores, educational background, free-form interview comments, etc.
NOTE: If you wish
a line of comments to appear red then key an asterisk (*) at the beginning of the line. If several lines are to appear in red, be
sure to key an * in the first position of each line. The data keyed on this screen is displayed
when “General” option is select from
the left hand Display column from
employee search screen.
Because this is a single screen of data, you may wish to use the next screen (activity comments) to enter data such as reference checks or previous employment history.
Use the <TAB> key to move to the desired line and then key desired comments.
OR
If your organization has created a pre-formatted general comment design, click [Mask] to view your choices. (The general comments screen must be blank in order to select a pre-formatted mask). If it is not blank, the screen will display:
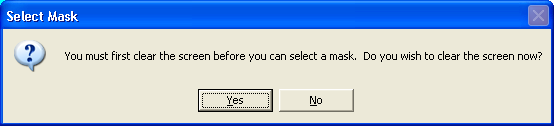
To clear the screen and select a mask, click [Yes]. To return to the general comments screen without clearing the comments and without selecting a mask, click [No].
If you select [Yes] to clear your screen, the screen will display:
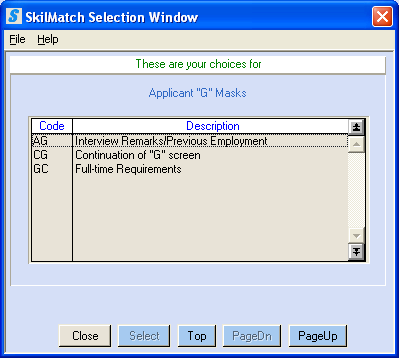
When you see the code you wish to use, either <DOUBLE-CLICK> on the description, or highlight and click [Select]. If you do not see the code and the [PageDn] button is not grayed out, then click [PageDn] to view more. When you get to the end, [Top] will start the selections over again. If you page down past a screen of selections, and wish to go back a screen, then click [PageUp]. To not select a code, click [Close].
Sample general comments masks:
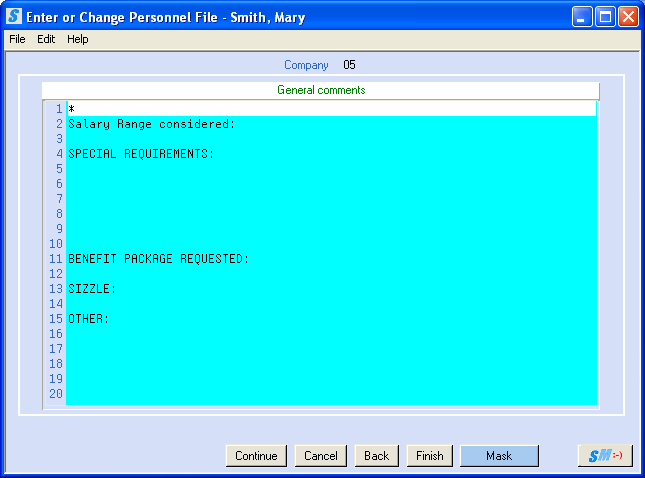
You can <TAB> to the desired line, or use your mouse to insert curser into desired location to key comments. You must use the “space bar” to advance within a blank line.
When comment is complete and ready to proceed with data entry of this employee, click [Continue].
OR
To view the previous screen before continuing, click [Back]. You will move to the previous screen (skill codes) while retaining the information keyed on this screen.
OR
To cancel without saving changes and return to main menu, click [Cancel]. All information keyed to this point will NOT be saved; you will receive a warning message.
OR
If you are making changes to an existing file and have completed the changes, or if this is a new file and you wish to bypass the remaining screens, you may click [Finish] to update the file and exit from this employee file.
If you clicked [Continue], the screen will display:

Use this 15-line screen to record a comment or multiple comments of the same type (like multiple reference checks, or pre-employment history or different kinds of test scores). Enter one screen of comment material at a time. NOTE: Once “saved/entered” these comments cannot be changed and/or updated, billable SkilMatch programming assistance will be needed.
Three options:
1) Comments can be keyed free-form onto a blank screen.
2) Use a pre-formatted
“default comment” designed by your organization. See details in Default
comment link.
3) Use a pre-formatted “mask” activity comment, designed by your organization. See details in Mask link.
Comment Type:
To key a free-form comment onto a blank screen, key a valid Comment Type and advance to the comment area.
OR
Starting with
a blank Comment Type field, select a code by clicking the ![]() button (prompt and select) to choose from a
full list of valid Comment Types.
button (prompt and select) to choose from a
full list of valid Comment Types.
OR
Select a
Comment Type by first keying 1 character of the Comment Type before clicking
the ![]() button (prompt and select) to the right to
limit the comment type selections.
button (prompt and select) to the right to
limit the comment type selections.
If you leave the Comment Type field blank and
select the ![]() button (prompt and select), the screen will
display:
button (prompt and select), the screen will
display:
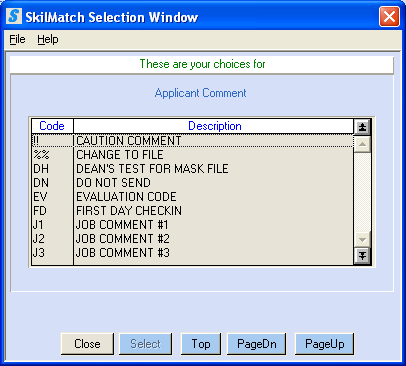
When you see the code you wish to use, either <DOUBLE-CLICK> on the description, or highlight and click [Select]. If you do not see the code and the [PageDn] button is not grayed out, then click [PageDn] to view more. When you get to the end, [Top] will start the selections over again. If you page down past a screen of selections, and wish to go back a screen, then click [PageUp]. To not select a code, click [Close].
Select Comment Type, the curser will advance to the large comment field. Key desired comments.
OR
If you key the first character (letter, symbol or number) of a Comment Type in the field, the system will sort and only give you the codes starting with this character.
If you keyed a partial comment
type “J” and clicked ![]() button (prompt and select), the screen will
display:
button (prompt and select), the screen will
display:
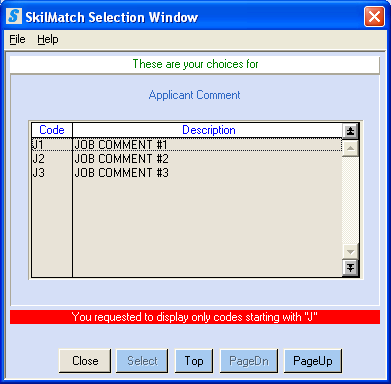
When you see the code you wish to use, either <DOUBLE-CLICK> on the description, or highlight and click [Select]. If you do not see the code and the [PageDn] button is not grayed out, then click [PageDn] to view more. When you get to the end, [Top] will start the selections over again. If you page down past a screen of selections, and wish to go back a screen, then click [PageUp]. To not select a code, click [Close].
Select Comment Type, the curser will advance to the large comment field. Key desired comments.
When you have added comment
text as needed, you have the following options…
To add this comment to the employee file, click [Add this comment]. You will be presented another blank activity comment screen and can enter additional activity comments. Continue entering comments and/or tasks using the above documentation, when done entering employee, click [Finished, don’t add comment]. You will be advanced to the social security number screen, ready for entry of the next employee file.
OR
To finish adding this employee record WITHOUT adding an additional comment, click [Finished, don’t add comment]. You will be advanced to the social security number screen, ready for entry of the next employee file.
OR
The [Add search words] feature is no longer available or supported, contact SkilMatch for additional information. If you select this option, you will receive an error message F13=add text not currently available on your system.
OR
To insert a comment using a pre-formatted mask, click [Mask], additional instruction on the following Mask link.
OR
To clear the comment type and the comment area (should you decide that you want to start over with the comment), click [Clear screen].
OR
To add a task to your SkilMatch calendar, click [Add Task], additional instructions on the following Add task link. When complete, you will be advanced to the social security number screen, ready for entry of the next employee file.
Rather than keying a free-form comment or completing a pre-formatted mask design, you may select a default comment that contains pre-defined information to add to employee file (usually complete without additional entry, but additional entry and editing is available). NOTE: Default comments need to be setup by your organization, for assistance call SkilMatch or review CODES menu, item Comment Masks, select Applicant Activity Comment.
Key a valid Comment Type that has been setup with a “default comment”, and then click [Default comment].
OR
Starting with
a blank Comment Type field, select a code by clicking the ![]() button (prompt and select) to the right of the
Comment Type, then click [Default comment].
button (prompt and select) to the right of the
Comment Type, then click [Default comment].
The screen will display:
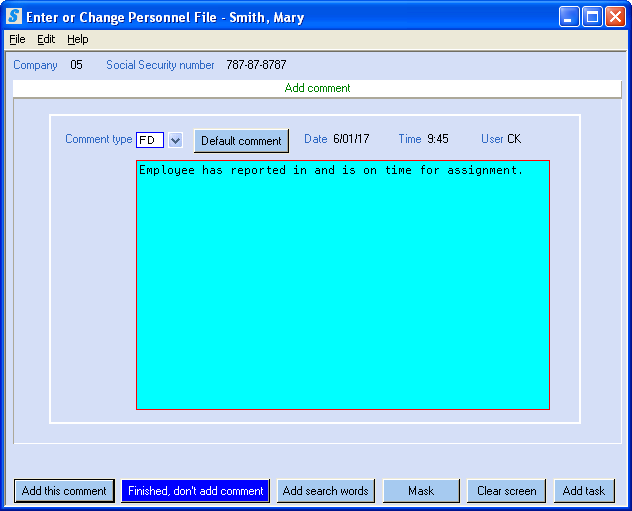
The example used in this screen is the First Day, FD, comment that indicates the employee reported for work and was on time. This type of comment will save your staff keystrokes for FD comments. This comment can be updated or edited to include additional information.
The default comment will be inserted into the comment field. You may edit comment as needed.
When you have added comment
text as needed, you have the following options…
To add this comment to the employee file, click [Add this comment]. You will be presented another blank activity comment screen and can enter additional activity comments. Continue entering comments and/or tasks using the above documentation, when done entering employee, click [Finished, don’t add comment]. You will be advanced to the social security number screen, ready for entry of the next employee file.
OR
To finish adding this employee record WITHOUT adding an additional comment, click [Finished, don’t add comment]. You will be advanced to the social security number screen, ready for entry of the next employee file.
OR
The [Add search words] feature is no longer available or supported, contact SkilMatch for additional information. If you select this option, you will receive an error message F13=add text not currently available on your system.
OR
To insert a comment using a pre-formatted mask, click [Mask], additional instruction on the following mask link.
OR
To clear the comment type and the comment area (should you decide that you want to start over with the comment), click [Clear screen].
OR
To add a task to your SkilMatch calendar, click [Add Task], additional instructions on the following Add task link. When complete, you will be advanced to the social security number screen, ready for entry of the next employee file.
To select a pre-formatted mask activity comment design, key a valid Comment Type that has been setup with a “mask”, and then click [Mask].
NOTE: Pre-formatted masks need to be setup by your organization, for assistance call SkilMatch or review CODES menu, item Comment Masks, select Applicant General Comment.
OR
Starting with
a blank Comment Type field, select a code by clicking the ![]() button (prompt and select) to the right of the
Comment Type, then click [Mask].
button (prompt and select) to the right of the
Comment Type, then click [Mask].
The screen will display:
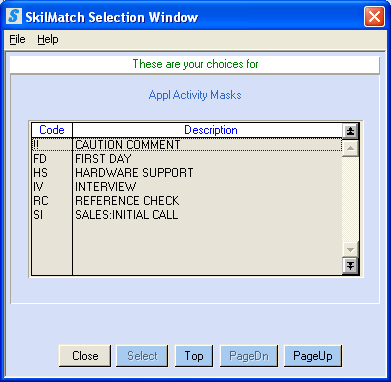
When you see the code you wish to use, either <DOUBLE-CLICK> on the description, or highlight and click [Select]. If you do not see the code and the [PageDn] button is not grayed out, then click [PageDn] to view more. When you get to the end, [Top] will start the selections over again. If you page down past a screen of selections, and wish to go back a screen, then click [PageUp]. To not select a code, click [Close].
If you select a mask, the activity comment screen will be pre-formatted with the design. The mask will replace all text on activity comment screen.
Sample “Reference check” activity comment mask:
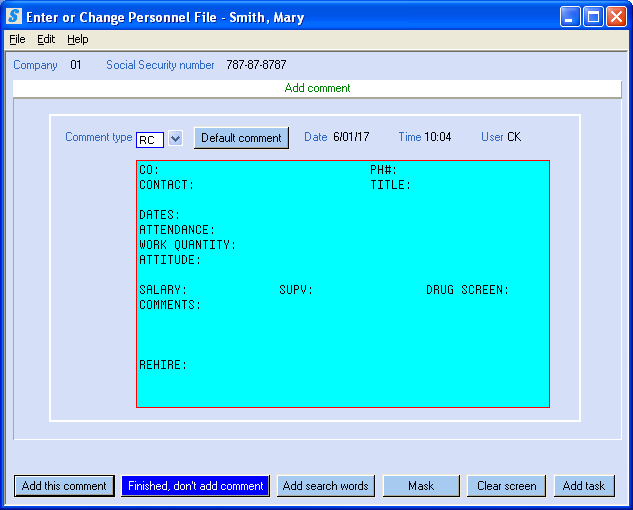
The mask will be inserted into the activity comment field.
Use your mouse to move your cursor from one keying area to
another. Do NOT use the <Tab> key to move from line to line - the
entire comment area will be treated as single field of information and pressing
<Tab> will move your cursor from
the comment area to the [Add this comment]
button.
When you have added comment
text as needed, you have the following options…
To add this comment to the employee file, click [Add this comment]. You will be presented another blank activity comment screen and can enter additional activity comments. Continue entering comments and/or tasks using the above documentation, when done entering employee, click [Finished, don’t add comment]. You will be advanced to the social security number screen, ready for entry of the next employee file.
OR
To finish adding this employee record WITHOUT adding an additional comment, click [Finished, don’t add comment]. You will be advanced to the social security number screen, ready for entry of the next employee file.
OR
The [Add search words] feature is no longer available or supported, contact SkilMatch for additional information. If you select this option, you will receive an error message F13=add text not currently available on your system.
OR
To insert a comment using a pre-formatted mask, click [Mask], additional instruction on the following mask link.
OR
To clear the comment type and the comment area (should you decide that you want to start over with the comment), click [Clear screen].
OR
To add a task to your SkilMatch calendar, click [Add Task], additional instructions on the following Add task link. When complete, you will be advanced to the social security number screen, ready for entry of the next employee file.
Add Task:
If you would like to add a ‘task’ to the Task calendar regarding this employee, click the [Add Task] button. The screen will display:
To create a calendar task for this employee, complete the fields required and click [Add or change]. If this task is in conjunction with a comment type/mask, you will be returned to the activity comment screen with the option to add additional comments and/or tasks. If this is a task entry only, you will advance to the social security number screen, ready for entry of the next employee file.
OR
To cancel adding a calendar task to the employee file, click [Cancel add or change]. If this task is in conjunction with a comment type/mask, you will be returned to the activity comment screen with the option to add additional comments and/or tasks. If this is a task entry only, you will advance to the social security number screen, ready for entry of the next employee file.
OR
To have system review information
or verify the current responses on this event or task, click [Verify]. The system will review and
provide response if fields need to be confirmed or changed before
proceeding. When complete, you can click
[Add or change] or [Cancel add or
change].
All comments, masks, task
entry complete:
If you are finished entering comments and tasks and wish to add/update this employee file to the system AND the comment field is now blank, click [Add Comment] or [Finished, don’t add comment]. You will be advanced to the social security number screen, ready for entry of the next employee file.

If you would like to add or update the next employee, key company number and social security number to start a new employee file.
OR
When you have finished with data entry, click [Exit] to return to menu.