LOCAL
MAGNETIC MEDIA
If you have withheld taxes for a local authority, and if that authority requires that you report those earnings using magnetic media rather than reporting on paper, contact SkilMatch.
Currently, you may use this option to create the magnetic media file for only three local taxing authorities:
Philadelphia (In City), PA
Philadelphia (Out of City), PA
Wilmington, DE
SkilMatch
recommends the following coding for these custom programs:
PH Local code for Philadelphia (In City), PA city tax
PT Local Code for Philadelphia (Out of City), PA city tax
WM Local code for Wilmington, DE city tax
For the programming to work properly, the corresponding code described above MUST be keyed in the PR GL Distribution code description with the LAST two characters of the description.

NOTE: The local tax “Distribution Code” can be UNIQUE to your staffing company (when the above local code recommendations are not available), but you MUST BE SURE that the appropriate code (PH, PT, and/or WM shown in the recommendation above), is placed in the last two spaces on the Distribution Description field for that UNIQUE local tax code.
The Local Quarterly Report option will need to be run once for EACH local tax codes that requires W-2 file.
If you need to create magnetic media for any other locality, SkilMatch must custom program the local tax code before you can use this menu option.
To begin, select the [End-of-Year] menu in the Pay and Bill library. The screen will display:
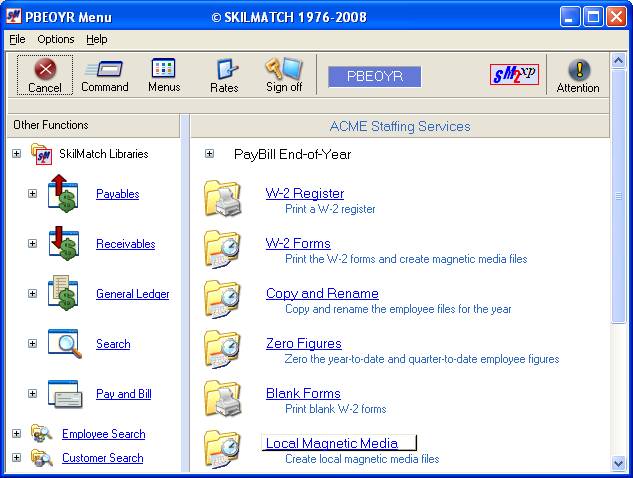
Select [Local Magnetic Media]. The screen will display:
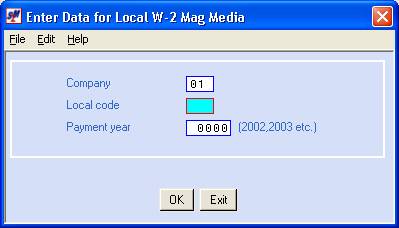
Company:
The system will default to Company 01. If the local taxes are in a different company number, key the correct company number.
Local
Code:
Key the local code. For all localities (other then PA), you will need to report W2 information on paper.
OR
For PA custom magnetic media programs, key the PA local codes (this may be SkilMatch recommend codes, PH, WM, and PT or may be codes designed by your staff).
If you want to submit magnetic media for another locality, you will need to submit the format requirements to SkilMatch for custom, billable programming.
Payment
Year:
Key the 4-digit year that you are reporting. (2013, 2014, etc.)
To continue, click [OK].
OR
To cancel and return to menu, click [Exit].
If you select [OK] to continue, the screen will display:

Screen images and examples in document may not reflect
current law; always verify rates and figures with government officials and/or
accounting professional.
Note: Many of the fields will be filled in for
you, using data from the system set-up files.
Make necessary corrections to existing data and enter the appropriate
data in the remaining areas.
Remove any special characters. The magnetic media program will not accept them.
Company Name:
Will display as it appears in the payroll system requirements file (Menu Maintenance, Item Payroll System Requirements). Examine carefully for accuracy.
Make any necessary corrections,
or key the data if missing.
Note:
Make certain that there are no commas, hyphens, # signs, apostrophes,
etc. in your name.
Company Address (Street or
PO Box):
Will display as it appears in the payroll system requirements file (Menu Maintenance, Item Payroll System Requirements). Examine carefully for accuracy.
Make any necessary corrections,
or key the data if missing.
Note:
Make certain that there are no commas, hyphens, # signs, apostrophes,
etc. in your address.
Company Address 2 (Attn,
Suite, or Room):
Will display as it appears in the payroll system requirements file (Menu Maintenance, Item Payroll System Requirements). Examine carefully for accuracy.
Make any necessary corrections,
or key the data if missing.
Note:
Make certain that there are no commas, hyphens, # signs, apostrophes,
etc. in your address.
Company City:
Key the city for which you are processing this state report. The data will be retained from the last time this option was processed. Examine carefully for accuracy and make any necessary corrections.
Note: Make certain that there are no commas,
hyphens, # signs, apostrophes, etc. in your city.
State:
Key the state for your company address. The data will be retained from the last time this option was processed. Examine carefully for accuracy and make any necessary corrections.
Zip Code:
Key the zip for your company address. The data will be retained from the last time this option was processed. Examine carefully for accuracy and make any necessary corrections.
Contact Name:
Key up to 27 characters of name the social security administration should contact with questions about this data. The data will be retained from the last time this option was processed. Make any necessary corrections.
Contact Phone:
Key the business phone number belonging to the contact name. The data will be retained from the last time this option was processed. Make any necessary corrections.
Contact Ext:
Key the extension number, if applicable. The data will be retained from the last time this option was processed. Make any necessary corrections.
Contact Fax:
Key a fax number for the contact person, if desired. The data will be retained from the last time this option was processed. Make any necessary corrections.
Contact Email:
Key a valid email address for the contact person, if desired. The data will be retained from the last time this option was processed. Make any necessary corrections.
Note: If you select to notify via e-mail, you MUST key a valid email
address for the contact person.
Problem Notify:
If the government needs to get in
touch with your contact person, click once to select the preferred method. You may select only one: e-mail or ground mail.
Federal Tax ID:
Will display as it appears in the payroll system
requirements file (Menu Maintenance, Item Payroll System Requirements). Examine carefully for accuracy. Make any necessary corrections, or key the
data if missing.
Note: Make certain there are no hyphens or letters in this field or your federal ID will not be written to magnetic media correctly.
Other EIN:
If you have submitted forms for this same tax year
under a different EIN than the one entered in the Federal Tax ID area, key the
other EIN here.
Personal ID Number/User ID:
Key your User ID registered with the Federal
Government. The data will be retained
from the last time this option was processed.
Examine carefully for accuracy.
Make any necessary corrections, or key the data if missing.
This number had previously been referred to as the
PIN by the SSA Website.
Note: The federal government requires that a User ID be included with W-2s being submitted on magnetic media. You should already have registered for this User ID with the SSA.
FICA Gross Limit:
Defaults to the FICA gross limit from the FICA tax
file (Menu PBMANT, Item FICA Tax Table).
Note:
If you print W-2s after you have begun a new payroll year and have
already changed the limit for the new year in the FICA tax table, you will need
to key last year's dollar limit here.
Any change made here does NOT affect Menu PBMANT, Item FICA Tax Table.
Employee File Name:
The data will be retained from the last time this option was processed. Examine carefully for accuracy. Make any necessary corrections.
The current year file name is EMPMAS.
OR
If you process this option AFTER processing
‘Copy and Rename’ and ‘Zero Figures’ you will need to change this file name to EMASxx
(where xx = the last 2 digits of the W-2 year).
State File Name:
The data will be retained from the last time this option was processed. Examine carefully for accuracy. Make any necessary corrections.
The current year file name is STLCTX.
OR
If you process this option AFTER processing
‘Copy and Rename’ and ‘Zero Figures’ you will need to change this file name to SLTXxx
(where xx = the last 2 digits of the W-2 year).
Employee Deduction File:
The data will be retained from the last time this option was processed. Examine carefully for accuracy. Make any necessary corrections.
The current year file name is DEDUCT.
OR
If you process this option AFTER processing
‘Copy and Rename’ and ‘Zero Figures’ you will need to change this file name to DEDUxx
(where xx = the last 2 digits of the W-2 year).
To continue, click [OK].
OR
To cancel and return to menu, click [Exit].
If you select [OK] to continue, the screen will display:
Screen images and examples in document may not reflect
current law; always verify rates and figures with government officials and/or
accounting professional.
Confirm that the information keyed on the previous screen is accurate. If it is not, click [Close] to go back a screen to make corrections. If it is correct, then complete this screen.
Local Tax ID
Key your local tax ID, without hyphens or blanks.
To continue, click [OK].
OR
To cancel and return to menu, click [Exit].
If you select [OK] to continue, the screen will display:
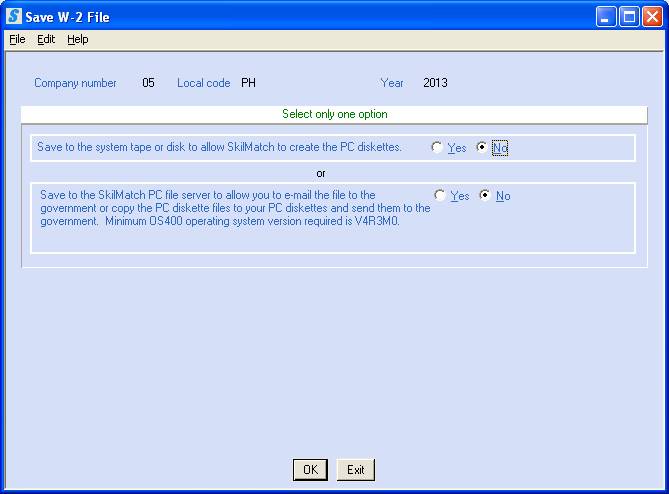
If you wish to create and transmit the
W-2 file to the government electronically using the Internet, or you want
to create your own diskettes, you should select:
Save to
the system tape or disk … : NO
Save to
the SkilMatch PC file server … : YES
If you want SkilMatch to produce PC
diskettes for you, or you are not equipped to transmit electronically, you
should indicate:
Save to
the system tape or disk to allow SkilMatch to create the PC diskettes: YES
Save to
the SkilMatch PC file server to allow you to e-mail the file to the … : NO
To continue, click [OK].
OR
To cancel and return to menu, click [Exit].
If you chose to save to tape or disk, go to Save W-2s to tape or disk for further instructions.
If you chose to save to the SkilMatch PC file
server, go to Save to PC file server for further
instructions.
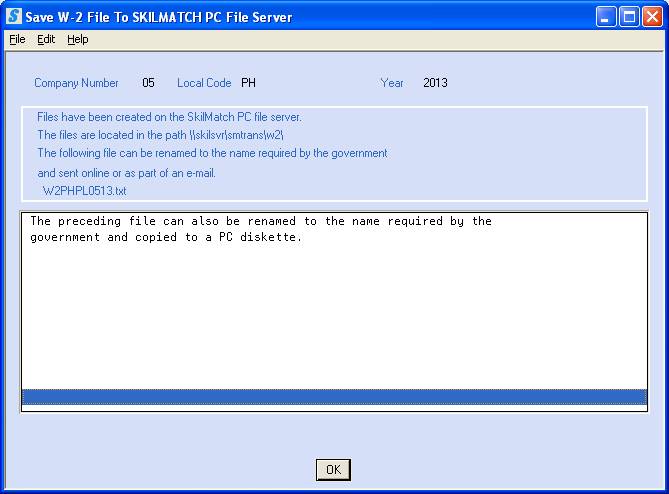
SAVE LOCAL W-2S TO SKILMATCH PC FILE SERVER
If you chose to save to the SkilMatch PC file
server, the screen will display:
WE RECOMMEND THAT YOU MOVE
YOUR CURSOR TO THE TOP LEFT CORNER OF THE SCREEN, CLICK THE SM2 SYMBOL AND MAKE
A PRINT OF THIS SCREEN SO THAT YOU HAVE A COPY OF THE “PATH”.
Note:
the file name will be W2zzPLxxyy.txt
(zz=locality name, xx=general ledger company
number and yy=last two digits of the W-2 year being reported).
If the W-2 file is small enough to fit on a SINGLE
PC disk, then the screen will display as it is shown above and only a single
file will be created.
If the W-2 file would NOT fit on a SINGLE PC disk,
then the system will create 2 or more files and the screen above and will
display this extra verbiage:
The following file can also be renamed to the
name required by the government and sent online or as part of an e-mail.
W2zzPLxxyy.txt
The following files can also be renamed to the
names required by the government and copied to PC diskettes.
W2zzPLxxyy01.txt (zz= locality name, xx=general
ledger company number; yy=year being reported; 01=diskette number 1)
W2zzPLxxyy02.txt (zz= locality name, xx=general
ledger company number; yy=year being reported; 01=diskette number 2)
Note:
You will have a file name for each diskette and they will be numbered
sequentially.
Note:
Refer to Locating the PC File Server and
Electronic Transmission for further assistance.
To continue, click [OK].
OR
To cancel and return to menu, click [Exit].
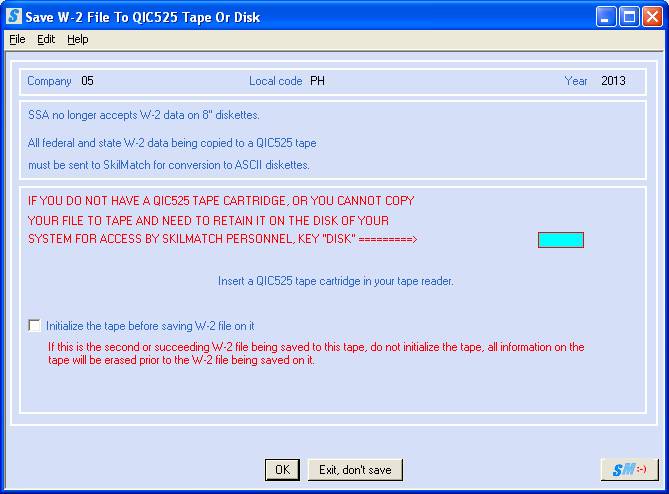
SAVE LOCAL W-2S TO SYSTEM TAPE OR DISK
If you chose to
save to the system tape (no SkilMatch user should select Tape option) or disk,
the screen will display:
If you are not saving your W-2 files to the SkilMatch PC File server, then we prefer to retrieve your file names off of the hard disk.
If you are not saving your W-2 files to the PC File
server, then you should save your W-2 files to the hard disk of the IBM
SERVER. SkilMatch will dial into your
system to create the magnetic media for the reporting of W-2 data. We will send the diskettes to you upon
completion. Go to SAVE W-2S TO DISK to Disk for further
instructions.
SAVE W-2S TO DISK
To save your W-2 files to the IBM SERVER hard disk,
key DISK and do NOT place a checkmark in the initialize tape
question. Leave it blank.
Click [OK]
to continue.
If you keyed DISK, the next screen will display:

Note:
record the file name on the worksheet provided by SkilMatch in the End
of Year checklist (see website to obtain copy). Fax or mail this worksheet to SkilMatch for conversion to the
required magnetic media.
Once you have written the file name on the worksheet provided, click [OK] to continue.
SAVE LOCAL W-2S TO 525MB TAPE
NO users
should select W-2s to 525MB tape.
LOCATING THE PC FILE SERVER
You will need to locate the Local W-2 file on your server to send to necessary authorities. SkilMatch customers that have their own server, please follow the steps below.
If you are a SkilMatch E/E+ customer, then you will NOT be able to access the PC file server. To receive the files via email, you need to setup the EMAILMAINT files for your company. This EMAILMAINT file dictates where the system will email your End of Year files (i.e. Federal W-2’s, State W-2, 1099, etc…). You are not required to use this option, however, not taking these actions will cause you to be unnecessarily charged for SkilMatch support to manually email the files to you.
SkilMatch customers that own their own server:
____
When you are back to the “PayBill
End of Year” menu, open Windows Explorer.
____ Locate and click Network Neighborhood
(term used by Windows 95/98/some NT).
-OR-
____
Locate and click My Network Places
(term used by Windows ME/XP/2000/some NT).
(If you cannot find Network Neighborhood or My Network Places, contact your local PC person for assistance.)
____ Once
you have selected Network Neighborhood or My Network Places, locate and click SKILSVR. If
you cannot locate SKILSVR, right click and select Find Computer (Windows
95/98/some NT)
-OR-
Right click and select Search for Computer (Windows ME/XP/2000/some NT)
Named: key SKILSVR
Click Find Now (Windows 95/98/some NT)
-OR-
Click Search Now (Windows
ME/XP/2000/some NT)
____ Once you have located and selected SKILSVR:
Open folder SMTRANS
Open folder W-2
____ Look for the file name(s) displayed during the processing of W-2 Forms.
Copy to your everyday folder (example: My Documents or Paste-From). Local files may need to be renamed to a designated format – please check with
your local authorities for
specifications.
____ Once you have copied these file(s), you are ready to transmit electronically to the local authorities and you may create your own diskettes for archival
purposes.