Printing
Temp or Staff W-2s:
Create-A-Check Version 8.0
“Create-A-Check” (CAC) is a
software interfaced with SkilMatch to allow printing of W-2s (as well as
invoices, A/P checks, payroll checks, and more) using specific types of laser
printers. You must purchase the CAC
interface and SkilMatch staff must set it up for you before it will be active
during your payroll. Special W-2 stock
is required.
The SkilMatch program prints the
employee W-2s, totals pages and employer copies in a single print file. The employee receives one W-2 “sheet” per
state. The employee sheet includes 4
copies: Copy B (for federal return), Copy 2 (for state, city or local return),
another Copy 2 (for state city or local return), and Copy C (for employee
records). A “totals” page prints after the employee sheets. The employer copy prints 4 employee W-2s per
sheet.
It is very important that you be
aware of the number of W-2s your company ordered! There is no break between the employee and
employer copies! If you ordered enough
W-2s to print both the employee and employer copies, then you can simply load
the W-2 forms and let them print. If
you only ordered enough W-2s for the employee copies, and a few extra for
replacement copies, then you must be careful that the extras are not used up on
the employer copies!
SkilMatch customers are divided
into 2 groups: those who lease space on the SkilMatch/E (SM/E) server,
and those who own a server. Make
certain before proceeding that you know your group. There is a separate set of steps for SM/E users.
If you are a SM/E user, click W-2DOWN to go to your instructions.
SkilMatch users who own
their server will see the following screen:
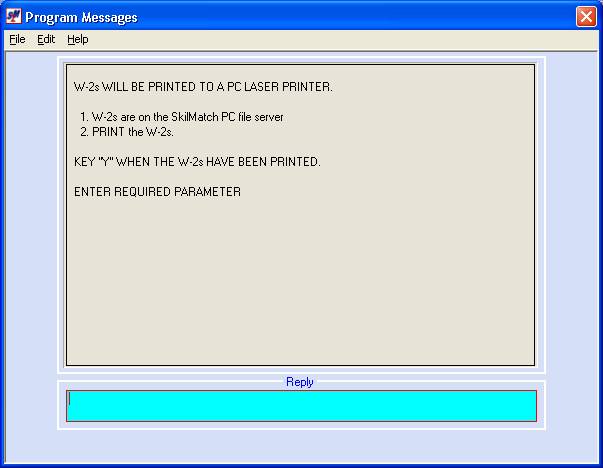
Leave this screen as it is. Do NOT reply.
For instructions on how to print
your checks using Create-A-Check, click SkilMatch 2 session.
W-2DOWN
SM/E customers (who lease space on the SkilMatch ASP
server) will see the following screen:
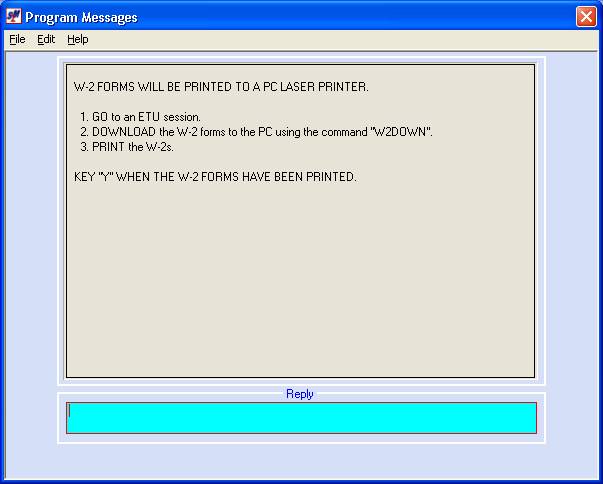
Leave this screen as it is. Do NOT reply. Stop and do the following:
1) Go to your PC’s desktop and
open the ES32 session, but do NOT sign on.
2) Look in the top right section of the ES32 session and write down the session name beside the word DISPLAY.
Leave
the sign on screen displayed.
3) Sign on to another SkilMatch2
session or go a session already open
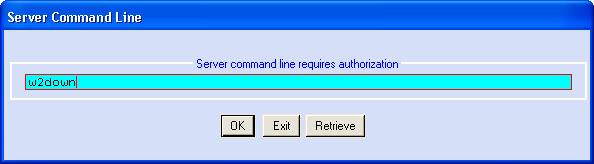
4) Get to a command line on the
other session, key W2DOWN and click [OK].
The screen will display:

Company Number:
Key company number.
Temp checks or Staff checks:
Select Temp or Staff. Click [OK].
The screen will display:
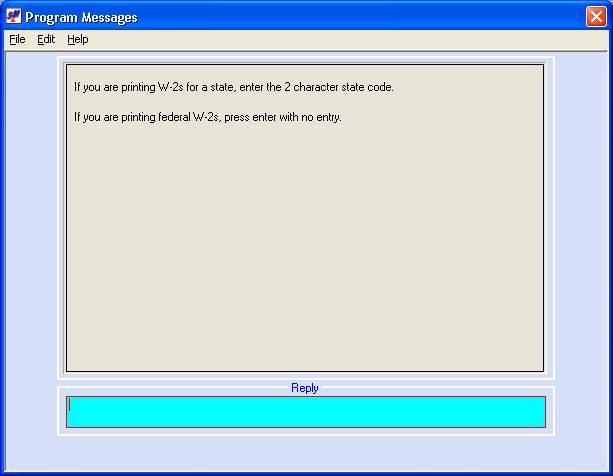
If you used a
state code when you processed W2 Forms option, key the state code that you
used.
If you did NOT use a state code when processed the
W2 Forms option, leave this area blank.
Key your response and press [Enter].
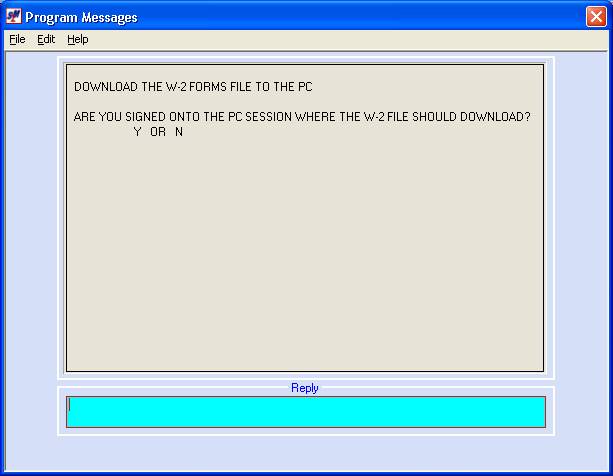
Are You Signed On To The PC
Session Where The W-2 File Should Download:
Since you are NOT signed onto
the ES32 session, key N and press [Enter].
The screen will display:
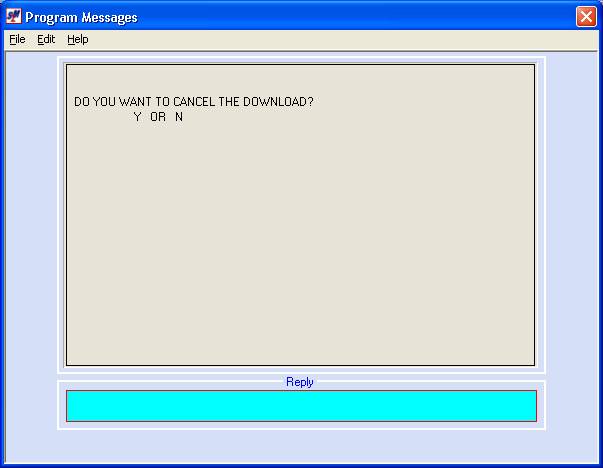
Do You Want To Cancel The Download:
To continue, key N and press
[Enter].
The screen will display:
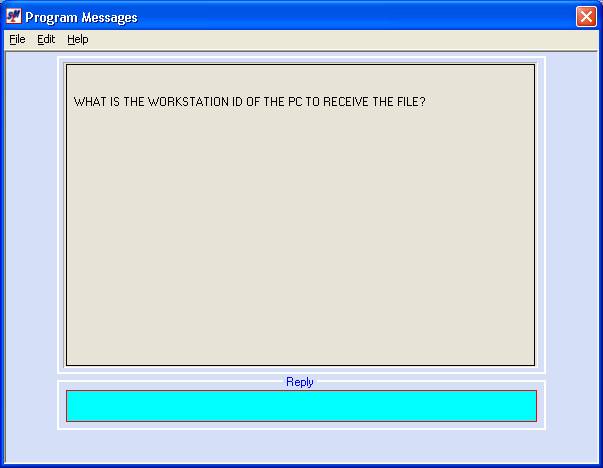
What Is The Workstation ID Of The PC To Receive The File:
Key the name of the ES32 display
that you wrote down earlier and press [Enter].
The screen will display:
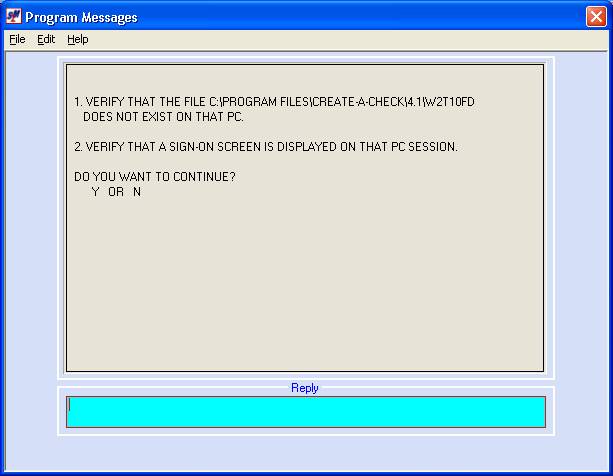
Go to your C:
drive, and look in the CreateACheck folder and make certain that a file named
W2yxxzz(where y equals T for temp or S for staff, xx equals the company number,
and zz equals FD for federal or the state code you keyed earlier) does NOT
exist on that PC.
Verify that a signon screen is still displayed on the ES32
session.
To continue, key Y and press [Enter].
There will be a momentary delay
(the more W-2s you have, the longer the delay) and then the screen will
display:
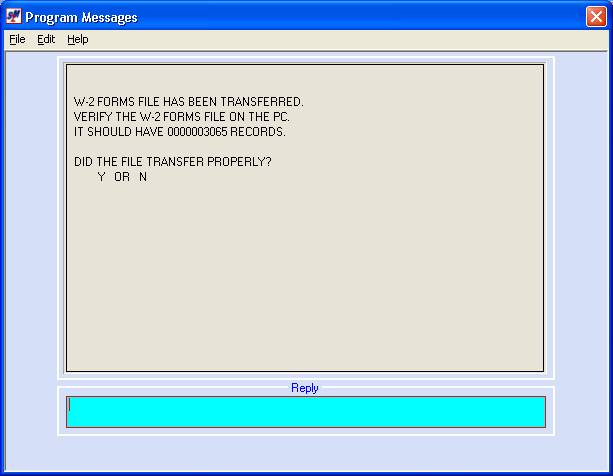
Did The File Transfer Properly:
At this time, you do not know if
the file transferred properly. Leave
this screen as it is. Do NOT reply.
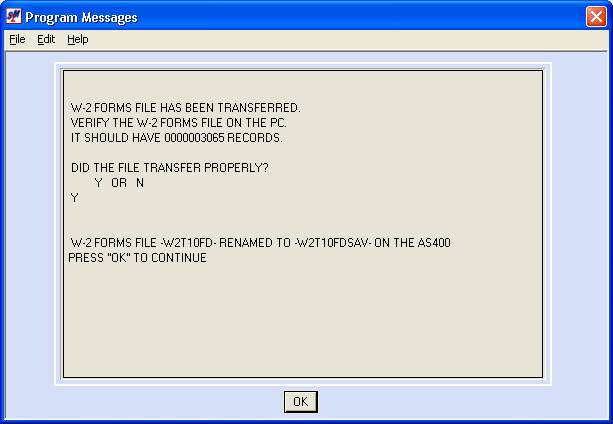
Go to your C:
drive, and look in the CreateACheck folder and make certain that a file named
W2yxxzz (where y equals T for temp or S for staff, xx equals the company
number, and zz equals FD for federal or the state code you keyed earlier) now
exists on the PC.
If the file is there with
today’s date and time, return to the session with the screen shown above and
key Y. Press [Enter].
The screen will display:
Click [OK]. The screen will display:
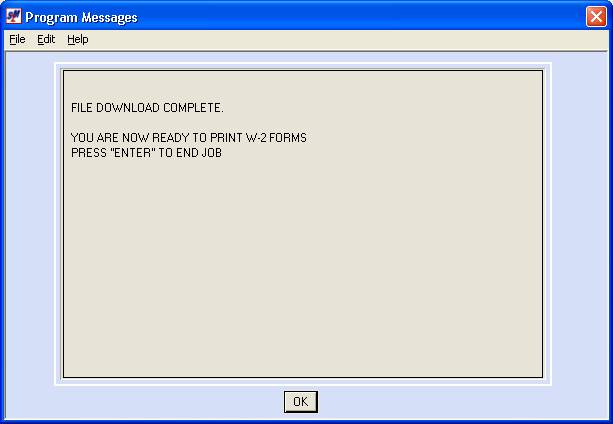
Click [OK]. You will return to menu. You are ready to go to Create-A-Check and
print the W-2s.
Printing W-2s using a SkilMatch2 session
1) Load W-2 stock in the laser
printer.
2) Open Create-A-Check from your
desktop.
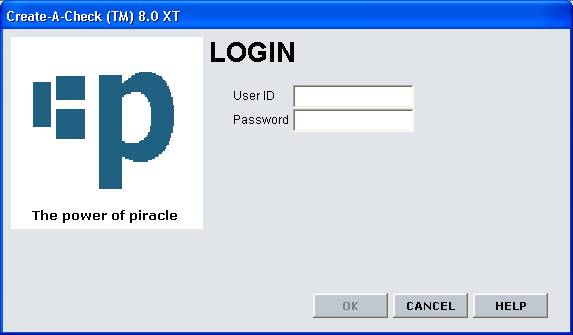
Log in with your special
Create-A-Check user ID and password.
The screen will display the last
CAC option you used. The screen
displayed below is set for “PRINT –Select items to Queue for Printing”. If your screen comes up with some other
option, simply click PRINT from the list displayed across the upper part
of your screen.

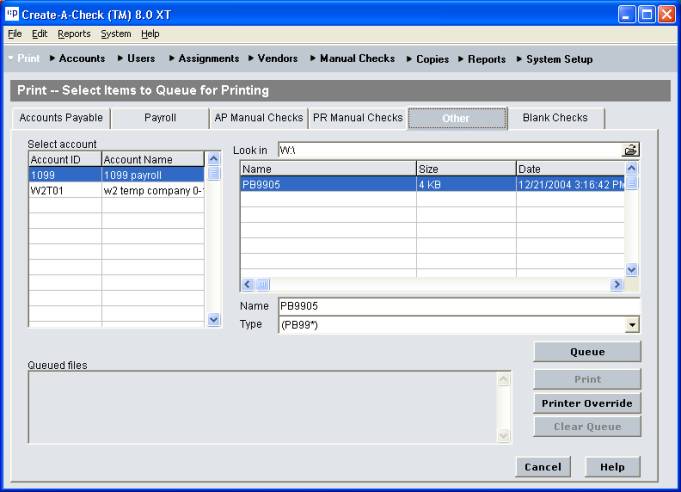
Now that your screen displays “Print
– Select Items to Queue for Printing”, you should select the “Other”
tab. Look in the left column under “Select
Account”. Highlight the appropriate
account.
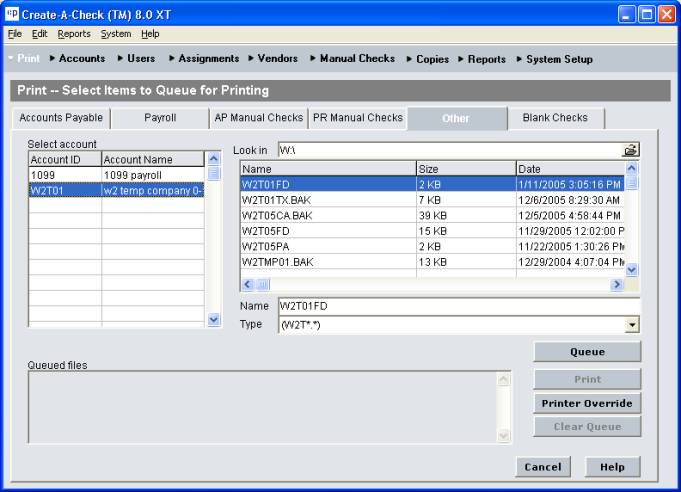
The system will display one or
more print files in the right hand box.
Highlight the print file you wish to print, and click [Queue]. (If a print file has an extension of .BAK,
you will NOT be allowed to QUEUE. The
.BAK extension indicates the file has already been printed.) The screen will display:
The file you highlighted should now display in the bottom left box under “Queued Files”.
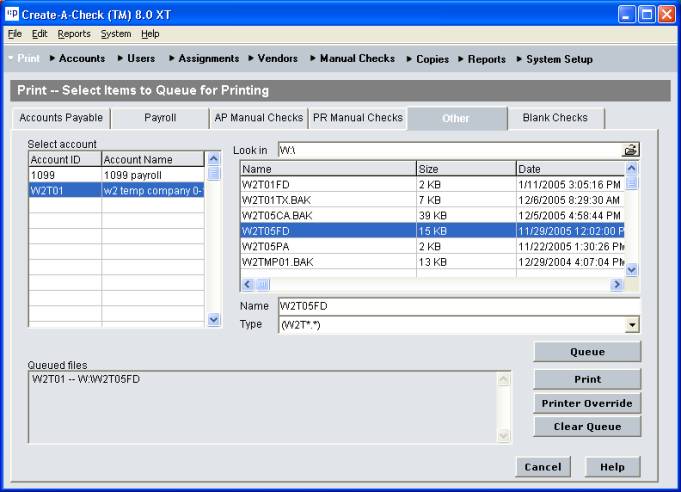
Click the [Print] button on the right side of the screen. The next screen will display:
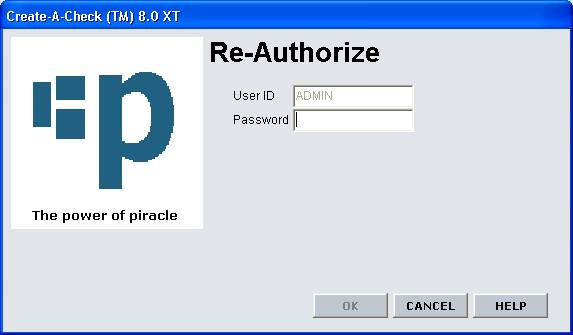
Password:
Enter your CAC password again
and click [OK].
The screen will display:
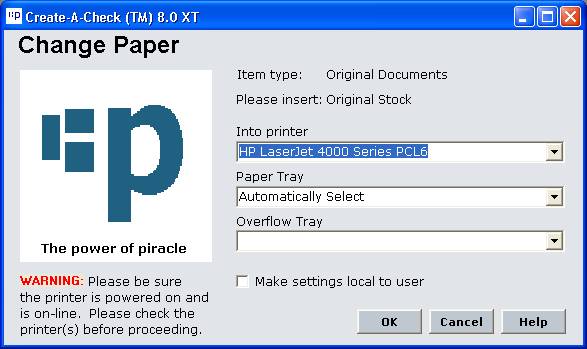
The screen will default to the
printer normally used. This should be
the laser printer that you previously loaded with W-2 stock. If it is not, use the drop down arrow to
select the correct printer. Click [OK].
The screen will display:
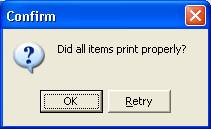
Click
[OK] whether or not the checks printed properly.
Note: Even if you click
OK and they are not okay, you can reprint them from Create-A-Check.
You may or may not get a screen that
reads:

The system will check for old
print files.
If you would like the system to
delete them for you, click [Yes].
OR
If you prefer to do your own
cleanup, click [No].
The screen will return to:
Click [Cancel].
To complete the CAC process,
(1) Click the red X in the top
right corner to close Create-A-Check.
(2) When the W-2s have finished
printing, remove the W-2 stock from
printer.