TIMESHEETS
A timecard is keyed into a ‘batch’ in order to pay an employee and/or bill a customer. You may key all timecards into a single batch, or divide them into groups and key them into an unlimited number of individual batches. A timecard is processed against an employee’s job order. The employee receives one paycheck per timecard. You may pay or bill for hours worked or pay/bill a flat dollar amount.
There are many types of timecards that may be keyed into a batch:
1) Timecards to pay/bill for hours worked
2) Timecards to pay a SkilMatch Bonus or Paid-Time Off (PTO)
3) Timecards to adjust a previous paycheck that paid the wrong amount
4) Timecards to bill a customer, but not pay an employee
5) Timecards to pay an employee, but not bill a customer
Creating Batch files:
A batch is simply a file containing one or more timecards. If yours’ is a small company with one person processing the entire payroll, you could theoretically key all of the week’s timecards into a single batch. Otherwise, creation of multiple batches is an option of convenience. For example, if there are 2 of you doing payroll, then you can split the timecards between you and enter simultaneously into 2 batches. Or, maybe you want each branch office to key in it’s own timecards. Or perhaps you use one of the SkilMatch interface programs (timeclock, FasTime, etc) that create batches of timecards automatically. You may enter timesheets, not only for the current payroll, but also for the next payroll, by creating separate batches.
SkilMatch also offers the option of “Assigned Batches” to simplify batch creation, as well as to add a level of security when you have numerous staff participating in timesheet entry. A user is assigned a 3-character batch code so that when Timesheet entry is selected; the user goes straight into the designated batch, without being given the option of creating a batch (refer to document Menu PayBill Maintenance, Item User Assigned Batches).
Selection of Employee jobs:
In order to key a timecard, you must select the job order that is to be paid or billed on. In order to bring up a list of the employee’s jobs, you will need either part of or all of the employee’s social security number, or their name (to locate the jobs through the Name search). Every job the employee has been assigned to will display for selection, the most recent start date displaying first. You will be able to “clean up” this display of jobs for payroll purposes only, so that all jobs that are over and done with do not continue to display.
Data entry of timecards:
This document covers examples of many potential scenarios, from ordinary paying and billing of hours worked, to before-tax adjustments (like pre-tax deductions), after-tax adjustments (like reimbursed expenses), over/under payments, invoice adjustments, credit memos, holiday bonus pay, and billed expenses.
Employee Paychecks:
Each timesheet entered that has hours or dollars to
pay will produce a separate paycheck. If an employee works 3 different assignments, the employee will receive 3 paychecks.
If an employee turns in a late timesheet and a current timesheet, the
employee will receive a separate check for each timesheet.
Because of size limitations of the Social
Security field, a timesheet may not contain gross dollars exceeding
$12,000.00.
If an employee needs to be paid an amount greater than $12,000.00, split
the amount into multiple entries. This
will result in multiple checks, each with a gross of no more than $12,000.00.
According
to your system’s setup, the gross amounts of the checks may or may not be
combined for tax calculation purposes (refer to document Menu
PBMANT, Item Payroll System Requirements).
Automatic
deductions that are scheduled to be withheld from this payroll process, will be
split proportionately between all of the checks issued to an employee for a
single weekending. Unlike the tax
calculation mentioned previously, the splitting of deductions is hard-coded
into the programs, and is not a user-selected option.
Paychecks for SkilMatch Bonus plan holiday pay, referral bonuses, and
other bonus pay:
Holiday Pay – There is no need to enter a separate job order for Holiday pay, or to key a separate timecard. If hours or dollars are keyed in the Holiday Pay area of the timecard, then a separate check will be issued to the employee, and the customer will not be billed. Hours keyed in this area will not accumulate toward any future bonus plan of any type. Automatic deductions for Holiday paychecks are based on the deduction frequency on the timesheet on which the Holiday hours are keyed. Only use this area if the expense for the holiday wages are absorbed by your company, and not passed on to the customer. The system will use a specific wage account for holiday wages.
Referral Bonus – Many users add job orders with a designated Branch/Division/Class combination in order to track this referral bonus pay separately from regular wage expense. A separate job is not mandatory since Referral bonuses are not tracked through SkilMatch bonus programs. These dollars will be subject to taxation. Some users prefer to issue Accounts Payable checks, rather than payroll checks, for referral bonuses so that a gross amount can be paid, rather than a net (like a flat $25.00).
Other types of Bonus pay – If you use the SkilMatch bonus programs to track employee eligibility, then you must process a “timecard” against special Bonus Job Orders. These Bonus-type job orders may also have designated Branch/Division/Class combinations in order to post the wages to specific expense accounts. It is only by producing paychecks on these special Bonus jobs that the system can track payment and future eligibility for bonuses.
Paychecks for PTO:
You may include the hours or
dollars for paid-time-off on the regular timecard, or may key it onto a
separate timecard if you want to generate a separate check.
Customer Invoices:
Normally, how the timesheet is keyed has no effect as to what prints on the invoice, or how many invoices are created for a single customer. Selections within the Customer file, within the Job order file, from the Payroll System Requirements file, and from the Payroll Constant file make these determinations.
You can, however, utilize options on the timecard to add additional billing data onto the invoice, or force the creation of separate invoices, or pick up extra information from the job order. See the Invoice Adjustments area for instructions on how to affect this payroll’s invoicing.
FYI: SkilMatch does not allow creation of “debit memos”, only credit memos. If a customer has been billed incorrectly, you may adjust this week’s billing, or you may credit all or part of an existing invoice. You cannot ADD billing to an existing invoice.
Prepaid Check Warning
Message:
New with 2012 Enhancement, during timesheet entry and edit the system has a new warning message during prepaid check entry. A terminal error message will display if the calculated employer paid Social Security and Medicare exceed $999.99. There is no override option; this time sheet entry must be corrected on screen to proceed.
Click on the following
topics to move directly to that section of this document:
Preparing
timecards for batch entry
Displaying an
employee’s jobs for selection in timesheet processing
Locate employee by last 4-digits of SSN
Using Name search (F4) to locate employee
Bringing back last employee viewed (F6)
Overriding automatic deductions
Processing multiple timecards for the same employee
on the same job
Adding a special check message to a paycheck
Adding or deducting dollars to/from the paycheck
Making adjustments to current or past invoices
Using =2= to create separate invoices
Using =3= to create separate invoices using job’s
Accounting note data
Using =4= to sort timecards and print invoices
Adding a second line of detail to an invoice
Invoicing
different hours than are being paid
Holiday pay that is not
billed out
Adding prepaid check data
to a timecard
PREPARING TIMECARDS FOR DATA ENTRY
Because the system has the ability to duplicate data from a previously entered timecard, we suggest that you sort individual timecards into groups before beginning timecard entry. The first sort should be by weekending date. Any late timecards should be separated from the current timecards. If you plan to key the last day worked, then each weekending group should be separated into groups by last day worked. If the employee indicates on the timecard how the paycheck is to be handled (mailed, picked up), then take each weekending/last day worked group and divide each into groups by check handling method (unless paychecks are handled based on a Check handling code in the employee’s file, in which case no further sorting is required.
Next, take each group of timecards and run a calculator tape on total regular hours, total overtime hours, and total double time hours. If the group is large, we suggest that you may want to divide them into manageable sizes (maybe 10 timecards per group, or 20 timecards per group). You will be able to “balance” to the hours as you enter timecards, which can save much wasted time in tracking down keystroke errors!
Each group of timecards that has a calculated total can be added as separate batches (1 batch per sorted group of 10 or 20), or can be keyed into 1 large batch where you have balanced as you go along.
There can be an unlimited number of batches in process at any one time. A "batch" simply represents a group of timesheets (timesheets belonging to a branch office, or being entered by a specific payroll person, or having "special" requirements).
To begin, on the “PayBill Library Master” menu, click [Timesheet Processing]. The screen will display:
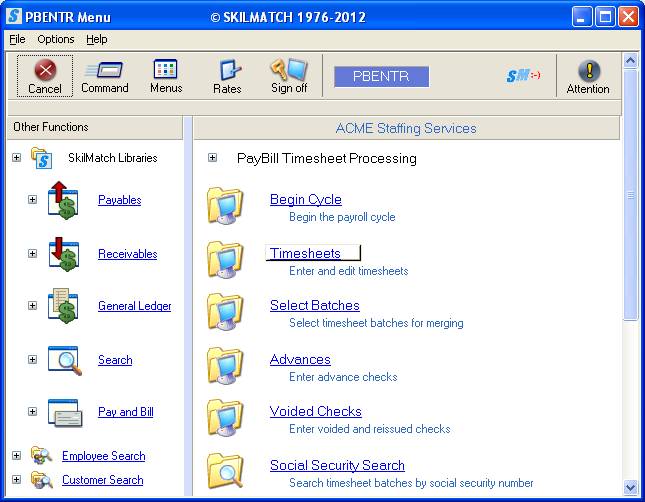
Click [Timesheets]. The screen will display:
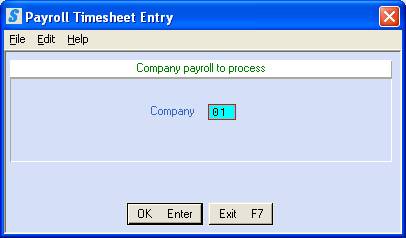
Company:
Defaults to company 01. To enter timesheets for another company, key the desired company.
To NOT proceed, click [Exit F7]. You will be returned to the “PayBill Timesheet Processing” menu.
OR
To proceed, click [OK] or press <Enter>.
Note: users with an assigned timesheet batch will
NOT see this screen.
(Click “Options” or <RIGHT
CLICK> on the screen to
see options and shortcut keys)
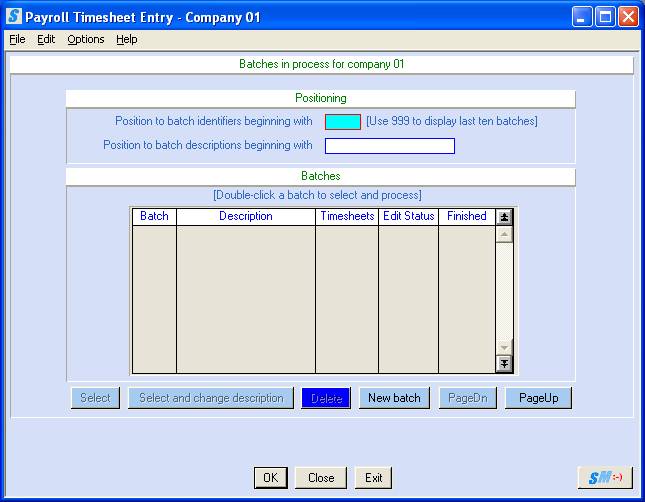
Once you have reached this screen, you have two basic choices – either work with an existing batch of timecards, or start a new batch of timecards.
Create
a new batch
If you want to begin a new batch of timecards, click New Batch to move forward in this document.
Working with an existing batch
You may choose from the following actions:
Add additional timesheets to an existing batch,
Delete an existing batch,
Change the description of an existing batch
Re-edit an existing batch
POSITIONING
Before you can work with an
existing batch, it must be displayed for selection. If the batch you want to work with is not displayed on this
screen, you can click the [PageDn] button one or more times until you
find the batch, or you may use one of the “Positioning” areas to locate
it. Locate the batch by using either
part of the batch ID, or part of the batch description.
Position to batch
identifiers beginning with:
Key up to three characters of the batch ID. Click [OK] or press <Enter>.
OR
To display the final 10 batches, key 999 in this field and click [OK] or press <Enter>.
OR
You may page up/page down to
display batches.
Position To
Description Beginning With:
Key up to 15 characters of the batch description. Click [OK] or press <Enter>.
To position again, <TAB> to this field and key the desired batch description again.
To add/change/delete
individual timecards in an existing batch:
Use your mouse to <DOUBLE
CLICK> on the batch.
OR
Click once on the batch to highlight it and then click [Select].
Refer to How To Display A Person’s Jobs For Selection For Timesheet Entry
To change the description of an existing batch
Note: users with an assigned timesheet batch will
NOT be allowed to perform this function.
Click once on the batch to highlight it and then click [Select and change description].
The screen will display:
Key the desired description and click [OK] or press <Enter> to continue changing the description of the batch.
OR
To not change the description of the batch, click [Close].
To delete an entire batch:
Note: users with an assigned timesheet batch will
NOT be allowed to perform this function.
To delete one of the batches displayed, click once on the batch to highlight it and then click [Delete].
The screen will display:
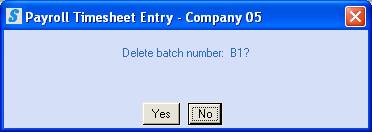
To NOT continue deleting this batch, click [No]. You will be returned to the list of timesheet batches.
OR
To continue deleting the batch, click [Yes].
The screen will display:

To continue working with timesheets, key the desired company and click [OK] or press <Enter>.
OR
To NOT continue working with timesheets, click [Exit] or press <F7>.
Note: users with an assigned timesheet batch will
NOT be allowed to perform this function.
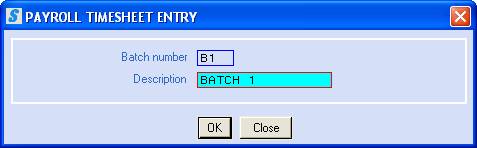
To create a new batch, click [New batch].
The screen will display:
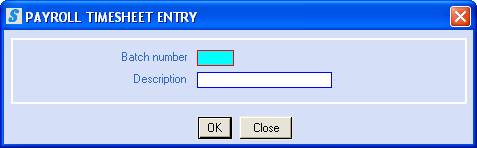
Batch Number:
Assign a two or three character combination (letters or numbers) to identify the batch (you cannot use an ID that is already assigned a timesheet batch, void batch, assigned batch, or reserved batch).
Description:
Key up to 15 characters that describe the contents of the batch (name, initials, office, kind of timesheets to be included, etc.).
To NOT continue creating the new batch, click [Close].
OR
To continue creating the new batch, click [OK] or press <Enter>.
The screen will display:
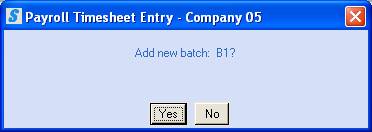
To NOT continue creating the new batch, click [No]. You will be returned to the list of timesheet batches.
OR
To continue creating the new batch, click [Yes].
The screen will display:
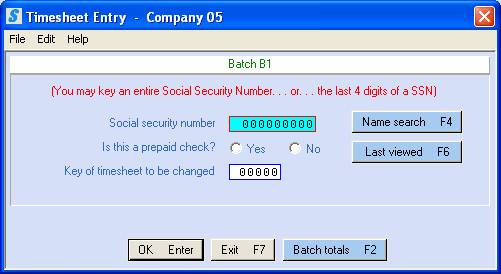
HOW TO DISPLAY A PERSON’S
JOBS FOR SELECTION OF TIMESHEET ENTRY
There are 4 methods for getting to a list of an employee’s jobs for selection and entry of a timecard.
(1) Last 4 digits of a social security number
(2) Complete social security number
(2) Name Search
(3) Bring back last viewed employee
4-digits
of Social Security Number (SSN)
Key the last 4 –digits of the employee’s SSN
OR
Social Security Number
Key the employee’s 9-digit SSN, omitting dashes and slashes.
OR
Click this button or press <F4> to go to the Name search. When the correct employee is displayed, click [Exit] or press <F7> button to return to Timesheet entry. The SSN will be filled in for you.
OR
If you have already keyed one timecard for an employee, and need to add another, click this button, or press <F6> to have the system retrieve the SSN of the last employee viewed.
Is This A Prepaid Check?
A prepaid check
is written for a calculated net pay (gross pay minus taxes and deductions) and
is keyed as a part of timesheet entry.
It is not to be confused with a payroll advance,
which is a check written for part of the gross pay and is posted using a
separate menu option, prior to timesheet entry (refer to document Menu
PBENTR, Item Advances for further information on advances).
If you wrote a prepaid check for this timesheet and are prepared to input specific dollar amounts for net pay, taxes (FIT, Social Security, medicare, state and local taxes), and deductions, click [Yes]. In this document, refer to How To Process Prepaid Check Information for further information concerning prepaid checks.
(If you click [Yes], an extra screen of data will be required to complete entry of this timesheet.)
If you did NOT write a prepaid check for this timesheet, or if you have posted an advance for this timesheet, click [No].
Key Of Record To Be Changed:
If this is a new timesheet entry, leave this area blank.
To view or change an existing timesheet (one previously entered), key the record number.
Note: the
key number can be obtained from the batch’s edit report.
If you do NOT wish to proceed with entry of a timecard, and wish to return to menu, click [Exit] or press <F7>.
OR
If you wish to continue, click [OK] or press <Enter>.
If you keyed just the last 4-digits of the SSN, and if the system locates more than one person with these numbers in common, then the system will display:
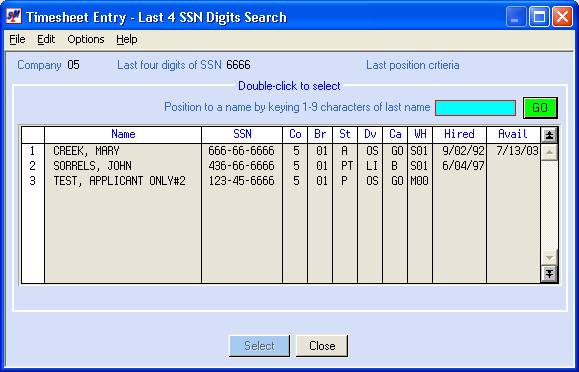
If the employee is displayed, highlight the name and click the [Select] button. If the employee is not displayed, but there are more employees located than can display on the screen, key up to 9 characters of the last name in the POSITION TO area and click the green [GO] button.
Once the system has located the employee, the screen will display the employee’s job orders:
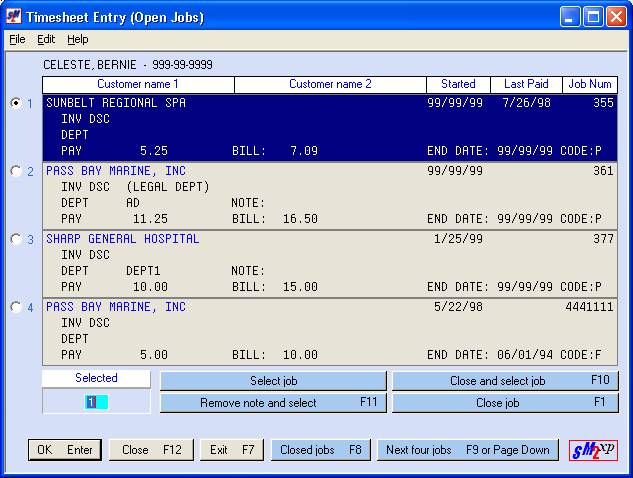
Up to 4 of the employee’s most recent job orders (that are ‘open’) will display.
For the “Front office”, jobs
orders are “open” or “filled”, and have an End code of either “Projected” or
“Final”. In timesheet entry, ‘OPEN’
means it still appears on the list of jobs available for timesheet
processing. “Closing” a job simply
removes the job from the open list and moves it to the closed list. Moving a
job to the closed list will reduce the opportunity of error for future
timesheet entry.
The jobs are displayed in start date order with the most recent start date displayed first. The system automatically selects the 1st job displayed (the one with the most recent start date).
You have the following choices when working with ‘OPEN’ jobs:
(Each item is described below this list)
(1) Do
Not Select Any Jobs For This Social Security Number:
(2) Do Not Process
Time On Any Jobs And Return To Menu
(3)
Process A Timesheet for the 1st Job displayed
(4)
Process A Timesheet For Jobs 2, 3, or 4
(5)
Process A Timesheet And Delete The Accounting Note
(6)
Process A Timesheet and Close A Job
(7) Close A Job - No Timesheet
(8)
Process Time On An Older Job
(9)
Display "Closed" Jobs
(1) Do
Not Select Any Jobs For This Social Security Number:
You may decide you do not wish to process a timesheet for this social security number, but wish to try another social security number. Click [Close F12].
(2) Do
Not Process Time On Any Jobs And Return To Menu:
You may decide you do not wish to process a timesheet for this social security number, but wish to return to the “PayBill Library Timesheet Processing” menu. Click [Exit F7].
(3)
Process A Timesheet for the 1st Job displayed:
To process a timesheet on the 1st job displayed, click [OK Enter], [Select job], or press <Enter>.
(4)
Process A Timesheet For Jobs 2, 3, or 4:
To process a timesheet on the 2nd, 3rd, or 4th job displayed, click the dot to the left of the job and click either [Select job], [Ok Enter], or press <Enter> to key a timecard for this job.
(5)
Process A Timesheet And Delete The Accounting Note:
If the accounting note refers to the current payroll only, and will not refer to future payrolls, you should remove it during this process. If you remove it, a copy will be added to the job order’s Activity comments.
To delete the accounting note AND process a timesheet for the job simultaneously, click the dot to the left of the job and click [Remove note and select F11].
(6)
Process A Timesheet and Close A Job:
If you believe that this timecard will be the last one you will receive on this job, we recommend that you close it at the same time you process the timecard. On the next payroll the job will not display on the open jobs.
To ‘close’ a job AND process a timesheet for a job simultaneously, click the dot to the left of the job and click [Close and select job F10].
(7) Close A Job - No Timesheet:
If you see from the end date that a job has been finished for a couple of weeks or more, then you probably will not be processing any additional pay or billing on this job. We recommend that you move this job off the list of open jobs, and over to the list of closed jobs. Closing a job in timesheet entry has NO effect on the job in the personnel file, customer file, or job file.
To ‘close’ a job for which you have no timesheet to process, click the dot to the left of the job and click [Close job F1].
The screen will update. If the employee has additional jobs that were not originally visible from this screen, the next job will appear at the bottom of the list of jobs.
(8)
Process Time On An Older Job:
If the job does not appear as one of the 4 jobs on this screen of ‘open’ jobs, click [Next four jobs F9 or Page Down]. The screen will display the next 4 jobs. Continue to click [Next four jobs] until the job order associated with your timesheet displays.
Note: you
may NOT go backwards. If you
accidentally pass the job screen you need, keep paging forward. When the end is
reached, the jobs will start over again.
(9)
Display "Closed" Jobs:
If you need to process a timesheet on a job that has been ‘closed’, click [Closed jobs F8].
The screen will display:
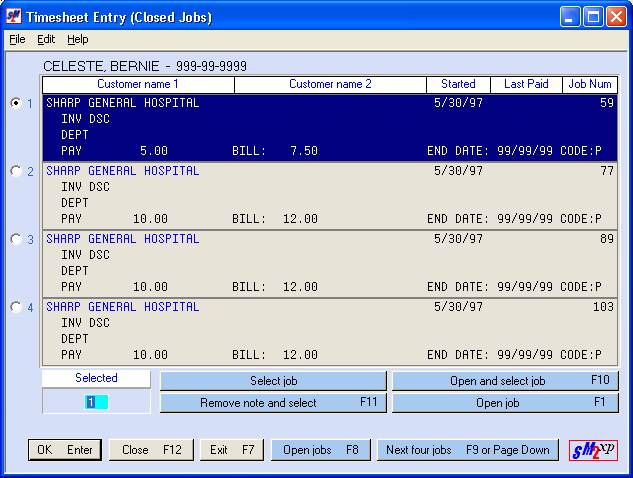
You have the following choices when working with ‘CLOSED’ jobs:
(Each
item is described below the list)
(1) Do
Not Select Any Jobs For This Social Security Number
(2) Do
Not Process Time On Any Jobs And Return To Menu
(3)
Process A Timesheet for the 1st Job displayed
(4)
Process A Timesheet For Jobs 2, 3, or 4
(5)
Process A Timesheet and Open A Job
(6)
Process A Timesheet And Delete The Accounting Note
(7)
Process Time On An Older Job
(8)
Display "Open" Jobs
(9) Open A Job - No Timesheet
(1) Do
Not Select Any Jobs For This Social Security Number:
You may decide you do not wish to process a timesheet for this social security number, but wish to try another social security number. Click [Close F12].
(2) Do
Not Process Time On Any Jobs And Return To Menu:
You may decide you do not wish to process a timesheet for this social security number, but wish to return to the “PayBill Library Timesheet Processing” menu. Click [Exit F7].
(3)
Process A Timesheet for the 1st Job displayed:
To process a timesheet on the 1st job displayed, click [OK Enter], [Select job] or press <Enter>.
(4)
Process A Timesheet For Jobs 2, 3, or 4:
To process a timesheet on the 2nd, 3rd, or 4th job displayed, click the dot to the left of the job and click either [Select job], [Ok Enter], or press <Enter> to key a timecard for this job.
(5)
Process A Timesheet and Open A Job:
To re-‘open’ a job AND process a timesheet for a job simultaneously, select the job by clicking the number to the left of the job and click [Open and select job F10].
Note: you
will get a timesheet screen for entry, but the job will no longer appear on the
screen of ‘closed’ jobs; it will appear on the screen of ‘open’ jobs.
(6)
Process A Timesheet And Delete The Accounting Note:
If the accounting note refers to the current payroll only, and will not refer to future payrolls, you should remove it during this process. Should you remove it, a copy will be added to the job order’s Activity comments.
To delete the accounting note AND process a timesheet for the job simultaneously, click the dot to the left of the job and click [Remove note and select F11].
(7)
Process Time On An Older Job:
If the job does not appear as one of the 4 jobs on this screen of ‘open’ jobs, click [Next four jobs F9 or Page Down]. The screen will display the next 4 jobs. Continue to click [Next four jobs] until the job order associated with your timesheet displays.
Note: you
may NOT go backwards. If you
accidentally pass the job screen you need, click [Close F12] and try again.
(8)
Display "Open" Jobs:
To go back to the list of “Open” jobs, click [Open jobs F8].
(9) Open A Job - No Timesheet:
If job was closed by accident, or the employee begins working on the job again, you can re-open the job. To ‘open’ a job for which you have current and FUTURE timesheets to process, click the dot to the left of the job and click [Open job F1].
The screen will update. If the employee has additional jobs that were not originally visible from this screen, the next job will appear at the bottom of the list of jobs.
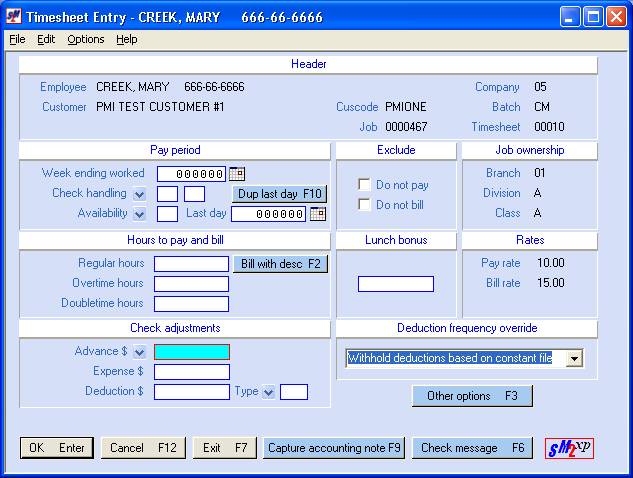
Once you have selected a job order on which to pay and/or bill, a timesheet data entry screen will be presented. There are more options available than present themselves on the initial timesheet entry screen. The initial screen will satisfy the most common timecard requirements. Areas on the continuation screen, accessed by clicking the [Other options F3] button, should handle all potential timecard scenarios.
The instructions for the more complex timecards are discussed just after the Deduction Frequency Override area.
Do not click [OK]
until you have determined that all necessary aspects of the transaction have
been handled.
Confirm that you have selected the correct job for the correct employee at the correct customer by reviewing the data displayed at the top of the screen. The screen will display the pay and bill rates from the job order so that you can do a last inspection for accuracy, it will also display the job’s Branch/Division/Class combination so that you can verify that this billing and expense will show up correctly on gross profit reports.
The cursor is positioned at Regular hours in the Hours to Pay and Bill box. You may need to <Tab> back to modify areas in the PAY PERIOD box.
PERIOD
ENDING box
Week Ending Worked:
If this is the first timesheet in a batch, then <TAB> back to the weekending date and key:
0 for the current week ending
1 for one-week prior
2 for two weeks prior
3 for three weeks prior
You are not allowed to key a date
that matches one of the weekending dates currently in the Payroll Constant
file. Those dates must be entered as 0,
1, 2, or 3.
OR
If the timesheet’s weekending date does not match any of the dates from the Constant file, you must key the date.
OR
Select dates
by clicking the ![]() button (prompt and select button) to the
right of dates throughout SkilMatch2. The
button (prompt and select button) to the
right of dates throughout SkilMatch2. The ![]() button will display a
calendar from which you may click on a date to select, and then click [OK] or press
<Enter> to key the date.
button will display a
calendar from which you may click on a date to select, and then click [OK] or press
<Enter> to key the date.
If this is NOT the first timesheet of the batch and the week ending date is correct, you may leave your cursor at Regular hours.
(The weekending date from this
timesheet will be automatically duplicated for each additional timesheet
entered during this session. For this
reason, we recommend you separate late timesheets from current timesheets and
enter separately.)
Note: if the weekending date entered is more than 7 days after the final end-date on the job order (other than a date of 999999), you will receive an error message. The message is alerting you to a potential problem – is the timesheet legitimate? You may override the warning by clicking [Ignore] to continue.
The check handling code (also
known as the Paycheck hold code), if used according to SkilMatch standards, may
determine how the payroll check will be sorted during printing. This check handling code also prints on the
top of each paycheck. If need be, click
the prompt and select button ![]() , or
press <F4>, to select the Hold
code type.
, or
press <F4>, to select the Hold
code type.
There are 3 ways to get a check hold code onto a timecard:
(1) Duplicate - If the ‘Payroll System Requirements’ file is set up to duplicate the hold code from timesheet to timesheet, and this is the first timesheet of the batch, you will need to move your cursor to this area and key the appropriate hold code for this batch. The system will automatically duplicate the hold code for additional timesheets entered.
(You will not need to change the hold code until you reach a group of timesheets that belong to a different hold code.)
FYI: Timesheets with different hold codes can be
entered in the same batch. If you use
the duplicate option, SkilMatch recommends you separate timesheets into groups
prior to entering so you only have to change the hold code when you reach a
group of timesheets that belong to a different hold code.
OR
(2) Pull From Employee File - If the ‘Payroll System Requirements’ file is set up to use the hold code from the employee file, the hold code will be picked up from the employee file. If the hold code in the employee's file is blank, you will need to key the appropriate code.
Note: if the paycheck hold code in the employee
file is changed AFTER the timesheet is entered, the new hold code will not be
used until the next timesheet is entered.
It is the paycheck hold code in the employee’s file at the time of
timesheet entry that is used in payroll processing.
OR
(3) Both - If the ‘Payroll System Requirements’ file is set up for ‘Both’, the hold code will be picked up from the employee file. If the employee file does not have a default hold code, the last manually-entered hold code entered in this batch will be duplicated.
Because there are other ways of tracking a person’s availability, most organizations choose not to use this area. If used according to SkilMatch standards, the availability code can reflect the status of an employee’s availability and the status of their assignment. These codes may indicate that a person is returning to an assignment, or that the assignment has been completed. Most organizations get the availability information from the employee’s timesheet. If your timesheet does not have a question for the temporary’s response, then you will not use this area.
If you use a set of availability codes, the availability report that is generated during payroll (refer to document Menu PBPROC, Item Payroll Reports for further information) will sort the timesheets first by the employee's category and then by the timesheet availability code. This report may be given to your front office staff so they will know which word processors are returning to their assignments and which data entry operators have completed their assignments, for example.
If this is the first timesheet
of a batch, click the prompt and select button ![]() , or
press <F4>, to select an
approved availability code. (Blank may be your only approved code.) The availability code from this
timesheet will be automatically duplicated for each additional timesheet
entered during this session.
, or
press <F4>, to select an
approved availability code. (Blank may be your only approved code.) The availability code from this
timesheet will be automatically duplicated for each additional timesheet
entered during this session.
Last day:
If the
‘Payroll System Requirements’ file is set up to track the last day of the week
an employee worked, you may key the 6-digit date (MMDDYY) into this area, or
select a date by clicking the ![]() button (prompt and select button). The
button (prompt and select button). The ![]() button will display a
calendar from which you may click on a date to select, and then click [OK] or press
<Enter> to key the date.
The system will verify that the last day you key is within the date
range of the week-ending worked selected above.
button will display a
calendar from which you may click on a date to select, and then click [OK] or press
<Enter> to key the date.
The system will verify that the last day you key is within the date
range of the week-ending worked selected above.
If you have already keyed a timecard with a last date, and you want to use the same date on this timecard, click the [Dup last day] button or press <F10>.
(This date will
display in the employee’s file under ‘Action and More’/ Date Tracking.)
HOURS TO PAY AND BILL box
Hours entered in the “Hours to pay
and bill” areas will be paid to the
employee and billed to the customer unless other steps are taken. (See complex timecards for special instructions on timecards to pay without
billing, or to bill without paying, or for paying a different set of hours than
are being billed.)

Regular Hours:
Key the number of regular hours to be paid and billed. Use zeroes to hold decimal spaces, but do NOT key a decimal. The system will pay the employee using the Pay rate on the job order, and will bill the customer using the Bill rate on the job order.
(37 hours is keyed as 3700. 37 and 1/2 hours is keyed as 3750. If you need to bill exact minutes, then divide the number of minutes by 60. Example: 37 hours and 13 minutes is keyed as 3722)
If this timesheet for regular hours only, and has no other special considerations (like needing a special check message, or reimbursing expenses, or breaking out the billing into individual line items, or other pay and/or bill adjustments), click [OK] or press <Enter> after entering the regular hours. The current timesheet will be edited and if any potential errors are detected, you will receive a warning message(s). The cursor will be placed in the area with the error. Correct the error, or click [Ignore] to accept this timesheet with the error.
FYI: the system WILL allow you to [Ignore] a “terminal” error as a temporary convenience. A “terminal” error on any timecard in the batch, however, will not allow the batch to pass edit. You must go back into the batch and make necessary corrections so the batch will pass edit and can be selected for merging.
Repeat the preceding instructions in adding additional "regular hours only" timesheets.
(If this timesheet has overtime/doubletime hours or other special considerations, please read below for additional instructions.)
Overtime Hours:
Key the number of overtime hours to be paid and billed. Use zeroes to hold decimal spaces, but do NOT key a decimal. The employee will be paid time and ½ of the job order’s pay rate. The customer will be billed time and ½ of the job order’s bill rate, IF the Overtime rate field on the job order is left blank.
(4 hours are keyed as 400)
Doubletime Hours:
Key the number of doubletime hours to be paid and billed. Use zeroes to hold decimal spaces, but do NOT key a decimal. The employee will be paid double the job order’s pay rate. The customer will be billed double the job order’s bill rate, IF the Doubletime rate field on the job order is left blank.
(4 hours are keyed as 400)
CHECK
ADJUSTMENTS box
Dollars entered in any of the
“check adjustments” areas will affect only the employee’s paycheck. To also bill, refer to documentation below
on “expenses to be invoiced”.

Advance $:
If you gave an employee an advance on their payroll check, and have posted the advance check during a previous option (refer to document Menu PBENTR, Item Advances for further information), key either the full amount of the advance dollars, or a portion of the advance that you want to be subtracted from the net pay generated from this timecard.
Key the amount as a positive, NOT a negative.
(The system knows to DEDUCT this amount.) Use zeroes to hold two decimal spaces.
If the employee has an advance in
their file and you do not enter an advance amount, you will get a warning
message.
If the amount you key is greater
than or less than the amount of the advance in the employee’s file, you will
get a warning message.
If the amount of the advance is
greater than the anticipated gross amount of the timesheet (hrs X pay rate),
you will get a warning message.
If this employee has more than one timesheet, key
the advance on one timesheet ONLY. You will get a warning message on each
additional timesheet, but you should click [Ignore]
on the additional timesheets.
You cannot key advance dollars on a Holiday Pay timecard – you will get an error message. If you have advanced pay on holiday pay, then you must take it from a regular timecard.
Key the amount of a NON-TAXABLE reimbursement owed this employee. Use zeroes to hold two decimal spaces. This amount will be added to the net pay calculated for this paycheck. These dollars are not reported on the employee’s W-2.
(If the timecard is for reimbursed expenses only, no deductions will be subtracted.)
(Reimbursed expense dollars
post to a predefined general ledger account that may be different from employee
wage expense.)
Use this area to withhold one-time (non-recurring) deduction amounts, or to refund previously deducted amounts without permanently changing the employee’s recurring deductions set up through Menu PBMANT, Item Employee Deductions.
If you are withholding the deduction, key the amount as a positive, NOT a negative. (The system knows to DEDUCT this amount.)
If you are refunding a
deduction that was withheld from a previous payroll, key the amount as a
negative.
(These dollars will post to
a predefined general ledger account based on the deduction type entered below).
If the employee has recurring deductions (like garnishments, 401K contributions, and more) we recommend that you set up these deductions to occur automatically and not use this area on the timecard. (Use Menu PBMANT, Item Employee Deductions to create these automatic deductions.) The ‘Deduction Frequency’ code in the Payroll Constant file, selected during the “Begin Cycle”, determine which deductions will be withheld from timecards in this payroll.
If, however, there is a one-time deduction to be withheld, or you need to add to or subtract from an automatic deduction this pay period, you may key an entry in this area to affect just this one timecard.
If this is the first time this
deduction type has been withheld from this employee’s paycheck, then the system
will create a deduction record for you, and will add a Deduction frequency of
9, so that the deduction will be “inactive” after this payroll is processed.
(This is only true for non-garnishment and non-pre-tax type deductions; GARNISHMENT
or PRE-TAX deduction types must be set up ahead of time as an automatic
deduction.)
Key the amount of the extra deduction you wish to withhold from this check as a positive amount (500), or the amount of deduction you wish to refund on this check as a negative amount (-500: use the top right key on the keypad). Use zeroes to hold two decimal spaces. (500 is $5.00)
Note: A
negative deduction cannot be the only entry in a timesheet. At a minimum you must enter $.01 as expense
dollars and enter the deduction amount withheld in error as a negative
deduction. The employee will receive a
check in the amount of the deduction plus $.01.
Deduction Type:
Click the prompt and select
button ![]() , or
press <F4>, to select the
deduction type for the amount keyed in the deduction $ area.
, or
press <F4>, to select the
deduction type for the amount keyed in the deduction $ area.
EXCLUDE
box
Normally, hours
that are keyed into the Regular, Overtime and Doubletime areas are both paid to
the employee and billed to the customer.
However, there may be circumstances under which the employee should not
be paid for these hours, or the customer should not be billed for the
hours. If this is a straight forward no
bill or no pay situation, use the DO NOT PAY and DO NOT BILL areas to handle these situations.
Do not, however,
use these areas to handle situations where you want to create a single check
for the employee, but need to break out the hours being billed into separate
items. Instead, refer to complex
timecards for special instructions.
Do Not Pay:
If you wish to bill the hours keyed above, but do NOT wish to pay them, select ‘Do not pay’ by clicking once to display the checkmark.
Note: if you mark this timesheet ‘do not pay’, NO paycheck will be issued even if you enter pay data in other areas of this timesheet.
If you wish to pay the hours keyed above, but do NOT wish to bill them, select ‘Do not bill’ by clicking once to display the checkmark.
Note: if you mark this
timesheet ‘do not bill’, NO invoice will be issued even if you enter
bill data in other areas of this timesheet.
The Lunch Bonus option is an automated plan where employees earn “credits” based on the number of hours worked in a week. During timecard entry, credits or dollars are keyed to give the employee extra pay for “lunch”, but the customer is not billed.
If your organization uses the Lunch bonus option (look for #L bonus type in your Bonus Master file), and if this employee prints on the Bonus Eligibility list as having accumulated the required number of lunch credits, then you may add lunch pay to the employee's paycheck.
“Lunch pay” is taxable and will be listed under the
‘other transactions’ section of the paycheck stub. Lunch bonus is not billed to the client.

There are 2 ways to pay out a Lunch bonus:
(1) Key the number of lunch credits to pay (1-10) and
the system will add the equivalent of 1/2 hour of this job's regular pay rate
times the number of lunch credits entered.
Example: 5 lunch credits would be entered as 5, 10 lunch credits would
be entered as 10.
OR
(2) Key the dollar amount to be paid for lunch bonus. Any figure between 11 and 9999999 is treated as dollars, not credits. 11 would be $.11; 1000 would be $10.00, etc.
Note:
a) 1 through 5 assumed as credits; calculation performed; verification message “Lunch credits entered, verify lunch dollars calculated” displayed.
b) 6 through 10 assumed as credits; calculation performed; warning message “Lunch credits are greater than 5” displayed; verification message “Lunch credits entered, verify lunch dollars calculated” displayed.
c) 11 through 1000 assumed as dollars; no calculation performed; verification message “Lunch dollars are greater than $.10 and less than $10.01” displayed.
d) 1001 through 5000 assumed as dollars; no calculation performed; no verification message displayed.
e) 5000 through 9999999 assumed as dollars; no calculation performed; verification message “Lunch $$ are greater than $50.00” displayed.
f) You may pay lunch credits or dollars on a timesheet without any hours or other dollars being paid.
g) You may subtract lunch credits or dollars by entering the DOLLARS as a negative number. ALL NEGATIVE AMOUNTS ARE TREATED AS DOLLARS. You must be paying hours or dollars on the timesheet in order to do this (there must be something to subtract from) and you cannot do this on a timesheet where you are paying lunch credits or dollars (the lunch bonus cannot be entered as both negative and positive in the same timesheet).
During the ‘Begin Cycle’ a
Deduction Frequency is selected on the Constant file for this payroll. The system will automatically withhold any
“active” employee deduction whose frequency matches the Constant file
selection. If you need the “automatic employee deductions” for this
timecard to differ from the Frequency selected for the payroll, use the ![]() button (prompt and select button) to the
right of deductions to select a different frequency.
button (prompt and select button) to the
right of deductions to select a different frequency.
Choose from:
(1) Withhold deductions based on the frequency in the
Constant file.
(2) Withhold type 1 deductions only.
(3) Withhold type 2 deductions only.
(4) Withhold type 3 deductions only.
(5) Withhold type 1 and type 2 deductions.
(6) Withhold type 1, type 2 and type 3 deductions.
(7) Withhold type 2 and type 3 deductions.
(8) Withhold type 1 and type 3 deductions.
(9) Do not withhold any automatic deductions.
To NOT process this timesheet and try again, click [Cancel F12].
OR
To NOT process this timesheet and return to the “PayBill Library Timesheet Processing” menu, click [Exit] or press <F7>.
OR
If this timesheet is complete, click [OK] or press <Enter>.
OR
If this timesheet is not complete, or if the employee has multiple timesheets to be processed on the same job order, see the additional options listed below.
If you click [OK] or press <Enter>, the current timesheet will be edited and if any potential errors are detected, you will receive a warning message(s). The cursor will be placed in the area with the error. Correct the error, or click [Ignore] to accept this timesheet with the error.
Note: the system WILL allow you to [Ignore]
a “terminal” error as a convenience. A
“terminal” error, however, will not allow this batch to pass edit. You must make any necessary corrections so
this batch will pass edit and can be selected for merging.
Repeat
the preceding instructions in adding additional basic timesheets that do not
have special pay or bill situations.
For complex timecards that have special pay or bill situations, please select one of the topics listed below that best match your situation.
PROCESSING ONE PAY
TIMECARD, WITH MULTIPLE BILLING TIMECARDS
If you need
to create a single paycheck for the employee, but the customer needs the hours
broken up and billed as multiple line items on the invoice, you will use the [Bill with desc F2] button.
Begin by
keying the total hours to be paid to the employee. Instead of marking the timecard NO BILL and clicking [OK], click
the [Bill with desc
F2] button or simply press (F2). The system
will enter the timecard, marking it NO BILL, and will bring up a new card for
the same employee, same job, with the cursor positioned at INVOICE ADJUSTMENTS.
Key the
first of the billing timecards. Click [More billing F2] or press (F2)
instead of [OK]. The system will add
this billing timecard and will bring up a new timecard, again positioning the
cursor at INVOICE ADJUSTMENTS.
Repeat for
each additional billing timecard for this employee’s job. After you have keyed the final billing
timecard, press [OK] instead of
clicking [More
billing F2]. You will
return to the Timesheet Entry screen, ready to select another employee or
another of the employee’s jobs.
PROCESSING
MULTIPLE TIMESHEETS FOR THE SAME EMPLOYEE ON THE SAME JOB
If you need to create multiple paychecks and
multiple lines of billing on the invoice, (multiple timesheets for the SAME employee on the SAME job order), enter the basic timecard, then click [Other options F3].
The screen will display:
From this screen, click [Process and repeat F8].
This will (1) add this timesheet and (2) take you directly to a new timesheet for this same person, this same job order with your cursor positioned at regular hours.
Repeat these procedures again if you have another timesheet for the SAME employee on the SAME job order.
When you have finished entering the last timesheet for this person/this job click [OK] or press <Enter> rather than clicking “Options” and selecting “Process and repeat” and you will go to the screen for the next social security number.
Note: when
using the “Process and repeat” option, you cannot use the special check message
option.
Note: the system WILL allow you to [Ignore]
a “terminal” error as a convenience. A
“terminal” error, however, will not allow this batch to pass edit. You must make any necessary corrections so
this batch will pass edit and can be selected for merging.
During the Begin Cycle, the system’s Constant file is displayed for updating. At that time a default Check message can be added that will print on all paychecks during the payroll. The same check message will display again during the Print Check option for “one-payroll-only” changes.
You may override this default Check message on a timesheet-by-timesheet basis. To override the default message with a special message for THIS timecard’s paycheck, click [Check message F6].
NOTE: If you need to add a special check message
to timecard that used the [Bill with desc
F2] button, you will have to first enter all of the pay and bill
timecards, then will have to bring the pay timecard up using the Key number,
and add the check message to the existing timecard.

Before the system takes you to the Check message screen, the timesheet will be edited and if any potential errors are detected, you will receive a warning message (s). After error(s) have been corrected (or accepted by clicking [Ignore]), click [Check message] again.
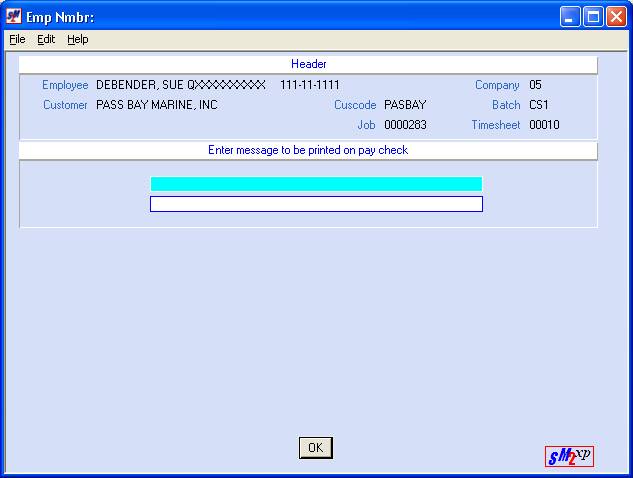
You will have two lines, 40 characters each, available for a specialized check message to print ONLY on this check.
If this timecard includes holiday pay (which create
separate checks to the employee), be aware that the special check message will
NOT print on the bonus check, just on the regular check).
Click [OK] or press <Enter> when complete. This will complete entry of this timesheet.
To
add a 2nd line of billing data to the customer's invoice:
The system will automatically print on the invoice the 60-character Invoice description from the job order. This occurs without any action from you. If, however, there is more needed on the invoice than will fit in the job order’s area, then the additional detail can be keyed on the timesheet’s Adjustment description and it will show up on the invoice as a second line of detail. This detail can be added two ways:
Key the information onto the timecard manually,
Or,
Key the information onto the Accounting Note line of the job order, then during timecard entry click [Capture Accounting Note F9]. Your cursor will reposition to the Adjustment Description area, and the first 23-characters from the job order Accounting Note area will now appear. Make any desired changes to this data and then click [OK] or press <Enter>.
The initial screen of the timesheets handles
the most common situations of a timecard.
If you have additional issues that need to affect the employee’s
paycheck or the customer’s invoice, click the [Other options F3] button
to bring up a screen with these additional options.
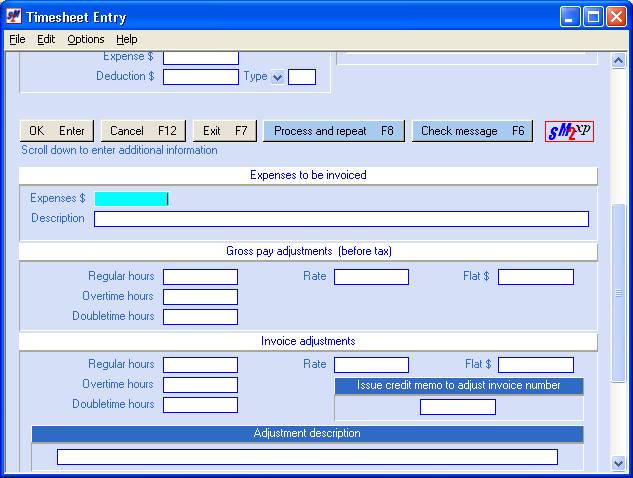
BILLING EXPENSES
After you click the [Other options F3] button, your cursor will be positioned at Expenses To Be Invoiced.

Expenses $:
Key the amount of an expense you wish to invoice. Dollars entered in “expenses to be invoiced” will be billed only. Use zeroes to hold two decimal spaces.
These dollars will post to
general ledger account that may be different from the income account. Do not bill normal income in this area!
Description:
Key a description of the expense dollars entered. Enclose this description in parentheses for a more distinctive appearance on the invoice. This information will print on a separate line on the invoice.
GROSS PAY ADJUSTMENTS (including the
payment of PTO):
Use this area to pay the employee an additional amount or take away money from this paycheck. The adjustment might be for an underpayment from a previous pay period, or an overpayment to a previous pay period, or it could be a payment for ‘paid-time-off’ (PTO). These amounts will become part of the taxable gross.
(Anything keyed into this area will affect ONLY the paycheck, it will not affect the invoice.)
Choose from:
Hours paid at the job order pay rate, or
Hours paid at a specified pay rate that you key on this screen, or
A FLAT dollar amount that is keyed on this screen.
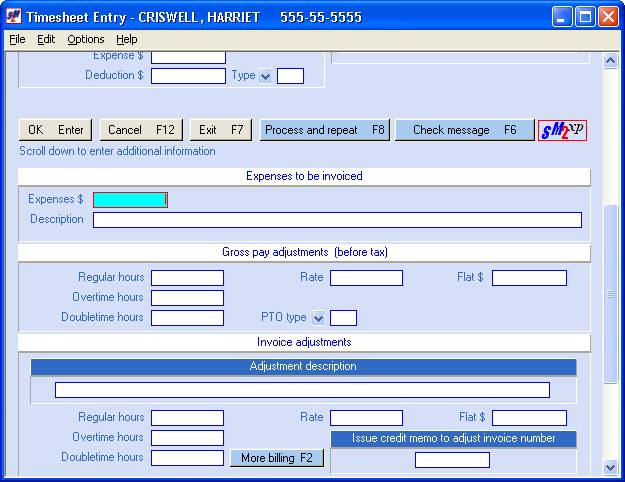
Overtime hours
Doubletime hours:
If you overpaid hours on a previous payroll, key the hours to take away, then press the negative sign key on the top right of your keypad.
If you underpaid hours on a previous payroll, key the hours as positive.
(Hours keyed without a rate
will affect all types of employee ‘hours paid or worked’ accumulations.)
Rate:
If the hours paid on a previous check were correct, but the pay rate on a job was incorrect at the time a payroll was processed, then the employee’s check was incorrect. Key the number of hours previously paid, then key the pay rate difference (correct rate minus incorrect rate) in the RATE area. (Unlike Invoice Adjustments, it is OK to key hours in more than one type of HOURS when using a rate.)
The rate will always be
entered as a positive amount.
(Hours keyed with a rate
will NOT affect any type of employee ‘hours paid or worked’ accumulation.)
Flat $:
To PAY this adjustment, key the dollar amount as a positive.
To WITHHOLD this adjustment, key the dollar amount, then press the negative sign key on the top right of your keypad
(Flat dollar amounts will
not affect any system hour accumulation.)
PTO type:
If the amount to be added to the employee’s paycheck is for paid-time-off, you must select the type of PTO in order to have the system cross-reference the payment against the employee’s accrued PTO plans. If you do not select a PTO type, then the system will pay this amount as a standard pay adjustment.
Click the prompt and select
button ![]() , or
press <F4>, to select the PTO
type.
, or
press <F4>, to select the PTO
type.
INVOICE ADJUSTMENTS
Use these areas to affect this pay period’s invoice, or to credit an existing invoice.
(Anything keyed into this area will affect ONLY the invoice - it will not affect the paycheck.)
Adjustments
may be necessary because:
(1) A customer was billed incorrectly, and asked you to
adjust the next invoice,
(2) A customer was billed incorrectly, and
asked that a credit memo be issued for all, or part of, the original invoice,
(3) Special
billing information must be added to the customer's invoice,
(4) Timesheets must be sorted into groups for separate invoice printing, but
the sort information changes weekly so it can’t be added to the job order ahead
of time.

ADJUSTMENT DESCRIPTION:
Use this area because:
1) You are keying hours, or a flat dollar amount into the Invoice Adjustment areas,
OR
2) You need to sort timecards into groups and have them print by group on separate invoices,
OR
3) You want to pull in the data from the job order’s Accounting Note on the invoice,
OR
4) You want to add an additional line of detail to the invoice about this employee’s job (if the job order has an Inv Description, then the timecard’s Adjustment description will print as a second line)
OR
5) You want to have an employee’s timecards sort a special way on the invoice.
1) If you will key hours or a flat dollar amount into any of the Invoice Adjustment areas, then the system will require that you key up to 60 characters describing the adjustment. We recommend you enclose this description in parentheses. This information will print on the invoice.
2)
If it is impractical to use the Job
order’s Department area for sorting, or if the Department area is too small for
the sorting criteria, then you should enter one of the following special
"sorting" codes in the Adjustment
Description area.
Key =2= in the first three positions of the Adjustment Description area, then key up to 23 characters of sorting criteria (like PO#, Cost center #, Supervisor name, Department name, Location name, etc.). The full 60 character Adjustment Description area will print on the invoice, but only the first 23 characters will be used for sorting (start counting after the =2=). The =2= does not print on the invoice, just the 57 characters. We recommend you enclose the sorting detail in parenthesis. Example: =2=(P O Box 123) or =2=(Accounting Dept)
OR
=4=
Method:
This feature works like the =2=, but will use the first 23 characters (start counting after the =4=) of the Adjustment description for sorting purposes only – they will not print on the invoice. Only the final 34 characters of the description will print on the invoice. The 24th character should be left blank since it is not used for either sorting or printing, but provides a good visual break between sorting criteria, and the printing verbiage.
3) This method works the same as =2=, except you don't have to key the sorting detail. Instead, the system will pick up the first 23 characters of the job order’s Accounting note.
Key =3= in the Adjustment Description area. You won't see anything else display in this area during entry of the timesheet. Should you have to go back into the timesheet using the key number, you will see "=2=" plus your 23-character description in the area!
The characters from the Accounting Note will be used to sort the timesheets into groups, will produce a separate invoice for each group, and will print the 23 characters beneath each employee's name on the invoice.
All of these sorts (=2=, the =3=, and the =4=) will occur AFTER the job order’s Division/Class breakout has occurred, unless one of the Invoice sorts that ignores Division/Class was selected on the Payroll Constant file for this payroll (refer to Menu PBMANT, Item Payroll Constant document for more detail). If you have 2 different Div/Class combinations, and the timecards for each job are keyed with identical =2=(AAA) sorts, you will still end up with 2 different invoices.
4) Even if you have not keyed hours or a flat dollar amount into the Invoice Adjustment areas, you can still key up to 60 characters of detail in the Adjustment Description area. Whatever you key will print beneath the employee’s name on the invoice. If the job order also has detail on it’s Invoice Description line, then the timecard’s Adjustment Description will print beneath the Invoice Description. (NOTE: if there are no hours keyed into the regular, overtime and double time hours on the first screen of the timecard, then the system will NOT print the Invoice Description from the Job Order.)
5) If you key data onto the Adjustment Description area, the system will use this data for an additional sorting of employee billing. The Invoice Sort selected on the Payroll Constant file will dictate whether the timecards print on the invoice in job number order, or alphabetically by employee last name. If an employee has multiple timecards for this customer, and if you want the timecards to print in a specific order on the invoice, then you should key data into this area to force the appropriate sorting.
Regular hours
Overtime hours
Doubletime hours:
If you overbilled hours on a previous invoice, key the hours to take away, then press the negative sign key on the top right of your keypad.
If you underbilled hours on a previous invoice, key the hours as positive.
(Hours keyed without a rate
will affect all system hour accumulations.)
Rate:
If the adjustment involves
overtime or doubletime hours, then you CANNOT use the RATE area, you must manually calculate
the billing adjustment and key it as Flat $.
If the hours billed on a previous invoice were correct, but the bill rate on the job was incorrect at the time a payroll was processed, then the customer’s invoice was incorrect. Key the number of hours previously billed into the Regular HOURS area, then key the bill rate difference (correct rate minus incorrect rate) in the RATE area.
The rate will always be
entered as a positive amount; key negative hours to reduce billing;
positive hours to increase billing).
(Hours keyed with a rate
will NOT affect any system hour accumulation.)
Flat $:
If the adjustment involves overtime or double time hours, then you CANNOT use the RATE area, you must manually calculate the billing adjustment and key it as Flat $.
To BILL, enter the dollar amount as a positive.
To CREDIT, enter the dollar amount, then press the negative sign key on the top right of your keypad.
(Flat dollar amounts will
not affect any system hour accumulation.)
Issue Credit Memo To Adjust Invoice Number:
If this is a credit to an existing invoice, key the original invoice number to be adjusted. The system will create a separate “invoice” for this adjustment.
SkilMatch does NOT allow the adding of additional dollars to an existing invoice (i.e. a debit memo).
If this is not a credit memo timesheet, leave this area blank. The adjustment will add to or subtract from the invoice produced by this payroll.
ADDITIONAL “OTHER” OPTIONS:
Beneath the Adjustment Description area are additional pay/bill options that are accessed by using the mouse to drag down on the right hand scroll bar.

Invoice
These Hours, Not The "Pay" Hours:
Regular
Overtime
Doubletime
There are several scenarios where the customer needs to be billed for a different set of hours than the employee is being paid. The most common use is when the employee has worked more than one job in a week, and went into overtime or doubletime on this job. Use the “Hours to Pay and Bill” area on the initial screen for paying the employee, and use the “Invoice These…” area for billing the customer. (Like paying 10 regular and 5 overtime hours, but billing 15 regular hours).
Another situation where this area might be used is when you do not want to remind the customer about hours you have agreed not to bill (like for poor employee performance). The first screen might show 8 hours to pay and bill, but if you enter 4 hours in the ‘Invoice these’ area, then the employee will be paid for 8 hours, and the customer will be billed for 4 hours.
Hours:
Flat $:
Any hours or dollars keyed in this area will create a separate check for the employee, but will not bill the customer. Only employees who have met your company’s eligibility can be paid in this area. If you key HOURS, then the system will use the job order pay rate.
NO SPECIAL CHECK MESSAGES WILL PRINT ON HOLIDAY CHECKSTUBS!
NO ADVANCES CAN BE DEDUCTED FROM HOLIDAY PAYCHECKS!
DEDUCTIONS
WILL BE WITHHELD FROM HOLIDAY PAYCHECKS!
If you DO NOT want deduction withheld,
then process the following steps.
After you have completed the timesheet merge process the
PREPAID CHECK INFORMATION
If an employee was paid outside of the normal
payroll process, then pay was issued as either an Advance or as a Prepaid check.
An Advance
is normally a portion of an upcoming paycheck that is given to the employee and
is posted before Timecard entry using the “Advances” item on the Timesheet
Processing menu. You then key part, or
all, of the amount advanced in the “Check Adjustments” area.
A Prepaid check
is written for an exact net, taking into consideration all taxes and
deductions, is not posted before Timecard entry, but is keyed during the
timecard entry. You must have a
breakdown of the check’s net pay, and know what G/L Cash account that the check
was written from.
New warning message with 2012 Enhancement, a terminal error message will display if the calculated employer paid Social Security and Medicare exceed $999.99. There is no override option; this time sheet entry must be corrected on screen to proceed.
If you indicated that this timesheet has prepaid
check information, then following screen will display after you have keyed the
timecard information:
PREPAID CHECK box
Check:
Key the check number of the prepaid check.
Check Date:
Key the date of the prepaid check.
Net Pay:
Key the net dollar amount of the check. Do not key a decimal, but remember to use 2 zeroes to hold the decimal place if the check is for an even amount. This area will accommodate up to $99,999.00.
Cash G/L Acct:
This area will default to the payroll cash account from your payroll system requirements file. If this account number reflects the G/L account the prepaid check was written from, leave as is.
If the prepaid check was written out of a different account, key the appropriate 8-digit account number.
FEDERAL TAX box
FIT $:
Key the exact amount of the federal income tax that was withheld from the prepaid check.
FICA $:
Key the exact amount of Social Security that was withheld from the prepaid check.
Medicare $:
Key the exact amount of Medicare that was withheld from the prepaid check.
STATE TAX box
SIT Code:
The 2-character state tax code from the job order will display.
Press the <TAB> key for additional keying.
SIT $:
Key the exact amount of state income tax that was withheld from the prepaid check, if any.
SDI Code:
The 2-character SDI tax code from the job order will display, if applicable.
Press the <TAB> key for additional keying.
SDI $:
Key the exact amount of SDI that was withheld from the prepaid check, if any.
LOCAL TAX box
Local 1 – 3:
The local tax codes from the job order will display.
Press the <TAB> key for additional keying.
Local 1-3 Tax $:
Key the exact amount of local tax that was withheld from the prepaid check, if any.
Press the <TAB> key for additional keying.
DEDUCTIONS box
Deduction 1-12:
If deductions were withheld from this check, enter the deduction type(s), up to 12 different types, otherwise leave blank.
Deduction 1-12 Deduction $:
Key the exact amount of each deduction that was withheld from the prepaid check, if any.
When you have completed the entry of this screen, click [OK] or press <Enter>. An anticipated gross pay will be calculated based on the hours/dollars entered on the timesheet. The taxes and deductions entered on this screen will be deducted from the calculated gross to arrive at a calculated net.
If the figures ‘cross foot’ (the calculated net matches the net pay you entered), then the timesheet and prepaid check detail will be added to the batch and you will return to the timesheet entry screen.
If the figures do not balance, you the following message will display “Prepaid Check Does Not Crossfoot Scr1 Is $Xxx Calc Net Is $Xxx. Press Ignore”.
Note: even though this screen has an override - [Ignore],
this override is only a convenience to give you time to work through the
problem. The timesheet batch will NOT
pass the edit if the timesheet gross minus the prepaid check taxes and
deductions entered do not equal the Net Pay entered on this screen.
If the GROSS is wrong because you entered the wrong hours or flat dollar amount on the timesheet, correct the timesheet.
If the gross looks right, but the CALC NET is wrong, make certain that your data entry of the prepaid taxes, deductions and net pay is absolutely accurate.
If your calculation of the gross is different from the system's calculation of the gross because of rounding, or if your calculation of the net is wrong due to addition or subtraction errors, then you must go back to the prepaid check screen and either reduce the federal income tax or enter a deduction with a (Field Plus) or a (Field Minus) to take care of the difference. (We suggest a special deduction type code for use with prepaid adjustments only.)
The system calculates Gross pay using the following formulas:
(a) Multiply all amounts using 3 positions to the right of the decimal. If the 3rd decimal position is 0-4, drop it (10.543 = $10.54). If the 3rd decimal position is 5-9, increase the 2nd position (10.546 = $10.55).
(b) Front screen pay/bill hours use the following:
Regular rate = regular hrs X job pay rate
OT rate = (regular rate X 1.5) X OT hrs
DT rate = (regular rate X 2) X DT hrs
(c) Gross Pay Adjustment hours - (F3) screen - use the following:
Regular rate = Regular hrs X job pay rate
OT rate = (OT hrs X reg rate) X 1.5
DT rate = (DT hrs X reg rate) X 2
WHEN ALL TIMESHEETS ARE
ENTERED
When you have entered all the timesheets in a batch, click [Exit] or press <F7> to display the batch totals.
The screen will display:
Compare the totals on the screen with your own totals. One of three situations may exist:
(1) Totals Balance/More Timesheets To Enter:
Click [Clear totals and Continue F8]. The totals will be reset to 0 and you will return to the timesheet entry screen.
(2) Totals Do Not Balance:
Click [Keep totals and Continue Enter] to return to timesheet entry and display previous timesheets using the key number until you find the one in error. Make corrections, click [OK] or press <Enter> and then click [Batch totals] to display your batch totals again.
(3) Totals Balance/End Job/Return To Menu:
Click [Clear totals and Exit F7].
Once you have clicked [Clear totals and Exit F7] the screen will display:

To print only timesheets with errors, plus any new timesheets added during this session, leave the screen as it is with “Print ONLY ERROR timesheets” selected (a black dot appears beside your selection).
To print every timesheet in the batch, including timecards printed previously that are error-free, select “Print ALL timesheets” (a black dot appears beside your selection).
Click [OK] or press <Enter>.
If the
system finds a critical error, you will return to menu without the next screen
displaying. If the batch passes “edit”
(just warning errors or no errors), the screen will display:
Is Batch Finished And Ready To Merge?
If you answer YES, you will be unable to access this batch again.
If your company uses “Assigned Batches” so that you go directly into your own batch when selecting this menu option, then the button that you click on this screen will determine whether or not you can access this batch again during this payroll process. If you are finished making entries, and have carefully inspected the edit and made necessary changes, and are COMPLETELY FINISHED, click [Yes, finished].
If you are NOT finished making entries in this batch and the batch is NOT ready for merging, click [No, leave open Enter].
Even if your company does not use “Assigned Batches”, you should respond whether or not the batch is finished and ready to merge. This can be a helpful communicator to other payroll staff. (Although technically, you may re-access the batch any time until the batch is merged.)
When you are back to menu, you will receive a two-part printed report.
The first section is the timesheet edit that will display the timesheet detail. Any error found will print directly beneath the timesheet, preceded by asterisks.
The second section prints the batch totals for this batch, and (hopefully) the message:
THIS BATCH PASSED ALL EDITS ** AND CAN BE MERGED
HOW TO CORRECT ERRORS IDENTIFIED ON THE EDIT
If the batch’s timesheet edit has “terminal” errors, then these errors must be corrected before the batch can be merged for processing payroll.
Be aware that just because the system allowed you to [Ignore] an error message on the timesheet entry screen, this does not mean you can just ignore all errors. You are allowed to [Ignore] a “terminal” error as a temporary convenience - you don't have to stop what you are doing to investigate and fix the problem right then.
The system will not allow you to merge a batch that has not "passed" the edit.
The timesheet edit will identify ‘terminal’ errors with four asterisks (****). Display the edit and search for ****. The timesheet edit list will show you the Batch number for the timesheet in error, the Key number for the timesheet in error, and information about the error.
You will need the timesheet’s Key number from the left column to make a change to the timesheet.
Go back into the Batch. The screen will display:
Key of timecard to be changed
Position your cursor in the ‘Key of timecard to be
changed’ area. Using your timesheet
edit report, get the key number of the timesheet in error. Key that number.
Click [OK] or press <Enter> to continue.
The system will display the "full" version of the timesheet. Move your cursor to area(s) that needs correcting. After all areas are correct, click [OK] or press <Enter> to record the changes.
You will return to the timesheet entry screen. Repeat the procedure for any other timesheets needing corrections.
When you have made all corrections, click [Exit]. The batch totals screen will display. If you changed any numeric fields, the changes will be displayed.
Compare the totals on the screen with your own totals. One of three situations may exist:
(1) Totals Balance/More Timesheets To Correct:
Click [Clear totals and Continue F8]. The totals will be reset to 0 and you will return to the timesheet entry screen.
(2) Totals Do Not Balance:
Click [Keep totals and Continue Enter] to return to timesheet entry and display previous timesheets using the Key number until you find the one in error. Make corrections, click [OK] or press <Enter> and then click [Batch totals] to display your batch totals again.
(3) Totals Balance/End Job/Return To Menu:
Click [Clear totals and Exit F7].
Once you have clicked [Clear totals and Exit F7] the screen will display:
To print only timesheets that still have errors, leave the screen as it is with “Print ONLY ERROR timesheets” selected (a black dot appears beside your selection).
Continue repeating the
instructions outlined in HOW
TO CORRECT ERRORS IDENTIFIED ON THE EDIT until your edit has
the message THIS BATCH PASSED ALL EDITS ** AND CAN BE MERGED.