ENTER INVOICES
This option is used for entering vendor invoice data and prepaid check
information. This option produces an
Accounts Payable Journal Proof (APINV2).
Through this option you may:
(1) Enter invoices (not yet
paid) and expense them.
(2) Enter invoices (already paid), enter the
prepaid check data, and expense them.
(3) Enter invoices (paid or not yet paid) and
create the vendor file if it doesn’t already exist.
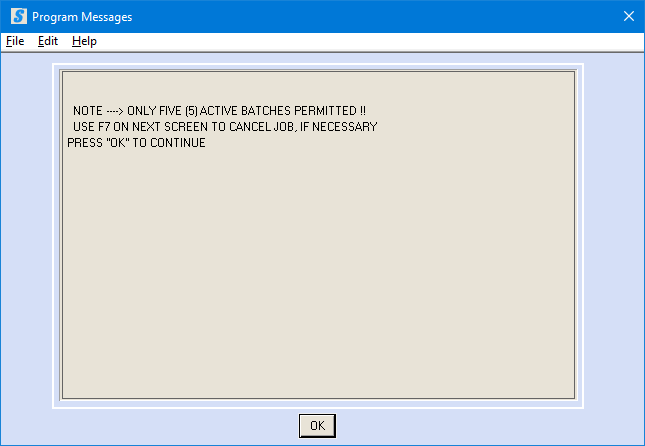
Only
five active batches are permitted at a time.
A batch is a group of vendor invoices that share some basic criteria
such as general ledger company and accounting period.
While the system will allow you to enter up to 99 invoices in a batch, SkilMatch does not recommend that you enter more than 25. The reason for this lower number is the procedure required to make a change to an invoice. You cannot simply key a "key/sequence" number and go straight to the invoice, you must "page" through all invoices (starting with the last invoice in the batch) to get to an invoice for a change. Imagine if your error is on invoice number 1!
The following is a list of the different features described in this documentation:
How To Create/Select A Batch for Accounts Payable Invoices
How To Page Through Accounts Payable Invoices/Distributions Previously Entered
HOW TO CREATE/SELECT A BATCH FOR ACCOUNTS PAYABLE
INVOICES
Before beginning, SkilMatch recommends you:
(1) Separate invoices into batches by general ledger company number and fiscal period (all entries in a batch should be for the same general ledger company number and fiscal period).
(2) Write on each invoice the vendor code and fiscal period.
To begin, select the [Transactions] menu in the Payables library:
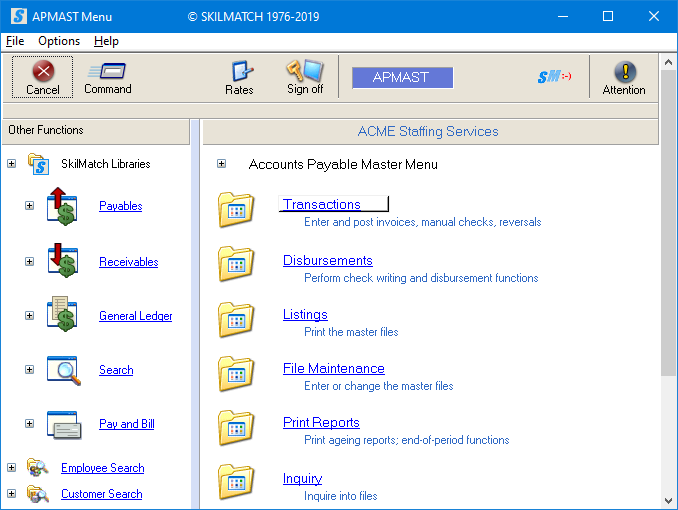
The screen will display:
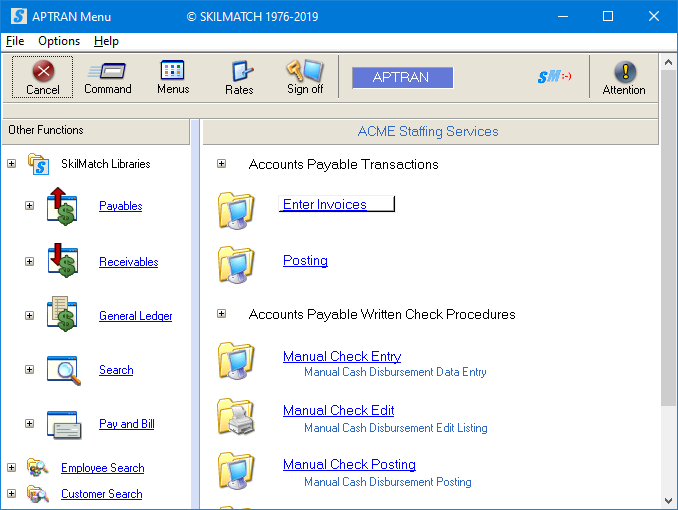
Click [Enter Invoices], the screen will display:
Click [OK] to continue, the screen will display:
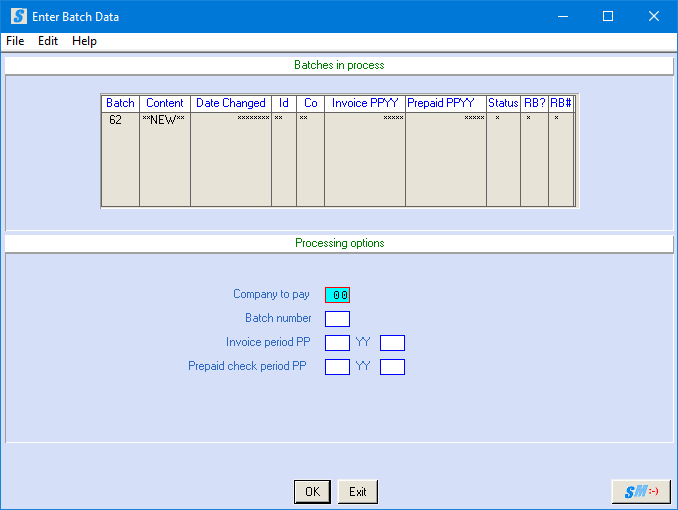
NOTE: The batch detail of your screen will NOT display the same data as above. Your screen will display the batch available on your system.
The top of the screen will show the active batch numbers, the number of invoices in each active batch, the date the batch was last changed, which workstation is using the batch, the general ledger company number, invoice fiscal period/year, the prepaid check fiscal period/year, the status of the batch, whether the batch was copied from a saved "recurring” batch, and the "recurring" batch number.
Batch Status:
(1) Status ‘U’ (in use). If the STS column shows a ‘U’, you cannot select this batch; it is in USE.
(2) Status ‘A’
(available). If the STS column shows
"blank" or ‘A’, you may select this batch; it is AVAILABLE.
(3) Status ‘P’ (passed
edit). If the STS column shows ‘P’, the
invoices in this batch have passed all editing and can be POSTED.
The bottom of the screen
establishes the batch information for the invoices you are about to enter.
Company To
Pay:
Key the number of the general ledger company to pay.
NOTE: Do not enter invoices for multiple general ledger
companies in the same, single batch.
Batch Number:
To create new batch, key the batch number indicated on the line marked as
"*NEW*".
OR
To update an existing batch, key the number of an existing batch that you
wish to add or update records.
OR
To delete an existing batch, key the number of the batch you wish to
delete.
NOTE: Only 5
active batches allowed at one time. Only
99 invoices allowed in one batch.
Invoice
Period, PP:
Key the 2-digit month of the fiscal accounting period, (i.e. 01=first
period or 01=January).
NOTE: If you key a period that has been closed
(through Menu AP File Maintenance, Item System File), you will receive a
message, “Invoice period is closed”, no posting is allowed to a closed period.
Invoice Year,
YY:
Key the 2-digit year of the fiscal accounting period, (i.e. 2023=23).
NOTE: If you key a period that has been closed
(through Menu AP File Maintenance, Item System File), you will receive a
message, “Invoice period is closed”, no posting is allowed to a closed period.
Prepaid Check
Period, PP:
Key the 2-digit accounting period for the prepaid checks, (i.e. 01=first
period or 01=January)
NOTE: If you key a period that has been closed
(through Menu AP File Maintenance, Item System File), you will receive a
message, “Invoice period is closed”, no posting is allowed to a closed period.
Prepaid Check
Year, YY:
Key the 2-digit prepaid check year, (i.e. 2023=23).
NOTE: If you key a period that has been closed
(through Menu AP File Maintenance, Item System File), you will receive a
message, “Invoice period is closed”, no posting is allowed to a closed period.
To continue, click [OK].
OR
To cancel and return to menu, click [Exit].
If you click [OK] to continue, the screen will display:

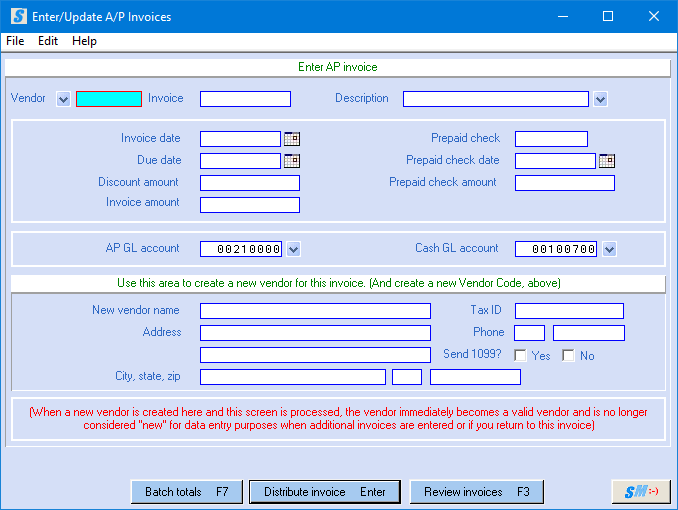
Vendor:
(REQUIRED) Key the vendor code. You may use up to 6 characters.
NOTE: If this is a NEW vendor, and you have not
already setup a vendor file in A/P file maintenance, you may enter the invoice
and the vendor information at the same time by assigning a 6-character vendor
code in this area, and keying the vendor name and address in the miscellaneous
vendor area. A vendor file will be
created using the 6-character vendor code.
Invoice:
(REQUIRED) Key the invoice number. You may use up to 9 characters.
NOTE: You may NOT use the same invoice number on
any other invoice belonging to the same vendor within the same general ledger
company. You may re-use an invoice
number from an invoice that has been reversed.
Description:
(OPTIONAL, BUT RECOMMENDED) Key
a description of the invoice. You may
use up to 20 characters.
OR
Select a description by clicking
the ![]() button (prompt and select button) to the right
of the description.
button (prompt and select button) to the right
of the description.
NOTE: This description will print on the check
stub.
Invoice Date:
(REQUIRED) The vendor invoice date may be keyed in MMDDYY format (without punctuation)
OR
You may select
date by clicking the ![]() button (prompt and select) to the right of
dates and a calendar from which you may click on a date to select, and then
click [OK] to bring the calendar date
into the date field.
button (prompt and select) to the right of
dates and a calendar from which you may click on a date to select, and then
click [OK] to bring the calendar date
into the date field.
Due Date:
(OPTIONAL, BUT RECOMMENDED) The due date may be keyed in MMDDYY format (without punctuation).
OR
You may select
date by clicking the ![]() button (prompt and select) to the right of
dates and a calendar from which you may click on a date to select, and then
click [OK] to bring the calendar date
into the date field.
button (prompt and select) to the right of
dates and a calendar from which you may click on a date to select, and then
click [OK] to bring the calendar date
into the date field.
OR
Leave field blank and current day’s date will be used.
NOTE: This date is used for running reports, and
for selecting checks by due date.
Discount
Amount:
(OPTIONAL) Key the amount of the discount, if one is to be taken.
NOTE: This is NOT contingent on being paid by a
certain date. If the invoice is entered
with a discount, then the discount will be deducted from the check amount
during processing, regardless of the date it is paid. You will have to remove the discount from the
invoice if you do not wish to take the discount when the invoice is paid.
Invoice
Amount:
(REQUIRED) Key the amount of the invoice. Do not use a decimal point. Use zeroes to
hold spaces.
Example: $25.00 is keyed as 2500.
NOTE: This will
probably be all you will need to enter on this screen.
If one of these three conditions apply, continue with entry on this screen,
following the instructions below:
(1) This check was prepaid.
(2) The default account numbers are not correct
for this invoice.
(3) There is no vendor account set up for the
vendor code used above, and you need to enter the vendor name & address.
If none of the three conditions apply, you may click [Distribute
invoice] to continue.
Refer to instructions for distribution screen
below.
If this entry
is a PREPAID CHECK, follow these instructions:
If you have already written a manual check paying this invoice, key the
check number.
Prepaid Check
Date:
If you have already written a manual check paying this invoice, key the
prepaid check date.
OR
You may select
date by clicking the ![]() button (prompt and select) to the right of
dates and a calendar from which you may click on a date to select, and then
click [OK] to bring the calendar date
into the date field.
button (prompt and select) to the right of
dates and a calendar from which you may click on a date to select, and then
click [OK] to bring the calendar date
into the date field.
Prepaid Check
Amount:
If you have already written a manual check paying this invoice, key the
amount of the prepaid check.
AP GL Account:
The default A/P liability general ledger account number will
automatically appear in this field. If
you wish to use a different account number for this invoice, key the account
number that applies to this entry.
OR
Select A/P G/L account by clicking
the ![]() button (prompt and select button) to the right
of the account field.
button (prompt and select button) to the right
of the account field.
Cash GL
Account:
The default cash general ledger account number will automatically appear
in this field. If you wish to use a
different cash account for this invoice, key the account number that applies to
this entry.
OR
Select Cash G/L account by
clicking the ![]() button (prompt and select button) to the right
of the account field.
button (prompt and select button) to the right
of the account field.
If this entry
is a NEW VENDOR, follow these instructions:
If you
are entering an invoice and/or prepaid check information on a vendor who does
not have a vendor file in the system, and you assigned a NEW vendor code, then
complete the following vendor information.
A vendor account is being created during the entry of this invoice.
New Vendor
Name:
If this is a NEW vendor code, key the vendor name.
Address:
If this is a NEW vendor, key the vendor mailing address.
City:
If this is a NEW vendor, key the vendor city.
State:
If this is a NEW vendor, key the vendor state.
Zip:
If this is a NEW vendor, key the vendor zip code.
Tax ID:
If this is a NEW vendor, key the vendor Federal Tax ID/Social Security Number.
Phone:
If this is a NEW vendor, key the vendor phone number.
Send 1099:
If you want this vendor to receive a 1099 at the end of the year, click Yes on this option to select (a checkmark will appear next to the
selection).
OR
If this vendor does not require a 1099, click No on this option to select
(a checkmark will appear next to the selection).
To complete this invoice entry and continue with distribution of expense
of this invoice, click [Distribute
invoice] or press < Enter>.
OR
CAUTION selecting Batch totals, data entered will NOT be saved: To review batch totals, click [Batch totals] or press <
F7>. NOTE: Any data entered on this screen will NOT be
saved.
OR
CAUTION selecting Review invoices, data entered will NOT be saved: To review invoices, click [Review invoices] or press <
F3>. NOTE: Any data entered on this screen will NOT be
saved.
OR
To cancel without saving changes and return to main menu, click [Batch totals]. NOTE: Any data entered on this screen will NOT be
saved. On the batch totals screen, click
[Close
Batch].
If you select [Distribute
invoice] (or press <Enter>) to continue, the screen will display:
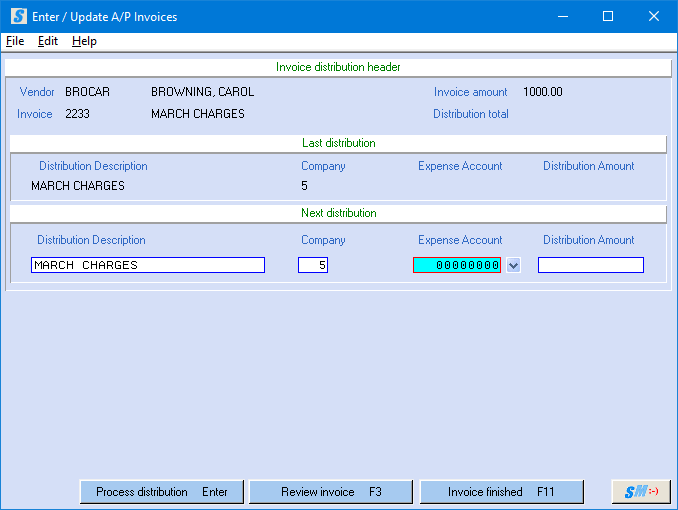
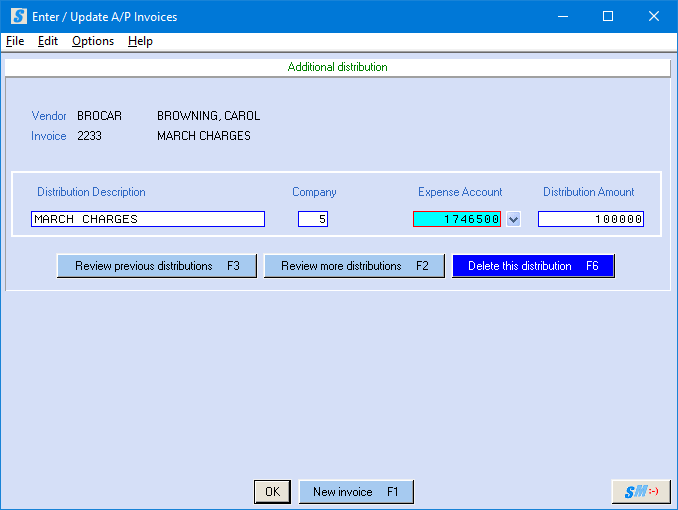
This screen provides the opportunity to distribute the expense of the
invoice to the appropriate account(s).
It can be distributed to one expense account or multiple expense
account(s).
Distribution
Description:
Defaults to the description entered on the previous screen for this
invoice.
OR
To use a different description, you may change the data in this area.
Example: the description on the
invoice is "Office supplies", but this detail line should say "Computer
paper".
Company:
Defaults to the general ledger company entered previously.
NOTE: You should NOT change this data. Do not enter invoices for multiple general
ledger companies in the same, single batch.
Expense
Account:
Key the 8-digit general ledger expense account number that is to receive a portion OR the entire invoice amount.
OR
Select a G/L expense account by
clicking the ![]() button (prompt and select) to the right of the
account field.
button (prompt and select) to the right of the
account field.
Distribution
Amount:
Key the amount you wish to distribute to this general ledger account
number.
To accept and include this distribution, click [Process distribution] or press < Enter>.
OR
To return to the first (previous) screen and review invoice, click [Review invoice] or press <F3>. Any data entered on this screen will NOT be
saved.
OR
When distribution is complete and ready to proceed, click [Invoice finished] or press <
F11>. An NEW invoice screen will display.
OR
To delete this invoice, click [Review Invoice]. You
will be returned to the front screen of this invoice. From here, click [Delete
invoice] (or press Shift+F8). A
blank invoice record will display. You
may enter another invoice OR you may exit from this option by clicking [Batch Totals] (or press
<F7>), select [Close batch] (or press
<F7>).
“Account Number is not
valid” Error messages:
If you
entered a general ledger account number that does not exist, the screen will
display a message, "Account Number is not valid". You cannot continue until you do one of these
three options:
Option 1) Change the GL account number if it
was entered inaccurately. Once the
account number is accurately entered,
click [Process
distribution] (or press <Enter>). The
distribution will be added if the newly keyed GL account number is valid.
Option 2) If the GL account number should be
valid. Go to another workstation session
and enter/add the invalid general ledger account number
(refer to Menu GL Maintenance, Item Accounts for assistance). Once the account
number is in the system, click [Process
distribution]
(or
press <Enter>). The
distribution will be added if the keyed GL account number is valid in the GL
accounts.
Option 3) If you would like to delete this
invoice so that you can research at a later time to determine the correct GL
account number,
click [Review Invoice] to return to the front
screen of the invoice and then click [Delete Invoice] to delete the invoice.
If you chose to [Process Distribution] and continue, the screen will display:
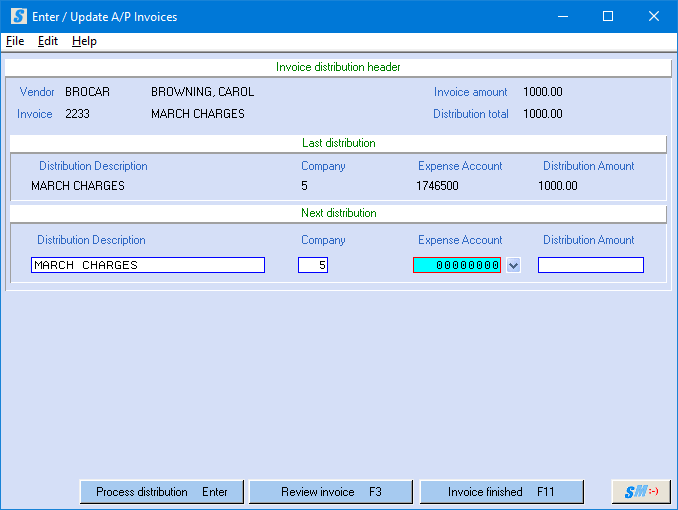
The amount expensed appears in the Distribution Total area at
the top right of the screen and a “Last distribution” line is displayed.
If the Distribution total does NOT match the Invoice amount, repeat the
preceding steps until the full amount of the invoice has been expensed and the
totals match. If necessary, refer to Out Of Balance instructions for further assistance.
When the full amount of the invoice has been expensed accurately and the Distribution Total matches the Invoice Amount, click [Invoice Finished] to save and complete this invoice.
You may then begin entry of another invoice.
NOTE: You cannot leave the invoice if the
Distribution Total (amount expensed) does not match the Invoice Amount.
NOTE: You
are limited to 99 lines of detail per invoice, SkilMatch recommends you STOP at
95 to prevent programming assistance to correct.
“Invoice distributions do not equal invoice amount.” - Out of Balance, Corrective Options:
Option 1) If you are out of balance because
you did not finish expensing the invoice amount, click [Add
distribution] (or press <F9>) and add
additional entry(s) for the balance of the invoice distribution and click [Invoice finished] (or press <F11>) again.
Option 2) If you are out of balance because
the invoice amount is incorrect, click [Review
invoice] (or press
<F3>) to return to the first
screen
of the invoice. Correct the invoice amount and click [OK]
to accept the corrected invoice amount and then click [Review distributions]
(or press
<F7>) to return to the
second screen of the invoice where you may click [Invoice
finished] (or press <F11>).
Option 3) If you are out of balance due to an
error in one of the distributions, click [Review
invoice] (or press
<F3>) to return to the first
screen
of the invoice.
The
screen will display:
Next, click [Review
distributions] (or press
<F2>) to begin moving
through the distributions for this invoice.
If there are NO distributions associated with this invoice, you will
remain on the first screen with message, “Invoice distributions do not equal
invoice amount.” Click [OK]
and then click [Add distribution] (or press <F9>) to add a distribution to this invoice.
A blank distribution screen will display.
If there are distributions associated with this invoice, the first
distribution record will display in the Expense Account and Distribution Amount fields.
Continue
to click [Review more distributions] (or press <F2>) and
each distribution entry will display, one-by-one. Make any corrections needed and click [OK]. When all
distributions have been displayed, the system will return to the front Enter AP Invoice
screen.
On Enter AP Invoice screen
you may select [Review
Distribution] (or press
<F2>)
as many times as needed, then select [Review previous distributions] (or press <F3>) and [Review more distributions] (or press <F2>) to move forward and back
through the entered distributions for this invoice.
If the
Distribution Total (amount expensed) now matches the Invoice Amount, you may
click [Invoice Finished] (or press <F11>) to save and complete this
invoice entry.
When each invoice entry is complete, you will receive a new
Enter/Update A/P Invoice screen to add additional AP invoices.
You may now continue with entry of the next AP invoice and its
distributions in this batch.
When you have entered all AP invoice for this batch, click [Batch totals] (or press <F7>).
When you select [Batch Totals] (or
press <F7>) to review totals exit from invoice entry, the
screen will display:
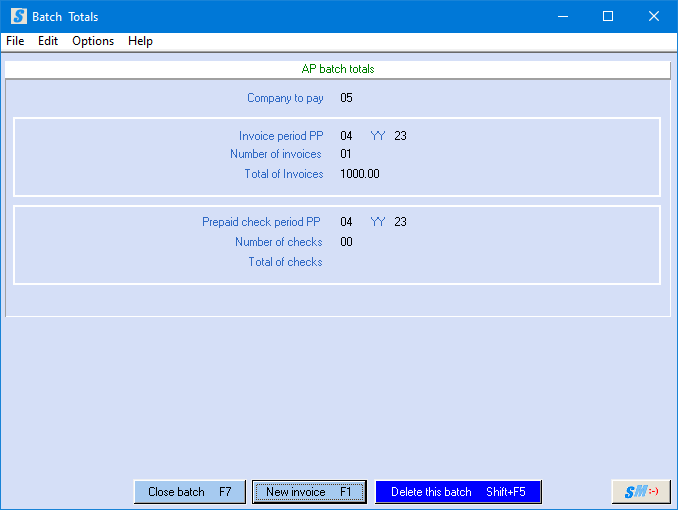
Verify the number of invoices
that should be in this batch, the total amount of those invoices, the number of
prepaid checks, and the total of prepaid checks.
If your totals are NOT correct and you want to review entries and
correct your errors, click [New invoice] (or press <F1>), you will be returned to the invoice entry
screen and can click [Review invoices] (or press <F3>) and again select [Review other invoices] (or press <F3>).
This will page forward through your invoices for review. You can select [Review distributions] (or press <F2>) as needed to also review the distributions
to each of the invoices.
OR
If your batch has problems and you would like to review the edit before
attempting to make corrections, click [Close
batch] (or press <F7>). You
will be returned to the “Accounts Payable Transaction Processing” menu and
reports will be in your outque, return to this batch to make any corrective
entries.
OR
If your batch has problems and you would prefer to delete the entire
batch, rather than attempt corrections, click [Delete
this batch] (or press <Shift +F5>).
OR
If your totals are correct and you want to exit from this option, click [Close batch] (or press <F7>). You will be returned to the
“Accounts Payable Transaction Processing” menu.
Accounts Payable Journal Proof (APINV2) - the system will
automatically generate an Accounts Payable Journal Proof that will show the
vendor code, the invoice number, the vendor name, the description, invoice
date, due date, company number, general ledger account number, debit amount and
credit amount, invoice amount, discount amount, and net due on invoice. Also displayed are the intra-company
transfers, batch totals and the difference between total debits and total
credits.
Carefully review this journal proof for errors.
Verify that prepaid checks numbers, dates and amounts are correct.
Inspect all account numbers, vendors, invoice numbers, and descriptions, etc. for accuracy before continuing with posting.
HOW TO PAGE THROUGH ACCOUNTS PAYABLE
INVOICES/DISTRIBUTIONS PREVIOUSLY ENTERED
If you selected an existing batch and wish to “page” through
invoices/distributions already in this batch, the first screen will display:
When you select [Review invoices] (or
press <F3>) to review invoice(s) in the batch, the screen
will display the last invoice entered:

To view a different invoice in this batch, click [Review other invoices] (or press <F3>).
Repeat until the desired invoice displays.
To display the distribution(s) associated with the displayed invoice,
click [Review distributions] (or press <F2>).
The first distribution associated with that invoice will display:

To view a different distribution associated with this invoice, click [Review more distributions] (or press <F2>) again.
Repeat until the desired distribution displays. If the last distribution associated with the
invoice is displayed and you click [Review more
distributions], the next
invoice in the batch will display, or, if this is the last invoice in the
batch, a blank record will display.
When you are finished paging through accounts payable
invoices/distributions previously entered, and you are at a blank record, click
[Batch totals] (or press <F7>). The
batch totals screen will display.
If your totals are NOT correct and you want to review entries and
correct your errors, click [New invoice] (or press <F1>), you will be returned to the invoice entry
screen and can click [Review invoices] (or press <F3>) and again select [Review other invoices] (or press <F3>).
This will page forward through your invoices for review. You can select [Review distributions] (or press <F2>) as needed to also review the distributions
to each of the invoices.
OR
If your batch has problems and you would prefer to delete the entire
batch, rather than attempt corrections, click [Delete
this batch] (or press <Shift +F5>).
OR
If your totals are correct and you want to exit from this option, click [Close batch] (or press <F7>). You will be returned to the
“Accounts Payable Transaction Processing” menu.