CHECK
PROCESSING
This option locates vendor invoices flagged for payment, calculates the amounts to be paid, writes the checks, posts the checks to the A/P bank reconciliation file, relieves (debits) the A/P account in the general ledger, and credits the cash account.
NOTE: If a check needs to be written for
$100,000.00 or over, no alpha check amount will be printed on the check (too
many characters). You must either type the written amount or use a check
protector to complete the written amount.
NOTE: If there are too many lines of detail to print on an A/P check stub, the check is printed with VOID and the final “page” has the real check printed. Only the real check number is added to the A/P bank reconciliation file. One detail line prints per A/P invoice being paid. Detail is the 20-character description keyed on the first screen when an A/P invoice is entered, not from the distribution screen.
“Create-A-Check” (CAC) is a software interfaced with SkilMatch to allow printing of vendor checks (as well as invoices, payroll checks, W2s, and more) using specific types of laser printers. You must purchase the CAC interface and SkilMatch staff must set it up for you before it will be active. A special toner cartridge is required, as well as specific check stock
SkilMatch customers are divided into 2 groups: those who lease space on the SkilMatch/E (SM/E) server, and those who own a server. Make certain that you know which group you belong to before continuing. There is a separate set of steps for SM/E users.
Printing Checks To A Dot Matrix Or Laser Printer
HOW TO
PRODUCE A/P CHECKS
To begin, select the [Disbursements] menu in the Accounts Payable library.
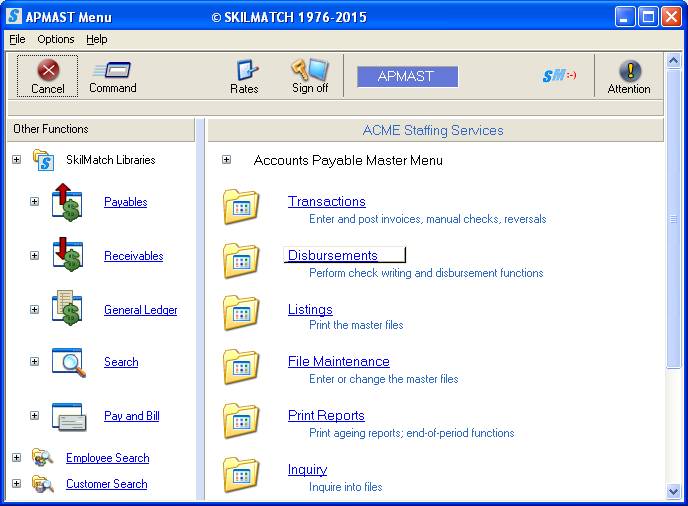
The screen will display:
Use the blue bar on the right side
to drag down to more options, or right-click in the white space on the right
side to display more options.
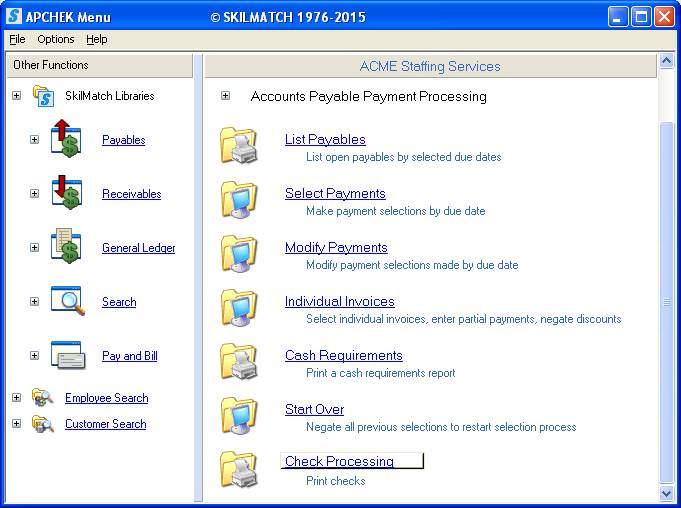
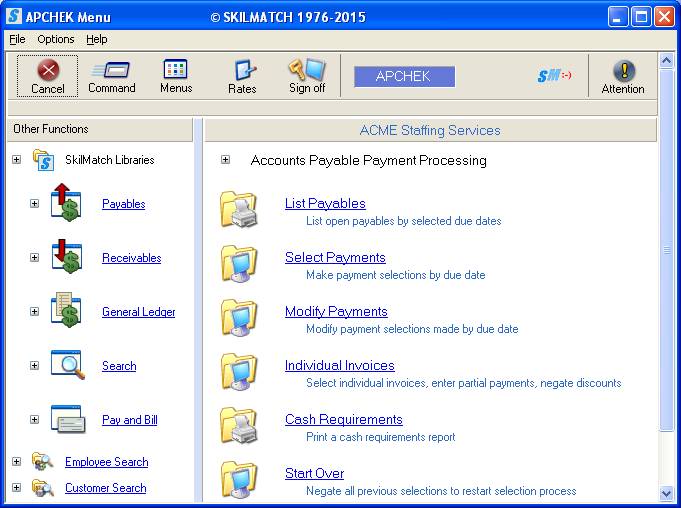
Click [Check Processing], the screen will display:
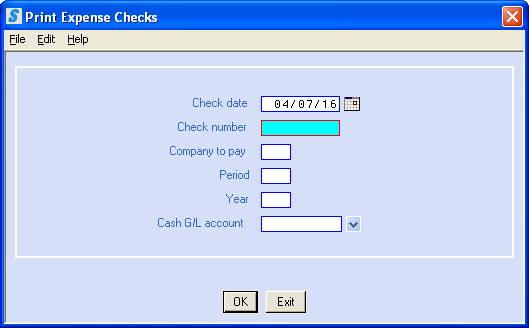
Check Date:
Key a six-digit (MMDDYY) you want to appear on the checks.
OR
Select date by
clicking the ![]() button (prompt and select) to the right of
dates and a calendar will display from which you may click on a date to select,
and then click [OK] to bring the calendar date
into the date field.
button (prompt and select) to the right of
dates and a calendar will display from which you may click on a date to select,
and then click [OK] to bring the calendar date
into the date field.
Check Number:
Key the beginning check number.
NOTE: Depending on your printing setup (Laser
Pre-printed forms or CAC), you may have an “alignment” check/page. The beginning check number may NOT be the number of the
first check in the box based on if you use the first check or a blank paper
when printing. NOTE: It is recommended that users with
pre-printed forms start with a “blank” paper on top to save check stock.
Company To
Pay:
Key the desired company number.
Period:
Key the 2-digit business (fiscal) period to which you are
posting this cash disbursement.
Year:
Key the 2-digit business (fiscal) year to which you are
posting this cash disbursement.
Cash G/L Acct:
Key the Cash account on which these checks will be drawn.
To continue, click [OK].
OR
To cancel without saving changes and return to menu, click [Exit].
If you select [OK] to continue…
If the
following issue is detected (there are 2 Possible System Messages):
1) If the fiscal period and
year does not match one of the GL valid posting periods, the following message
will display “Check Period Not Active”:
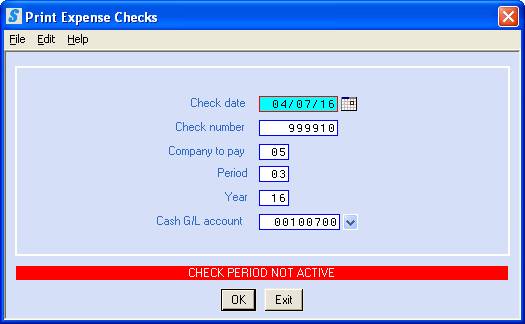
You must either change the screen to match one of the valid period/year
combinations, or you go must to the General Ledger library, and use the Maintenance
menu, item GL Posting periods to add this period and year as a valid
combination. Afterwards, click [OK] to try again.
2) If you keyed an account
that is different from the Cash Account currently set as the default in the A/P
System file, the system will display the following error message “Cash account is
not the AP default cash account”:
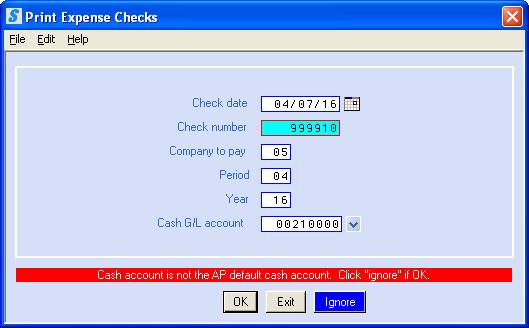
If you want to continue with check printing using the Cash account
displayed, click [Ignore].
OR
If you made a mistake when keying the Cash account, re-key the account
number. Click [OK] to continue.
Continue
with processing:
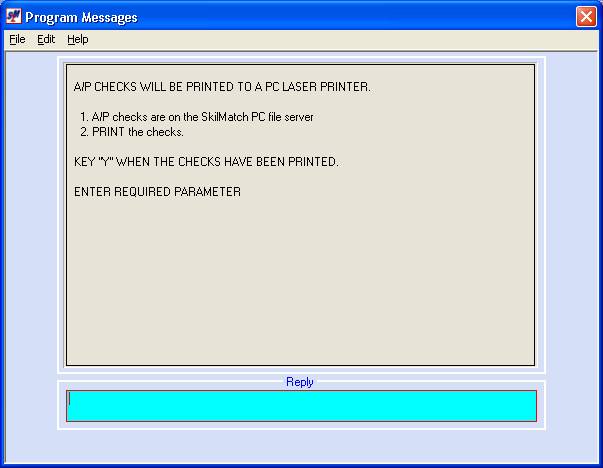
If you are NOT using Create-A-Check to print A/P checks, you will return to menu.
For assistance with printing
checks on a PC laser printer using pre-printed forms, refer to document How To
Print.
NOTE: Check spool
files can NOT be printed using the
“Client Print” option, see the “How to Print” instructions.
OR
If you are using CAC to print A/P checks, one
of the following screens will display:
For further instructions on printing checks on a PC laser printer using Create-A-Check forms, refer to document CACAP.
Platinum system Create-A-Check users; if you have not yet processed your APCKXX (XX=company #) from
a previous check run and it is still on your PC file server, the system will
display the following message:
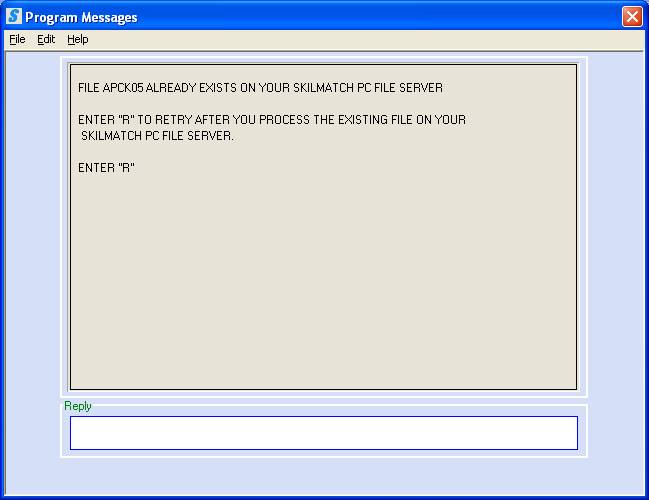
Complete the processing of the APCKXX (XX=company #) on your PC file server. When complete, return to this screen to key R and press <Enter> to retry the download of this APCKXX file. For
further instructions on printing checks on a PC laser printer using
Create-A-Check forms, refer to document CACAP.
Reports:
You will receive a Cash
Disbursements Journal (EXPCK3) in addition to the checks (EXPCK2). This report contains check number, the
vendor code, the invoice number, the vendor name, the invoice description, the
invoice date, the due date, the account number, the debit number, the credit
number, and the grand totals of each. This report should
be printed and kept in the A/P Cash Disbursements binder. This will be your only copy of detailed
posting data.
For assistance with printing
checks on a PC laser printer using pre-printed forms, refer to document How To Print.